法向
着色
参考
- 模式
物体模式
- 菜单
参考
- 模式
编辑模式
- 菜单
- 菜单
平直
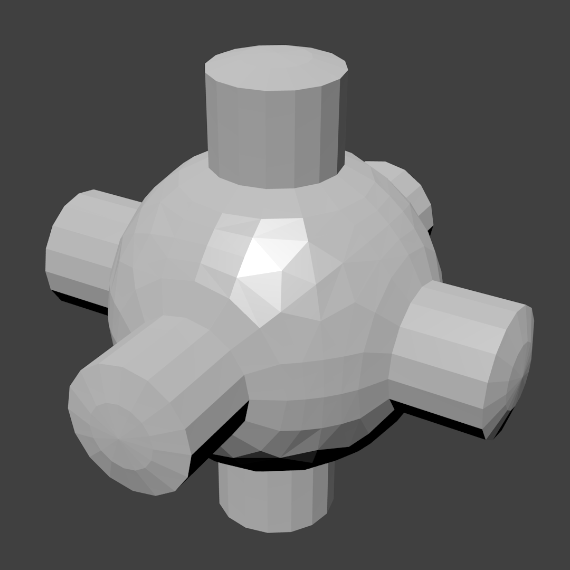
如前面的章节所见,多边形对于Blender很重要。大多数物体是使用多边形表示的,并且真正的曲面物体也是多边形网格的近似效果。在渲染图像时,你可能注意到这些多边形看上去就是一系列平直的小平面。有时候要的就是这样的效果,但是通常我们还是希望物体看上去漂亮而光滑的。
光滑
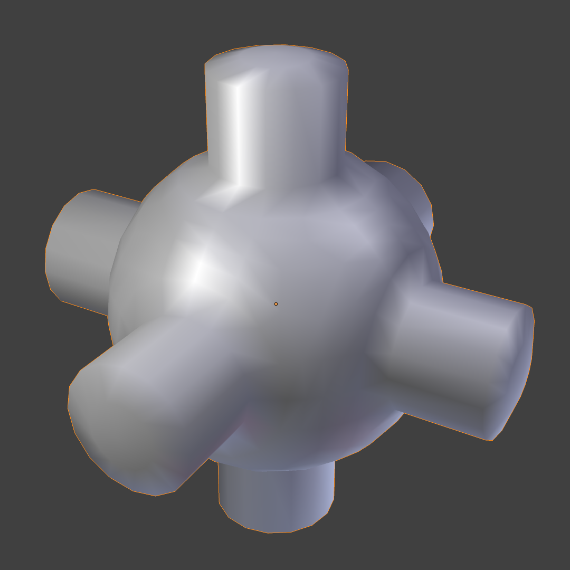
设定整个物体为光滑或平直的最简单的办法是在 物体模式 下,选择*物体*菜单里的*光滑着色*。该操作强制对网格中的每个面指定 光滑 属性,继续添加或删除几何体也一样。
可以注意到物体的轮廓仍然是棱角分明的。激活光滑属性实际上并没有修改物体的几何形状,只是改变了表面着色的计算方式(对法向进行插值),造成光滑表面的错觉而已。
选择*物体*菜单里的*平直着色*,恢复为上面第一张图中的着色状态(法向为常数)。
工具
反转方向
参考
- 模式
编辑模式
- 菜单
This will reverse the normals direction of all selected faces. Note that this allows you to precisely control the direction (not the orientation, which is always perpendicular to the face) of your normals, as only the selected faces are flipped.
重算法线方向
参考
- 模式
编辑模式
- 菜单
和
- 快捷键
Ctrl-N 和 Shift-Ctrl-N
这些工具会重新计算选择面法向让他们指向面的体积侧(区分于内)。体积不需要封闭;内外的区分取决于面的连接角度。
旋转
参考
- 模式
编辑模式
- 菜单
- 快捷键
R N
This is an interactive tool. As you move the mouse around, the selected normals are rotated. You can also invoke the Rotate Normals tool by pressing the Rotate transform key R, followed by N.
指向目标体
参考
- 模式
编辑模式
- 菜单
- 快捷键
Alt-L
设置所有选择的法向到目标并 Return or LMB 确认。
按键以设置目标:
鼠标游标 M
枢轴 L
原始物体 O
游标(单击设置) Ctrl-LMB
网格选择(单击设置) Ctrl-RMB。
- 模式
工具的操作可以修改,如果以下按键已经按下:
- 对齐 A
All normals will point in the same direction: from the center of selected points to the target.
- 球形化 S
Each normal will be an interpolation between its original value and the direction to the target.
- 反转 I
The normal directions are reversed from what was specified above.
- 重置 R
重置自定义法向回操作开始前的状态。

