简介
顶点组可能有很多关联的顶点,因此有大量的权重(每个顶点指定一个权重)。权重绘制 是一种以非常直观的方式保持大量权重信息的方法。
它主要用于绑定的网格,其中顶点组用于定义骨骼在网格上的影响区域。但是我们也使用它来控制粒子的发射,头发密度,许多修改器,形状关键帧等等。
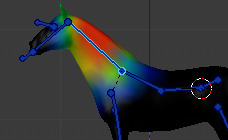
在权重绘制模式下的顶点组。
可以通过按 Ctrl-Tab 键从模式菜单进入 权重绘制模式 。所选的网格物体显示为带有彩虹色谱。该颜色可视化显示活动顶点组中每个顶点关联的权重。默认情况下,蓝色 表示无权重, 红色 表示满权重。
可以通过权重笔刷绘制为物体的顶点指定权重。开始在网格上绘制会自动向活动的顶点组添加权重(如果需要,将创建一个新的顶点组)。
权重颜色代码
权重通过使用冷/热颜色系统的渐变显示,使得低值(权重接近0.0)的区域以蓝色(冷)显示,高值(权重接近1.0)的区域以红色(热)显示。所有中间值都以彩虹色谱(蓝色,绿色,黄色,橙色,红色)显示。
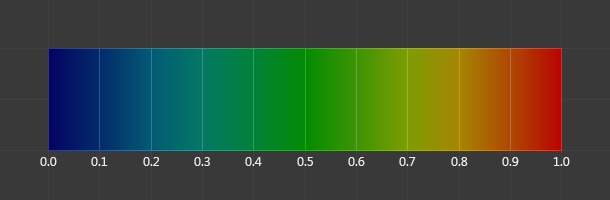
色谱及其各自的权重。
除了上面描述的颜色代码外,Blender对于未引用的顶点还有一个特殊的视觉标记(作为选项):它们被绘制(显示)成黑色。因此,您可以同时看到引用区域(冷/热颜色)和未引用区域(黑色)。当你查找权重错误时,这是最实用的。请参见 选项.
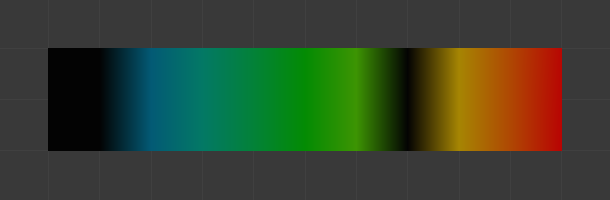
未引用的顶点示例。
Note
你可以自定义权重的渐变颜色,可以在 用户首选项 的 系统 选项卡中启用 自定义权重绘制色域 。
Normalized Weight Workflow
In order to be used for things like deformation, weights usually have to be normalized, so that all deforming weights assigned to a single vertex add up to 1. The Armature modifier in Blender does this automatically, so it is technically not necessary to ensure that weights are normalized at the painting stage.
However, while more complicated, working with normalized weights has certain advantages, because it allows use of certain tools designed for them, and because when weights are normalized, understanding the final influence of the current group does not require knowing weights in other groups on the same vertex.
These tools are provided to aid working with normalized weights:
- Normalize All
In order to start working with normalized weights it is first necessary to normalize the existing weights. The Normalize All tool can be used for that. Make sure to select the right mode and disable Lock Active.
- Auto Normalize
Once the weights are initially normalized, the Auto Normalize option can be enabled to automatically maintain normalization as you paint. This also tells certain tools that the weights are supposed to be already normalized.
- Vertex group locking
Any vertex group can be locked to prevent changes to it. This can be done via the lock icon in the vertex group list, or using bone selection and the locks pie menu.
This setting prevents accidental edits to groups. However, since it is also respected by Auto Normalize, in the normalized weight workflow it has a more significant meaning of locking the current influence of chosen bones, so that when you paint other bones, the weight is redistributed only between the unlocked groups.
In locations affected by more than two bones this allows more precise tweaking and re-balancing of weights by temporarily focusing on a subset of bones. This can also be aided by the Lock Relative option, which displays weights as if re-normalized with the locked groups deleted, thus making it appear as if the locked groups didn't even exist.
- Multi-Paint
Finally, the Multi-Paint option allows treating multiple selected bones as if they were one bone, so that the painting operations change the combined weight, preserving the ratio within the group. Combined with locking, this allows balancing between one set of bones versus the rest, excluding a third set that has its influence not affected in any way due to locks.
Technically, this option does not require the normalized workflow, but since non-normalized weights can add to more than 1, the weight display behaves best with Auto Normalize enabled.
Tip
For example, when dealing with a bone loop, e.g. mouth or an eye, selecting the loop with Multi-Paint exposes the falloff between the loop as a whole and surrounding bones, while locking the surrounding bones and using Lock Relative displays the falloff between bones within the loop. Thus the complex two-dimensional falloff of each bone can be viewed and edited as two independent one-dimensional gradients.