插件教程
目标读者
本篇教程旨在帮助技术型艺术家或者开发者学习如何扩展Blender。对于通读全文的读者,需要通晓Python的基础知识。
前提
阅读本教程前,用户需要:
熟悉Blender中的基础功能。
知道如何在Blender的文本编辑器中运行脚本。
了解 Python 基元类型(整数、布尔值、字符串、列表、元组、字典和集合)。
熟悉Python模块的概念。
对Python中的类(面向对象)有基础认知。
学习本教程前建议阅读。
"潜入蟒蛇 <https://finderiko.com/python-book>`__部分(1、2、3、4 和 7)。
Blender API 快速入门 ,帮助熟悉Blender/Python基础知识。
为了最好地解决Python在编写脚本时打印的任何错误消息,请从终端运行Blender。请参阅 "使用终端 <https://docs.blender.org/api/current/info_tips_and_tricks.html#use-the-terminal>`__。
Tip
您可以在首选项中启用 开发人员附加功能 ,以启用使开发加载项更容易的功能。
文档链接
在阅读教程时,用户可能需要查找参考文档。
Blender API概述 。这份文件相当详细,但如果你想了解更多关于某个主题的信息,还是很有帮助的。
bpy.contextAPI参考. - 可以方便地获得脚本可以调用的选项。bpy.types.Operator. - 下文的插件会定义操作,这些文档提供了更多操作的范例和细节。
何为插件?
插件是附加一些额外要求的Python模块,这样Blender可以列表形式显示有用信息。
下面的例子是一个最简单的插件:
bl_info = {
    "name": "My Test Add-on",
    "blender": (2, 80, 0),
    "category": "Object",
}
def register():
    print("Hello World")
def unregister():
    print("Goodbye World")
bl_info一个字典,包含插件元数据如标题、版本和作者,这些信息会显示在用户设置的插件列表。它还指定了运行该脚本的最低版本要求;更老的版本无法在插件列表中显示该插件。
register仅在启用插件时运行的函数,这意味着无需激活插件即可加载模块。
unregister用于卸载
register建立的数据的函数,在禁用插件时调用。
注意:该插件不会进行任何Blender相关操作(比如不会载入 blender_api:bpy 模块)。
这是一个刻意设计的插件示例,用于说明插件的基础要求其实很简单。
插件通常会注册操作、面板、菜单选项等,不过这没有多大价值,从文本编辑器,甚至交互控制台执行的脚本也可以做到 -- 插件与Blender的结合方式并没有本质上的不同, 这些功能都是 blender_api:bpy 模块提供的,任何脚本都可以访问。
所以,插件仅仅是一种封装Python模块的方法,以方便用户使用。
Note
在文本编辑器运行这个脚本不会有任何输出,必须通过用户设置安装该脚本才能看到输出。启用和禁用时均会打印提示信息。
第一个插件
上文中的最简插件除举例外别无它用。下面的插件也很简单,不过演示了如何使用一个 Operator 将脚本集成到Blender,Operator 是用于定义可从菜单、按钮和快捷键访问的工具的特有方法。
首先,写一个移动场景内所有物体的脚本。
写脚本
在文本编辑器添加下面的脚本:
import bpy

scene = bpy.context.scene
for obj in scene.objects:
    obj.location.x += 1.0
按下 运行脚本按钮, 活动场景内的所有物体均会移动1个Blender单位。
写插件 (简易)
这个插件使用了上面的脚本,并将其添加到一个operator的 execute() 函数中。:
bl_info = {
    "name": "Move X Axis",
    "blender": (2, 80, 0),
    "category": "Object",
}

import bpy


class ObjectMoveX(bpy.types.Operator):
    """My Object Moving Script"""      # Use this as a tooltip for menu items and buttons.
    bl_idname = "object.move_x"        # Unique identifier for buttons and menu items to reference.
    bl_label = "Move X by One"         # Display name in the interface.
    bl_options = {'REGISTER', 'UNDO'}  # Enable undo for the operator.

    def execute(self, context):        # execute() is called when running the operator.

        # The original script
        scene = context.scene
        for obj in scene.objects:
            obj.location.x += 1.0

        return {'FINISHED'}            # Lets Blender know the operator finished successfully.

def menu_func(self, context):
    self.layout.operator(ObjectMoveX.bl_idname)

def register():
    bpy.utils.register_class(ObjectMoveX)
    bpy.types.VIEW3D_MT_object.append(menu_func)  # Adds the new operator to an existing menu.

def unregister():
    bpy.utils.unregister_class(ObjectMoveX)


# This allows you to run the script directly from Blender's Text editor
# to test the add-on without having to install it.
if __name__ == "__main__":
    register()
Note
bl_info 被分割成多行,这仅仅是一种编程风格,可以方便添加元素。
Note
这里传递给 execute() 的参数是 context.scene ,而非 bpy.context.scene 。大多数情况下,两者是一致的。然而在一些情况下,传递给operators的是自定义context,所以脚本作者更愿意传递 context 参数至operator。
要测试这段脚本,你可以将其复制粘贴到Blender文本编辑器,并运行。这将直接执行脚本,并立即调用register函数。
不过,运行该脚本不能直接移动物体。你需要执行新注册的operator。
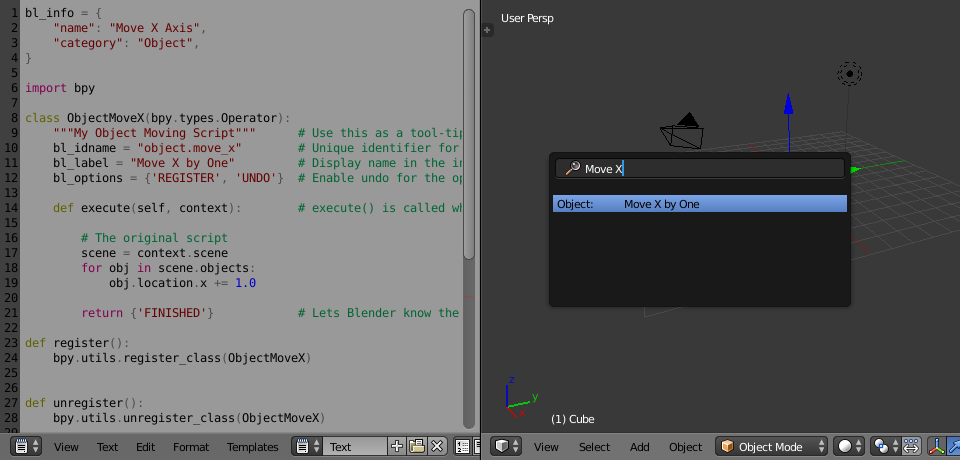
运算符搜索菜单。
打开 运算符搜索 菜单并键入 "X 移动 1"( bl_label ),然后键入 Return 。
物体将与前文一样移动。
不要关闭文本编辑器,下一步安装需要用到
安装插件
在Blender文本编辑器写好插件后,你可能想要安装该插件,这样就可以在用户设置中启用启动时加载插件。
尽管上面的插件只是一个测试,但还是把这些步骤都走一遍,这样以后就知道该怎么做了。
要安装Blender文本编辑器里写的插件,首先需要存盘,注意遵守Python模块的命名限制, 并以 .py 作为扩展名。
存盘之后,就可以跟从网上下载的插件一样安装了。
打开 ,并选择该文件。
现在将列出该加载项,您可以通过按复选框来启用它,如果您希望在重新启动时启用它,请按 另存为默认值 。该运算符的运行方式与 上一节 中所述的方式相同 。
When the add-on is enabled, Blender executes the code and runs the register() function.
When the add-on is disabled, Blender runs the unregister() function.
Note
插件的安装位置取决于你的Blender配置。安装插件时,控制台会提示插件的原始和目标路径。在Python控制台运行下面的脚本,也可以查找插件目标路径:
import addon_utils
print(addon_utils.paths())
更多这方面内容见: 目录布局 。
第二个插件
第二个插件是关于物体实例化 -- 亦即 -- 以与阵列修改器类似的方法生成物体的关联副本。
写脚本
和前面一样,我们从一段脚本开始,然后将其转化为插件:
import bpy
from bpy import context

# Get the current scene
scene = context.scene

# Get the 3D cursor location
cursor = scene.cursor.location

# Get the active object (assume we have one)
obj = context.active_object

# Now make a copy of the object
obj_new = obj.copy()

# The new object has to be added to a collection in the scene
scene.collection.objects.link(obj_new)

# Now we can place the object
obj_new.location = cursor
现在,把这段脚本复制到Blende文本编辑器,选择立方体并运行脚本。运行脚本前记得单击将3D游标移动一旁,副本物体将出现在游标位置。
运行过后,进入 编辑模式 修改立方体后 -- 所有的副本会同时变化,这在Blender里称作 关联副本。
下一步,把这段脚本加到循环里,在活动物体与游标之间生成物体阵列。:
import bpy
from bpy import context

scene = context.scene
cursor = scene.cursor.location
obj = context.active_object

# Use a fixed value for now, eventually make this user adjustable
total = 10

# Add 'total' objects into the scene
for i in range(total):
    obj_new = obj.copy()
    scene.collection.objects.link(obj_new)

    # Now place the object in between the cursor
    # and the active object based on 'i'
    factor = i / total
    obj_new.location = (obj.location * factor) + (cursor * (1.0 - factor))
将3D游标远离活动物体,运行脚本,查看结果。
在这段脚本里,对物体和游标位置做了一点数学运算,这是因为两者都是3D blender_api:mathutils. Vector 实例, mathutils 模块提供了这个方便的类, 并且允许向量与数值和矩阵做乘法运算。
如果你对这方面感兴趣的话,可以进一步阅读 mathutils.Vector -- 这里有很多方便的工具函数如计算向量夹角、叉乘、点乘, mathutils.geometry 还提供了更高级的函数如 Bézier 样条曲线插值和射线-三角形相交。
现在我们专心将这段脚本编程插件,不过知道这个3D数学模块也是不错的,以后更高级的功能可能用到它。
写插件
首先将脚本转换为插件:
bl_info = {
    "name": "Cursor Array",
    "blender": (2, 80, 0),
    "category": "Object",
}

import bpy


class ObjectCursorArray(bpy.types.Operator):
    """Object Cursor Array"""
    bl_idname = "object.cursor_array"
    bl_label = "Cursor Array"
    bl_options = {'REGISTER', 'UNDO'}

    def execute(self, context):
        scene = context.scene
        cursor = scene.cursor.location
        obj = context.active_object

        total = 10

        for i in range(total):
            obj_new = obj.copy()
            scene.collection.objects.link(obj_new)

            factor = i / total
            obj_new.location = (obj.location * factor) + (cursor * (1.0 - factor))

        return {'FINISHED'}

def register():
    bpy.utils.register_class(ObjectCursorArray)


def unregister():
    bpy.utils.unregister_class(ObjectCursorArray)


if __name__ == "__main__":
    register()
接下来的步骤上文已经介绍过了,不过你还是可以运行脚本,再考虑一下如何改进这插件的功能。
这个插件明显缺少两项功能 -- 总数固定为10,从 查找 访问该操作也不是很方便。
下文将讲解如何改进,并给出最终脚本代码。
操作属性
有多种属性类型可用于工具设置,常见的属性类型包括:整型、浮点型、矢量型、颜色、布尔型和字符串型。
这些属性与Python类的属性用法不同,因为Blender需要在界面显示、保存其键位映射设置,并保留设置供下次使用。
尽管这是相当Python化的方式,但是记住,实际上你定义的工具设置会被加载到Blender,并被Blender的其他部分从Python外部访问。
要消除 总数 为10的问题, 会用到一个操作属性。操作属性是通过 bpy.props模块定义的,将下面的代码加到operator类的主体中:
# moved assignment from execute() to the body of the class...
total: bpy.props.IntProperty(name="Steps", default=2, min=1, max=100)

# and this is accessed on the class
# instance within the execute() function as...
self.total
这些来自 bpy.props 的属性会被Blender特别处理,当(operator)类被注册后,会在界面显示属性按钮。可以传递很多参数给属性,如设置上下界、修改默认值和显示工具提示。
See also
这篇文档不会详细介绍如何使用其他属性类型,不过上面的链接包含了更高级的属性用法范例。
菜单选项
插件可以添加到现有的面板、标题栏和菜单等Python定义的用户界面中。
这个例子里,我们将其添加到现有菜单。
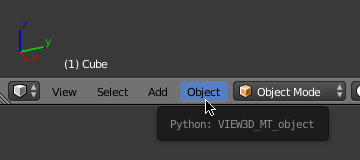
菜单标识符。
先在用户设置中启用 Python工具提示,鼠标在菜单上方停留,会出现提示,就能找到菜单标识符了。
添加菜单选项的方式是,在给现有类追加一个绘制函数:
def menu_func(self, context):
    self.layout.operator(ObjectCursorArray.bl_idname)

def register():
    bpy.utils.register_class(ObjectCursorArray)
    bpy.types.VIEW3D_MT_object.append(menu_func)
扩展菜单的文档,请参考 bpy.types.Menu 。
键位映射
在Blender中,插件可以有自己的键位映射,以避免与Blender内置键位映射冲突。
在下面的例子中,添加了一个新的物体模式 bpy.types.KeyMap ,接着向该键位映射添加了一个 bpy.types.KeyMapItem ,指向新添加的操作,使用 Shift-Ctrl-T 作为快捷键
# store keymaps here to access after registration
addon_keymaps = []

def register():

    # handle the keymap
    wm = bpy.context.window_manager
    km = wm.keyconfigs.addon.keymaps.new(name='Object Mode', space_type='EMPTY')

    kmi = km.keymap_items.new(ObjectCursorArray.bl_idname, 'T', 'PRESS', ctrl=True, shift=True)
    kmi.properties.total = 4

    addon_keymaps.append((km, kmi))


def unregister():

    # handle the keymap
    for km, kmi in addon_keymaps:
        km.keymap_items.remove(kmi)
    addon_keymaps.clear()
值得注意的是,键位映射的 total 值与operator的默认值不同,这样就可以通过不同按键组合访问不同设置的同一operator。
Note
虽然 Shift-Ctrl-T 不是默认的Blender键快捷键,但很难确保附加组件不会覆盖彼此的键盘映射。因此,在分配键时至少要小心,它们不会与Blender的重要功能冲突(另请参阅 Is Key Free )。
上文所用函数的API文档,见:
合二为一
bl_info = {
    "name": "Cursor Array",
    "blender": (2, 80, 0),
    "category": "Object",
}

import bpy


class ObjectCursorArray(bpy.types.Operator):
    """Object Cursor Array"""
    bl_idname = "object.cursor_array"
    bl_label = "Cursor Array"
    bl_options = {'REGISTER', 'UNDO'}

    total: bpy.props.IntProperty(name="Steps", default=2, min=1, max=100)

    def execute(self, context):
        scene = context.scene
        cursor = scene.cursor.location
        obj = context.active_object

        for i in range(self.total):
            obj_new = obj.copy()
            scene.collection.objects.link(obj_new)

            factor = i / self.total
            obj_new.location = (obj.location * factor) + (cursor * (1.0 - factor))

        return {'FINISHED'}


def menu_func(self, context):
    self.layout.operator(ObjectCursorArray.bl_idname)

# store keymaps here to access after registration
addon_keymaps = []


def register():
    bpy.utils.register_class(ObjectCursorArray)
    bpy.types.VIEW3D_MT_object.append(menu_func)

    # handle the keymap
    wm = bpy.context.window_manager
    # Note that in background mode (no GUI available), keyconfigs are not available either,
    # so we have to check this to avoid nasty errors in background case.
    kc = wm.keyconfigs.addon
    if kc:
        km = wm.keyconfigs.addon.keymaps.new(name='Object Mode', space_type='EMPTY')
        kmi = km.keymap_items.new(ObjectCursorArray.bl_idname, 'T', 'PRESS', ctrl=True, shift=True)
        kmi.properties.total = 4
        addon_keymaps.append((km, kmi))

def unregister():
    # Note: when unregistering, it's usually good practice to do it in reverse order you registered.
    # Can avoid strange issues like keymap still referring to operators already unregistered...
    # handle the keymap
    for km, kmi in addon_keymaps:
        km.keymap_items.remove(kmi)
    addon_keymaps.clear()

    bpy.utils.unregister_class(ObjectCursorArray)
    bpy.types.VIEW3D_MT_object.remove(menu_func)


if __name__ == "__main__":
    register()
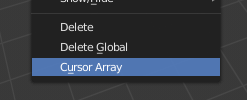
菜单选项。
运行该脚本(或保存后通过用户设置安装),操作会出现在 物体 菜单中。
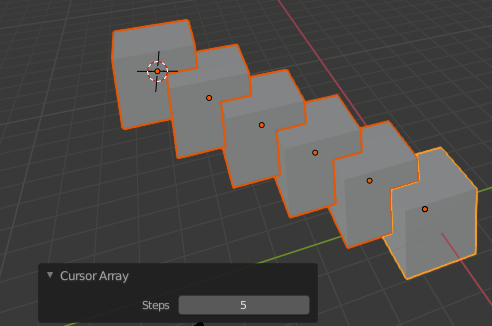
操作属性。
从菜单执行操作后,你还可以选择添加的立方体数量。
Note
多次直接执行脚本也会每次添加菜单。虽然没有有用的行为,但没有什幺可担心的,因为当通过首选项启用时,加载项不会多次注册自己。
结语
插件可以整洁地封装特定功能,用于编写工具改善工作流,或者编写功能供其他人使用。
尽管Blender中Python可以做的还存在一些限制,不过已经可以实现相当多的功能,使用户免于钻研Blender的 C/C++ 源码。
教程里可以给出的范例始终是有限的,不过已经演示了用于常见任务的Blender API,用户可以借此延伸出自己的工具。
扩展阅读
Blender附带了一些注释过的模板,可以在文本编辑器标题栏找到,如果你需要某个方面的示例代码,从这里开始是一个不错的选择。
看完上面的教程过后,这里提供了几个你可能用到的网址。
Blender/Python API概述 -- 关于Blender/Python整合的更多背景细节。
"如何像计算机科学家一样思考 <https://runestone.academy/runestone/books/published/thinkcspy/index.html>`__ - 对于那些仍在学习Python的人来说,这是一个很好的信息。
Blender 开发 (Wiki) -- Blender开发,一般信息和有用链接。
"开发讨论 <https://devtalk.blender.org/tag/python>`__ -- 人们向 Python 开发问题提问的论坛。