创建元骨骼
从 菜单添加一个骨骼。
进入骨架编辑模式,通过示例或者Rigify-类型建立元骨骼。
Define Rigify layers, bone grouping and selection sets.
在骨架属性面板中点击 生成 按钮来生成骨架。
Rigify 如何工作
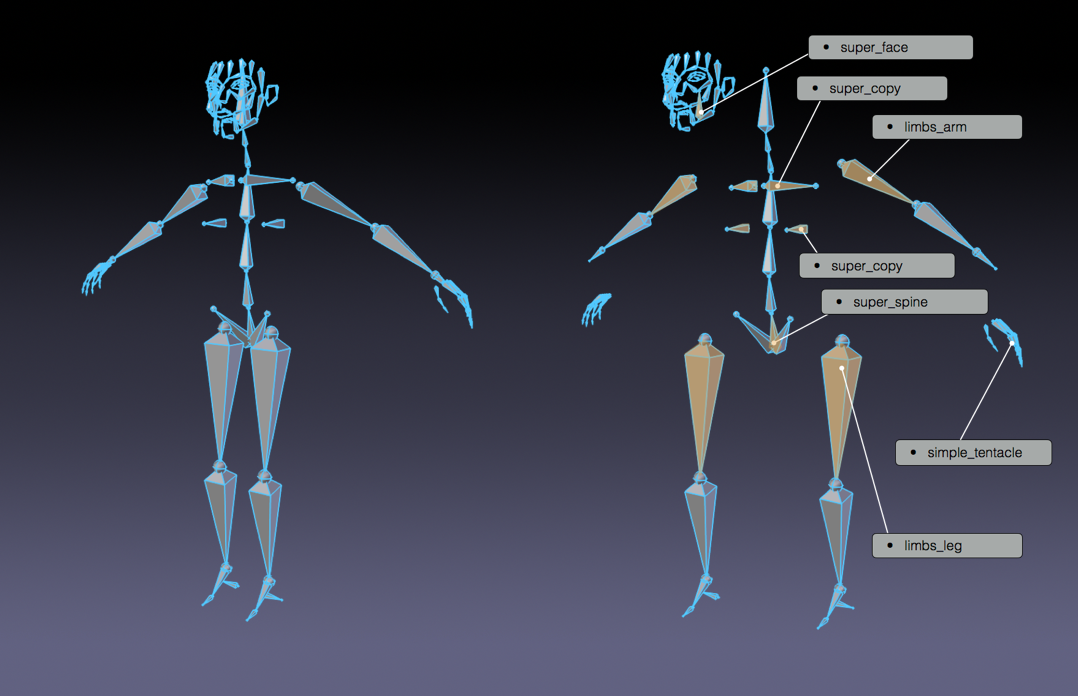
- Rigify 元骨骼分为多个子绑定
元骨骼由骨链组合而成,一个骨链由 连接 属性标识定义,骨链通过在不使用 连接 属性的情况下使用父子进行连接,可以将它们进一步连接在一起(例如在父子关系时使用 保持偏移 选项)。
- 子骨骼链的第一个骨骼设置自定义属性
骨链的第一个骨骼拥有自定义属性,Rigify 自定义属性定义子骨骼类型,在绑定生成时 Rigify 会确定创建哪些小部件和形变骨骼,处理从每个骨链的第一个骨骼到最后一个骨骼的元骨骼。

按样本拆分的人类元骨骼。
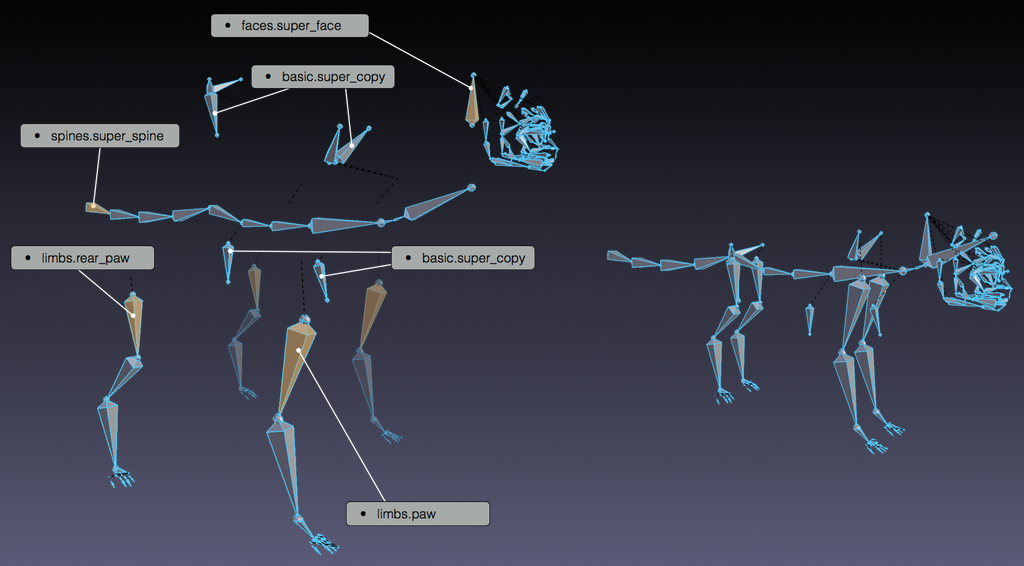
- 创建新的元骨骼组装子绑定范例
由于元骨骼只是子绑定的集合,因此可以以不同的方式组装子绑定来构建新的元骨骼。这样,可以从相同的绑定块中构建无限数量的元骨骼。

按样本拆分的人类元骨骼。
- 所有的结构,形变骨骼和小部件,只需简单的点击即可创建
元骨骼相比常规可视骨骼包含更多的信息,实际上,在生成时 Rigify 将识别每个子绑定类型,并根据所选选项,只需一次点击即可创建所有复杂的控件、开关和形变骨骼。
创建一个新的元骨骼
添加一个新骨架物体
参考
- 模式:
物体模式
- 菜单:
- 快捷键:
Shift-A
从头开始构建您自己的元骨骼,需要一个骨架物体来使用。只需从 添加 菜单中添加一个骨骼。
Tip
At this stage naming the newly added armature "meta-rig" is a good idea. You can do it at any time (or not at all) but it's suggested to do it before going on so it will always be clear on which armature you have to work when editing the meta-rig structure.
编辑骨架
现在有一个骨架物体用于工作 -- 选中骨架 -- 进入骨架编辑模式。在编辑模式下从头开始构建元骨骼可以通过两种方式搞定:
添加绑定范例。
创建骨骼链。
添加范例 (基础)
Adding samples in Edit Mode is a good way to start building a meta-rig. This way you can become familiar with the available building blocks and how they are meant to be used. To add a rig sample:
进入骨架标签。
向下滚动到 Rigify 面板。
从列表中选择一个范例。
点击 添加范例 按钮。
编辑骨骼位置以匹配你的角色。
列表可用范例可查看 绑定类型 页面。
使用绑定类型(高级)
Create your bone chains in Edit Mode.
Assign the correct rig type to the first bone of each chain in Pose Mode.
Note
每个子绑定都需要一定的骨骼数量作为输入。如果您不确定如何使用绑定类型属性,请将范例骨骼添加到骨架中,以查看应如何使用。
自定义根骨骼
If the meta-rig contains a bone called "root", it is used as the root control bone instead of creating a new one. This allows changing the rest position of the root bone, assigning a custom widget, or adding custom properties to the bone.
自定义根骨骼必须无父级,并使用 basic.raw_copy 子绑定类型或置空。
Layers, Bone Groups & Selection Sets
Armature Layers are usually used to isolate bones. Rigify can take advantage of armature layer to generate extra features and the user interface for the final rig. Rigify layers are displayed in a vertical layout inside their own separate panel named Rigify Layer Names.
The first column shows the layer number.
The second column is a display toggle.
This toggle controls the armature layer visibility. It has the same effect of enabling/disabling the layer visibility from the top armature layers menu. It is just redrawn here for a simplicity.
The third column sets a specific layer name to be used to build the rig UI of the final rig. If set, a button with the specified name will be created in the
rig_ui_templateto control the visibility of this specific armature layer. If layer contains at least one bone but its name field is empty, a button with no name will be created in the rig UI.The fourth column defines in which UI row the layer button will be created.
This numbers define the layer ordering in the UI and will ignore the effective layer number. If two layer have the same row number their UI buttons will be created in the same row.
The fifth column is a toggle for the selection set.
If checked a selection set with that name will be created and associated to the final rig.
The sixth column defines the Rigify Bone Grouping.
If Rigify Bone Groups are set, the user can make the association between the bones on the layer and the specified bone group from the list. The controls on the final rig will inherit the bone grouping through this value.
The seventh column displays -- if set -- the associated bone group name.
In order to use the Bone Groups in the Rigify Layer Names fields, Rigify Bone Groups must be set through the specific panel. Usually this panel is displayed just above Rigify Layer Names panel.
Rigify Bone Groups are used to define bone colors on the final rig. The top two rows of the Rigify Bone Groups panel are used to define the bone colors general behavior. Usually color themes use a gradient of colors to define the different bone states: default, selected and active. When multiple color themes are used in the same rig, identifying which bone is selected or active can be tricky since each color will have its corresponding state.
To override this behavior Rigify Bone Groups unifies the active and selected states with the same color. This is defined by two values:
- 统一的 选定/活动颜色
When this option is active adding a bone group in the list will always keep the colors consistent. When a color scheme is added as from a theme, the color scheme is loaded as is. Click on the Apply button to force the system to unify selected and active colors.
- 选定/活动 颜色
This two color fields define respectively Selected and Active colors. By default Rigify reads this colors from the theme defined by the user in the Blender preferences. This way the Selected/Active colors can always have a predictable and consistent behavior in the UI. The colors can be customized by clicking on the relative color field. To reset them to the Blender current theme value just click on the button with the update icon.
Bone Groups can be added and deleted as done in the general Bone Group panel
by clicking on the + or - buttons.
All Bone Groups can be deleted at once by clicking on the Specials menu.
To add the predefined Rigify Default Bone Groups list click on Add Standard button.
要添加具有自定义配色方案的特定主题,请从列表中选择它,然后单击 从主题添加 按钮。