Curve(カーブ)#
このページでは、カーブ編集の基本について説明します。
Transform(トランスフォーム)#
参照
- Mode(モード):
Edit Mode(編集モード)
- Menu(メニュー):
Bézier(ベジエ)カーブは、制御点とハンドルの両方の位置を変換することで編集できます。一方、NURBSカーブには制御点しかありません。
- Move(移動)、Rotate(回転)、Scale(スケール)
Blenderの他の要素と同様に、カーブ制御点とハンドルは、 基本的な Transformations(トランスフォーム変換) で説明されているように、移動、回転、スケールできます。
- To Sphere, Shear, Bend, Push/Pull, Warp, Randomize
Transform(トランスフォーム) ツールについては、Transformation(トランスフォーム変換) セクションで説明しています。
- Move/Scale Texture Space(テクスチャ空間を移動/スケーリング)
他のオブジェクトと同様に、カーブには 編集 可能なテクスチャ空間があります。
Radius(半径)#
参照
- Mode(モード):
Edit Mode(編集モード)
- Tool(ツール):
- Menu(メニュー):
- ショートカットキー:
Alt-S
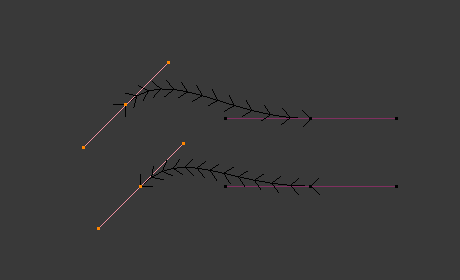
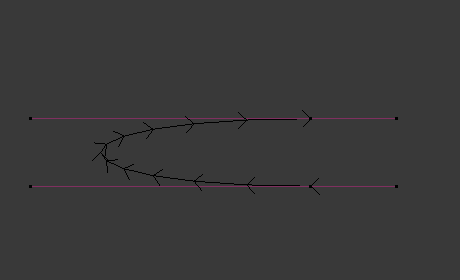
Controls the width of the extrusion along the "spinal" curve. The radius will be interpolated from point to point (you can check it with the normals). The Radius of the points is set using the Radius transform tool. Or in the Sidebar Transform panel.
1つの制御点の半径がゼロに設定されています。#
Mirror(ミラー)#
参照
- Mode(モード):
Edit Mode(編集モード)
- Menu(メニュー):
- ショートカットキー:
Ctrl-M
Mirror(ミラー) ツールも使用でき、 メッシュの頂点 とまったく同じように動作します。
Snap(スナップ)#
参照
- Mode(モード):
Edit Mode(編集モード)
- Menu(メニュー):
- ショートカットキー:
Shift-S
メッシュのスナップ は、カーブコンポーネントでも機能します。制御点とそのハンドルの両方は、それ自体(アクティブなカーブの他のコンポーネント)を除いて、スナップの影響を受けます。スナップは2Dカーブで機能しますが、点はローカルXY軸に制限されます。
Spin(スピン)#
参照
- Mode(モード):
Edit Mode(編集モード)
- Menu(メニュー):
Spin(スピン) 操作は、1次元の サーフェス オブジェクトに対してのみ機能します。現在、カーブでは使用できません。全機能は サーフェス編集 で説明しています。
Add Duplicate(複製を追加)#
参照
- Mode(モード):
Edit Mode(編集モード)
- Menu(メニュー):
- ショートカットキー:
Shift-D
Duplicates the selected control points, along with the curve segments implicitly selected (if any). If only a handle is selected, the full point will be duplicated too. The copy is selected so you can move it to another place.
Split(分割)#
参照
- Mode(モード):
Edit Mode(編集モード)
- Menu(メニュー):
- ショートカットキー:
Y
Splits a selected segment of a curve from the rest of the curve. This curve can then be moved or altered without affecting the other curve. If a single control point is selected the Split operator will create a new singular loose control point; leaving the previously selected control point attached to the rest of the curve.
Separate(分離)#
参照
- Mode(モード):
Edit Mode(編集モード)
- Menu(メニュー):
- ショートカットキー:
P
Separates curve objects that are made of multiple distinct curves into their own objects.
Note, if there is only one curve in a Curve object, This operation will create a new Curve object with no control points.
Toggle Cyclic(ループ切替え)#
参照
- Mode(モード):
Edit Mode(編集モード)
- Menu(メニュー):
- ショートカットキー:
Alt-C
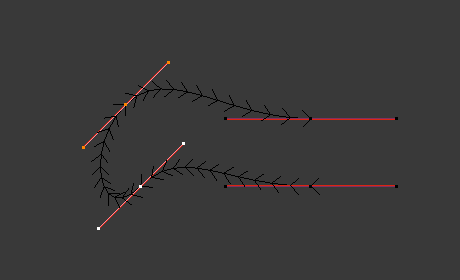
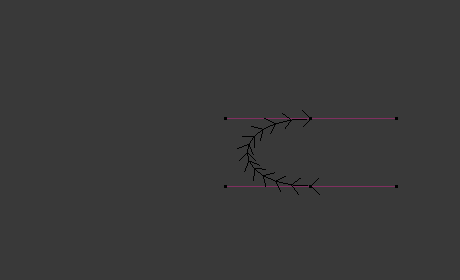
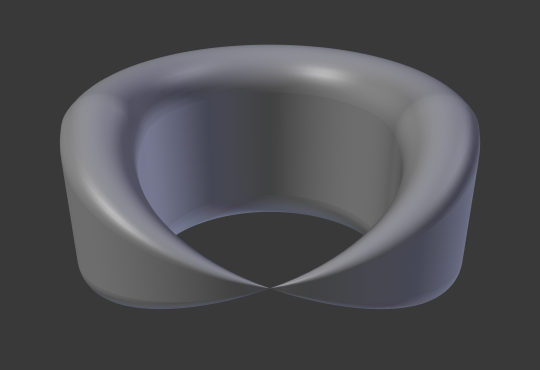
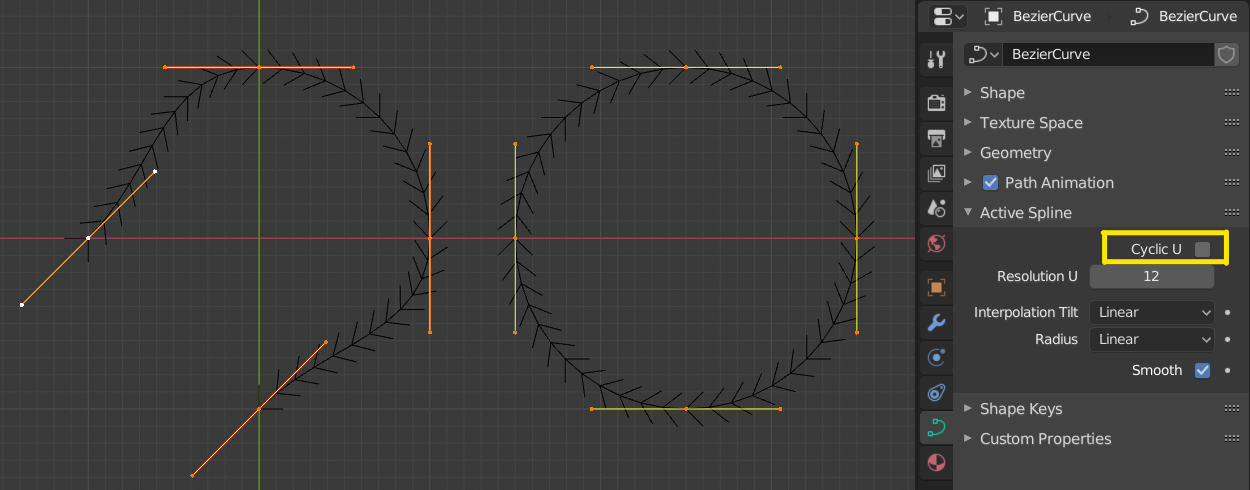
Toggles between an open curve and closed curve (Cyclic). Only curves with at least one selected control point will be closed/open. The shape of the closing segment is based on the start and end handles for Bézier curves, and as usual on adjacent control points for NURBS. The only time a handle is adjusted after closing is if the handle is an Auto one. Fig. 開いたカーブと閉じたカーブ。 is the same Bézier curve open and closed.
このアクションは、元の開始の制御点や最後に追加された制御点でのみ機能します。セグメントを削除しても、アクションの適用方法は変わりません。それでも、開始の制御点と最後の制御点でのみ動作します。これは、 Alt-C で1つのカーブを閉じるのではなく、実際には2つのカーブを結合する可能性があることを意味します!2Dカーブを閉じると、レンダリング可能な平面が作成されることに注意してください。
開いたカーブと閉じたカーブ。#
Set Spline Type(スプラインタイプを設定)#
参照
- Mode(モード):
Edit Mode(編集モード)
- Menu(メニュー):
Converts splines in a curve object between Bézier, NURBS, and Poly curves. Note, this is not a "smart" conversion, i.e. Blender does not try to keep the same shape, nor the same number of control points. For example, when converting a NURBS to a Bézier, each group of three NURBS control points become a unique Bézier one (center point and two handles).
参考
Mesh(メッシュ)からの Convert(変換) 。
Show/Hide(表示/隠す)#
参照
- Mode(モード):
Edit Mode(編集モード)
- Menu(メニュー):
- ショートカットキー:
Alt-H 、 H 、 Shift-H
Edit Mode(編集モード) では、要素を表示、非表示にすることができます。接続されたカーブのすべての制御点が非表示になっていない限り、セグメントは常に表示されるため、制御点のみを表示、非表示にできます。非表示の場合、カーブは完全に非表示になります。
Object Mode(オブジェクトモード) での Show/Hide(表示/隠す) を参照してください。 Curve(カーブ)の表示 パネルも参照してください。
Cleanup(クリーンアップ)#
Decimate Curve(カーブを簡略化)#
参照
- Mode(モード):
Edit Mode(編集モード)
- Menu(メニュー):
Decimate Curve(カーブを簡略化) 操作は、カーブを元の形状に維持しようとしながら、制御点の数を減らします。この操作は、 対応するメッシュ操作 と同様に機能します。
- Ratio(比率)
削除する制御点の割合。
注釈
このツールは、Bézier(ベジエ) カーブのみを簡略化できます。
Delete(削除)#
参照
- Mode(モード):
Edit Mode(編集モード)
- Menu(メニュー):
- ショートカットキー:
X 、 Delete
Delete(削除) ポップアップメニューのオプション:
- Vertices(頂点)
これにより、カーブを壊すこと なく 、選択した制御点を削除します(つまり、中間の点が削除されると、隣接する点が直接リンクされ、結合されます)。NURBSの次数は、制御点の数を超えることはできないため、一部の制御点を削除すると減少する可能性があることに注意してください。もちろん、1つの点だけが残っている場合、表示されるカーブはなくなり、すべての点が削除されると、カーブ自体が削除されます。
- Segment(セグメント)
選択した制御点を接続しているセグメントと、それらの制御点を削除します。
Dissolve Vertices(頂点を溶解)#
参照
- Mode(モード):
Edit Mode(編集モード)
- Menu(メニュー):
- ショートカットキー:
Ctrl-X
選択した制御点を削除しますが、残りのセグメントはハンドルを調整することで削除したカーブにフィットします。