Assigning a Vertex Group
Creating Vertex Groups
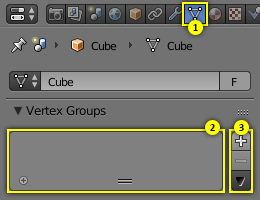
Empty Vertex Group panel.
Vertex Groups are maintained within the Mesh tab (1) in the Properties Editor. As long as no Vertex groups are defined (the default for new Mesh Objects), the Panel is empty (2).
You create a vertex group by LMB on the Add button (+) on the right Panel border (3). Initially the group is named “Group” (or “Group.nnn” when the name already exists) and gets displayed in the Panel (2) (see next image).
Vertex Groups Panel Controls
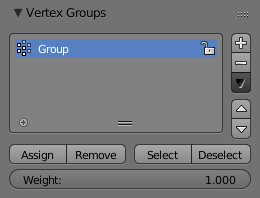
One Vertex Group.
Once a new Vertex Group has been added, the new Group appears in the Vertex Groups panel. There you find three clickable elements:
- Group Name
- The group name can be changed by double-clicking LMB on the name itself. Then you can edit the name as you like.
- Plus Icon
- When the little icon in the left lower corner can be clicked, a new row opens up where you can enter a search term. This becomes handy when the number of vertex groups gets big.
- Drag Handle
- If you have a large number of vertex groups and you want to see more than a few Groups, you can LMB on the small drag handle to tear the vertex groups list larger or smaller.
- Active Group
- When a Vertex Group is created, then it is also automatically marked as the Active Group. This is indicated by setting the background of the panel entry to a light blue color. If you have two or more groups in the list, then you can change the active group by LMB on the corresponding entry in the Vertex Group panel.
Deleting Vertex Groups
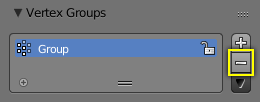
Delete a Vertex Group.
You delete a Vertex Group by first making it the active group (select it in the panel) and then LMB the Remove button (-) at the right Panel border.
Deleting a Vertex Group only deletes the vertex assignments to the Group. The vertices themselves are not deleted.
Locking Vertex Groups
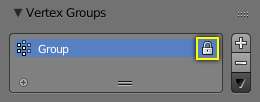
Lock a Vertex Group.
Right after creation of a Vertex Group, an open padlock icon shows up on the right side of the Vertex Group List entry. This icon indicates that the Vertex Group can be edited. You can add vertex assignments to the group or remove assignments from the group. And you can change it with the weight paint brushes, etc.
When you click on the icon, it changes to a closed padlock icon and all vertex group modifications get disabled. You can only rename or delete the group, and unlock it again. No other operations are allowed on locked Vertex Groups, thus all corresponding buttons become disabled for locked Vertex Groups.
Working with Content of Vertex Groups
Assigning Vertices to a Group
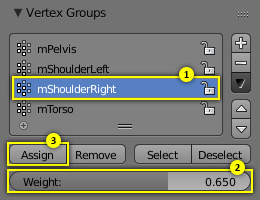
Assign weights to active group.
You add vertices to a group as follows:
- Select the group from the group list, thus make it the Active Group (1).
- From the 3D View select Shift-RMB all vertices that you want to add to the group.
- Set the weight value that shall be assigned to all selected vertices (2).
- LMB the Assign button to assign the selected vertices to the active group using the given weight (3).
Note that weight Assignment is not available for locked Vertex Groups. The Assign button is grayed out in that case.
Note
Assign is additive
The Assign button only adds the currently selected vertices to the active group. Vertices already assigned to the group are not removed from the group.
Also keep in mind that a vertex can be assigned to multiple groups.
Checking Assignments
To be sure the selected vertices are in the desired Vertex Group, you can try press the deselect button. If the vertices remain selected then they are not yet in the current Vertex Group.
At this point you may assign then, but take care since all selected vertices will have their weight set to the value in the Weight: field.
Removing Assignments from a Group
You remove vertices from a group as follows:
- Select the group from the group list (make it the active group).
- Select all vertices that you want to remove from the group.
- Press the Remove button.
Note that Removing weight Assignments is not available for locked Vertex Groups. The Remove button is grayed out in that case.
Using Groups for Selecting/Deselecting
You can quickly select all assigned vertices of a group:
- (optionally) press A once or twice to unselect all vertices.
- Select the group from the group list (make it the active group).
- When you now LMB click the Select button, then the vertices assigned to the active group will be selected and highlighted in the 3D View.
- When you LMB click the Deselect button instead, then the vertices assigned to the active group will be deselected in the 3D View.
Note
Selecting/Deselecting is additive
If you already have vertices selected in the 3D View, then selecting the vertices of a group will add the vertices but also keep the already selected vertices selected. Vice versa, deselecting the vertices of a vertex group will only deselect the vertices assigned to the group and keep all other vertices selected.
Finding Ungrouped Vertices
You can find ungrouped vertices as follows:
- Press A once or twice to unselect all vertices.
- In the header of the 3D View: Navigate to .