UVs & Texture Space
UV Maps

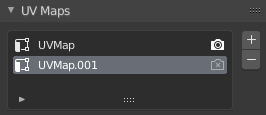
The UV Maps panel in the Mesh tab.
In the Mesh tab the UV maps panel contains a List view that lists the UV maps created for this mesh. The selected map is displayed in the UV Editor.
- Active Render
Click the camera icon to enable that UV texture for rendering. If no other map is explicitly specified.
- Add
+ Clicking the Add button duplicates the selected UV map.
Ver también
Note that each texture can be mapped to a specific UV layout.
Texture Space
Reference
- Mode
All Modes
- Panel
These are settings of the texture space used by generated texture mapping. The visualization of the texture space can be activated in the Viewport Display.
- Auto Texture Space
Adjusts the active object’s texture space automatically when transforming the object.
- Location, Size
If the texture space is not calculated automatically then you can define the location and size of the texture space relative to the base object. These can also be adjusted from the 3D Viewport, see Editing for more information.
- Texture Mesh
Use another mesh for texture indices, the vertex of the two objects must be perfectly aligned. Otherwise the UV map will be distorted. Note that, this is only for mesh objects.
- Match Texture Space
Modifies the Location and Size to match the objects bounding box. This disables Auto Texture Space. Note that, this is only for curve objects.
Editing
Reference
- Mode
Object Mode and Edit Mode
- Menu
To modify the texture space from the 3D Viewport, enable Edit Texture Space while transforming an object.
Accessing
The automatically calculated UV map can be accessed by an object’s material through the Generated output of the Texture Coordinate Node. This output can then be used to map any texture onto an object.
Truco
Generated texture spaces do not have rotation support, to overcome this, a Mapping Node can be used to rotate the UV map.