Modo Editar Partículas
Usando el modo de interacción Editar Partículas será posible editar los puntos clave y trayectorias de simulaciones de Pelo, Partículas, Ropa y Cuerpos blandos. (También será posible editar y peinar el pelo antes de capturarlo).
Debido a que el trabajo con el modo Editar Partículas es bastante sencillo y muy similar al trabajo con vértices en la Vista 3D, se mostrará cómo configurar un sistema de partículas y luego se darán algunas referencias sobre las distintas funciones.
Importante
El modo Editar Partículas, especialmente para su uso con pelo, es considerado como obsoleto; en su lugar se recomienda usar el nuevo objeto Pelo vacío con su Modo Esculpido asociado.
Uso
Truco
¡Sólo los fotogramas capturados en memoria serán editables!
En caso de no poder editar las partículas, comprobar que no sestén siendo capturadas a un Caché en disco.
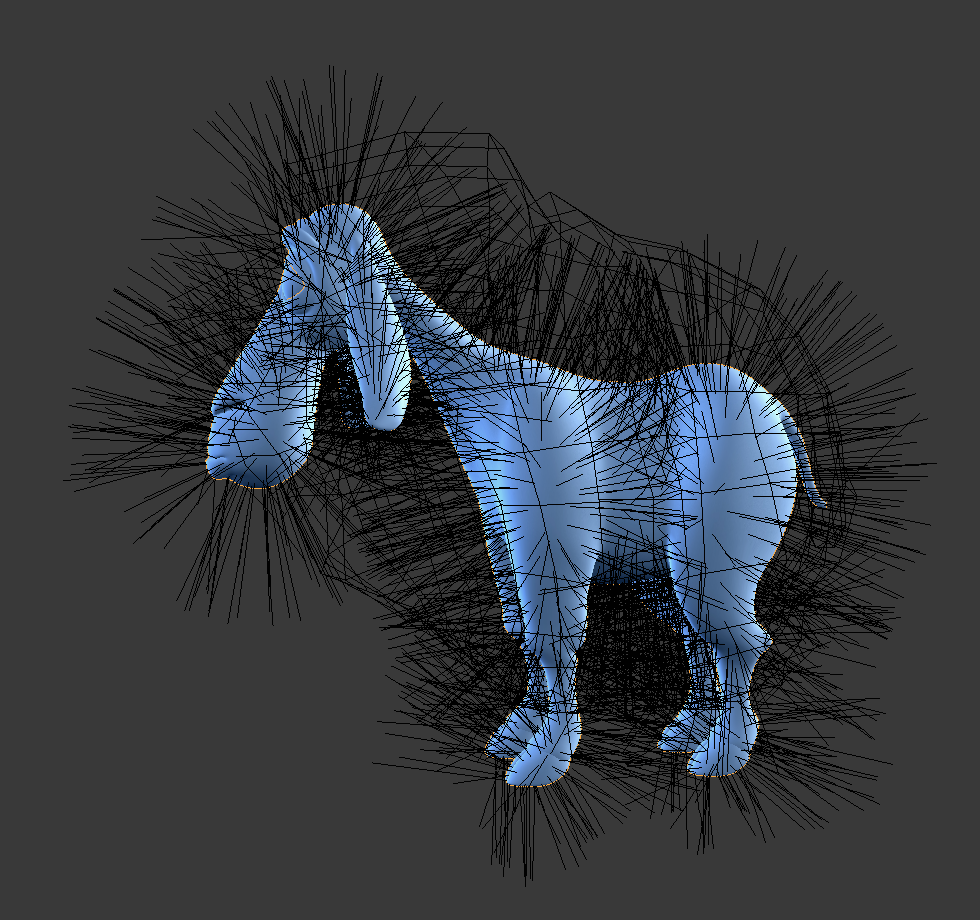
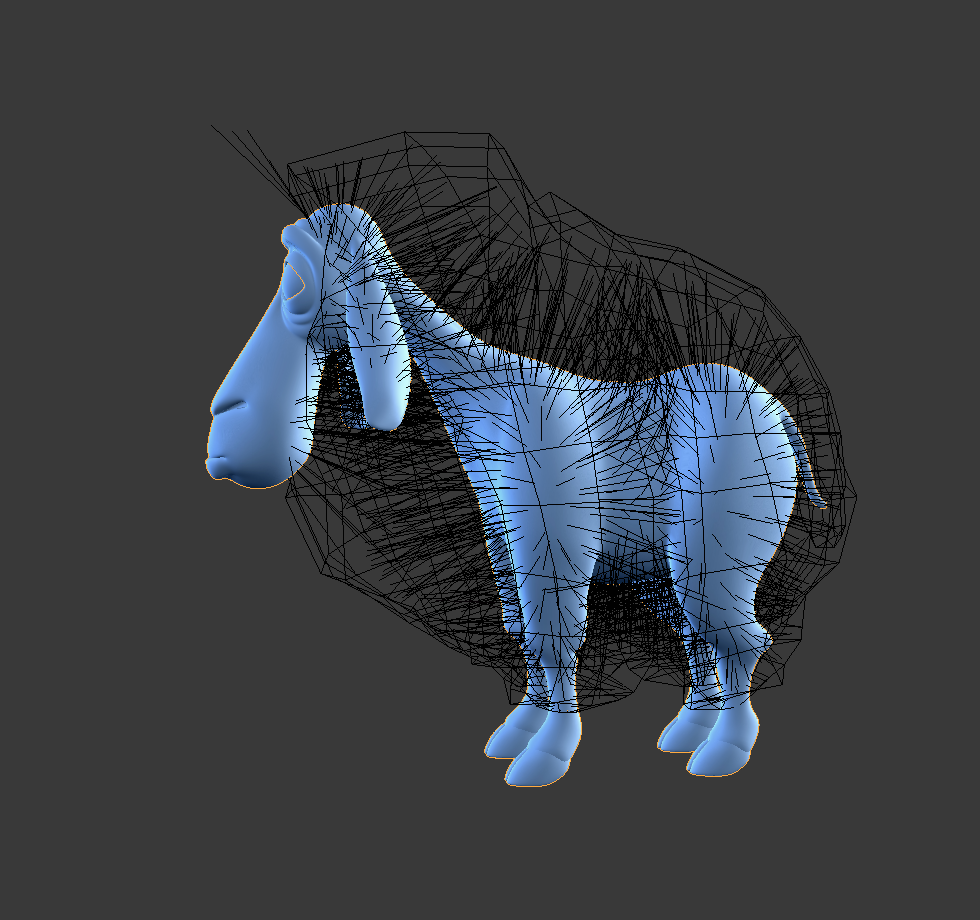
Configuración de partículas para pelo
Crear un sistema de partículas de pelo.
Proporcionarle una velocidad inicial en la dirección Normal.
Crear una simulación.
Activar la casilla Dinámicas de pelo.
Edición de hebras de pelo en el modo de interacción Editar Partículas.
Configuración para simulaciones con partículas, ropa y cuerpos blandos
Usar partículas de tipo Emisor o una simulación de ropa/cuerpo blando.
Crear una simulación configurando objetos o emisores, configurar el rango de tiempo (usar un rango pequeño al comienzo para experimentar), configurar la simulación de la manera deseada usando el atajo Alt-A para previsualizarla.
Captura de la simulación
Una vez que se esté conforme con la simulación, capturarla desde el modo Objeto. La simulación deberá ser capturada antes de poder ser editada.
Edición de la simulación
Switch to Particle Edit from the Mode select menu in the header of the 3D Viewport to edit the particle’s paths/Keyframes. You may need to press T from within the 3D Viewport to see the Particle Edit panel. Move to the frame you want to edit and use the various Particle Edit tools to edit your simulation. Work slowly, previewing your changes with Alt-A, and save often so that you can go back to the previous version should something happen, or that you do not like the latest changes you have made.
Truco
To be able to clearly see what you are working on:
Open the Options panel in the Toolbar.
Select Point select mode (see below) in the header of the 3D Viewport. This will display key points along the particle path.
Selección
Single: LMB.
Todas : A.
Linked: Move the mouse over a keypoint and press L.
Seleccionar con marco B.
Circle Select C.
Lasso Select Ctrl-Alt-LMB.
Raíces/Puntas: .
You may also use the Select Menu.
Truco
Selections
Selections are extremely useful for modifying only the particles that you want. Hover over a particle path and press L to link-select it, hover over the next and press L to add that path to the selection. To remove a path, hold Shift and press L. To Deselect all press A.
The method to select individual points is the same as in Edit Mode. RMB to select, Shift-RMB to add/remove a point from the selection.
Seleccionar aleatoriamente
Permitirá seleccionar partículas de manera aleatoria.
- Porcentaje
Porcentaje de partículas a ser aleatoriamente seleccionadas.
- Semilla aleatoria
Valor de semilla a ser usado para la operación de selección.
- Acción
El operador podrá ser usado para seleccionar o deseleccionar partículas.
- Tipo
Permitirá seleccionar pelos o puntos. (Los términos aquí pueden resultar confusos, debido a que pelo/puto en este caso no se refiere al tipo de partícula emitida, sino a las trayectorias del pelo o los puntos de las partículas).
Modos de selección

Los modos de selección.
- Ruta (o Trayectoria)
No se mostrará ningún punto clave, sólo será posible seleccionar/deseleccionar todas las partículas.
- Punto (o Apuntar)
Se mostrarán todos los puntos clave.
- Punta
Sólo se mostrarán y podrán editar (incluyendo los pinceles) las puntas de las partículas (es decir, los puntos clave en las puntas) .
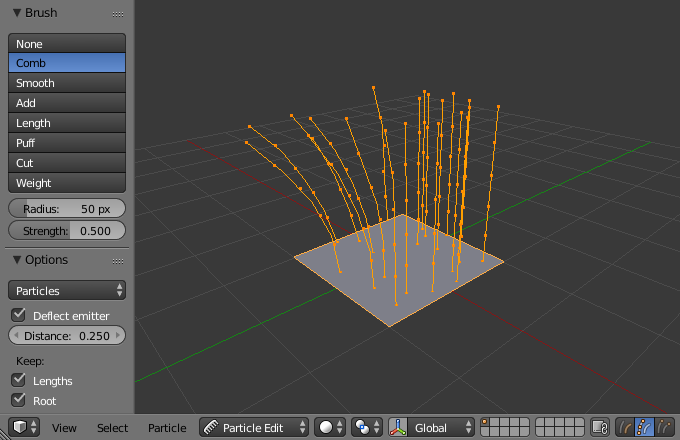
Herramientas
Referencia
- Modo:
Modo Editar Partículas
- Herramienta:
Peinar
Permitirá mover los puntos clave de las partículas (de manera similar a la función Edición proporcional).
- Deflectar emisor
Hair particles only – Do not move keypoints through the emitting mesh.
- Distancia
La distancia a mantener desde el emisor.
Suavizado
Parallels visually adjacent segments.
Agregar
Permitirá agregar nuevas partículas.
- Cantidad
La cantidad de nuevas partículas por cada intervalo del pincel.
- Interpolar
Interpolará la forma de las nuevas partículas a partir de las ya existentes.
- Intervalos
Cantidad de intervalos del pincel.
- Teclas
Permitirá definir con cuántos puntos clave crear las nuevas partículas.
Longitud
Scales the segments, so it makes the hair longer with Grow or shorter with Shrink.
- Crecer / Contraer
Determina si el pincel adicionará o quitará su efecto, al ser usado.
Soplar
Rotates the hair around its first keypoint (root). So it makes the hair stand up with Add or lay down with Sub.
- Volumen soplado
Apply puff to unselected end points, (Helps to maintain the hair volume when puffing the root.)
Cortar
Escalará los segmentos hasta que el último punto clave alcance al pincel.
Influencia
This is especially useful for soft body animations, because the weight defines the soft body Goal. A keypoint with a weight of 1 will not move at all, a keypoint with a weight of 0 subjects fully to soft body animation. This value is scaled by the Strength Min to Max range of soft body goals…
Opciones en común
Below the brush types, their settings appear:
- Radio F
Permitirá definir el radio del pincel.
- Intensidad Mayús-F
Set the strength of the brush effect (not for Add brush).
Opciones
Referencia
- Modo:
Modo Editar Partículas
- Panel:
- Velocidad automática Emisor
Recalculate velocities of particles according to their edited paths. Otherwise, the original velocities values remains unchanged regardless of the actual distance that the particles moves.
- Simetría en X
Enable mirror editing across the local X axis.
- Preservar
- Longitud de hebras
Keep the length of the segments between the keypoints when combing or smoothing the hair. This is done by moving all the other keypoints.
- Posición de raíces
Keep first key unmodified, so you cannot transplant hair.
Cortar partículas según forma
- Objeto de forma
Un objeto cuya superficie será usada por la herramienta Cortar según forma.
- Cortar
This grooming tool trims hairs to a shape defined by the Shape Object. This is a quicker way of avoiding protruding hair sections from lengthening than using the Cutting tool. It works especially well for characters with extensive fur, where working in a single plane with the Cutting tool becomes tedious.
Antes. |
Después. |
Presentación en vistas
- Intervalos trayectoria
La cantidad de intervalos usados para dibujar la trayectoria; mejorará la suavidad de la trayectoria de las partículas.
- Secundarias Pelo
Mostrará también las partículas secundarias. Esto permitirá retocar las partículas y ver su efecto en el resultado final, aunque podría degradar el rendimiento del sistema, en caso de tener muchas partículas secundarias.
- Partículas Emisor
Mostrará las partículas reales, encima de las trayectorias.
- Tiempo desvanecimiento
Desvanecerá las trayectorias y puntos clave alejados del tiempo actual.
- Fotogramas
Cuántos fotogramas a desvanecer.
Edición
Desplazamiento de puntos clave o partículas
Para mover los puntos clave seleccionados pulsar G o usar alguno de los métodos estándar para mover vértices.
Para mover la raíz de un pelo se deberá desactivar la opción Preservar Posición de raíces, en las Opciones de la herramienta activa.
Será posible realizar las mismas acciones que con cualquier vértice, incluyendo escalar, rotar y eliminar (tanto pelos completos como sus puntos clave).
No será posible duplicar ni extruir puntos clave o pelos, sin embargo sí será posible subdividirlos, lo que agregará nuevos puntos clave .
De forma alternativa será posible restablecer la cantidad de puntos clave de los pelos, usando .
Qué tan suave sea la visualización de los pelos y trayectorias de partículas en la vista, dependerá de la opción Intervalos trayectorias en las Opciones de herramientas. Valores bajos producirán una representación tosca entre sus puntos, mientras que valores mayores producirán curvas más suaves.
Voltear
Referencia
- Modo:
Modo Editar Partículas
- Menú:
If you want to create an X axis symmetrical haircut you have to do following steps:
Select all particles with A.
Duplicar y voltear las partículas con .
Turn on X Mirror in .
It may happen that after mirroring two particles occupy nearly the same place. Since this would be a waste of memory and render time, you can use Merge by Distance from the Particle menu.
Unificar longitud
Referencia
- Modo:
Modo Editar Partículas
- Menú:
This tool is used to make all selected hair uniform length by finding the average length.
Mostrar/Ocultar
Referencia
- Modo:
Modo Editar Partículas
- Menú:
Hiding and unhiding of particles works similar as with vertices in the 3D Viewport. Select one or more keypoints of the particle you want to hide and press H. The particle in fact does not vanish, only the key points.
Hidden particles (i.e. particles whose keypoints are hidden) do not react on the various brushes. But:
If you use Mirror Editing even particles with hidden keypoints may be moved, if their mirrored counterpart is moved.
Para volver a ver todas las partículas ocultas, pulsar Alt-H.