Création de méta-rigs
Ajoutez un seul os depuis le menu .
Allez en Mode Édition d’armature et construisez le méta-rig par échantillons ou types Rigify.
Define Rigify layers, bone grouping and selection sets.
Dans les propriétés de l’armature, cliquez sur le bouton Generate (Générer) pour générer le rig.
Comment fonctionne Rigify
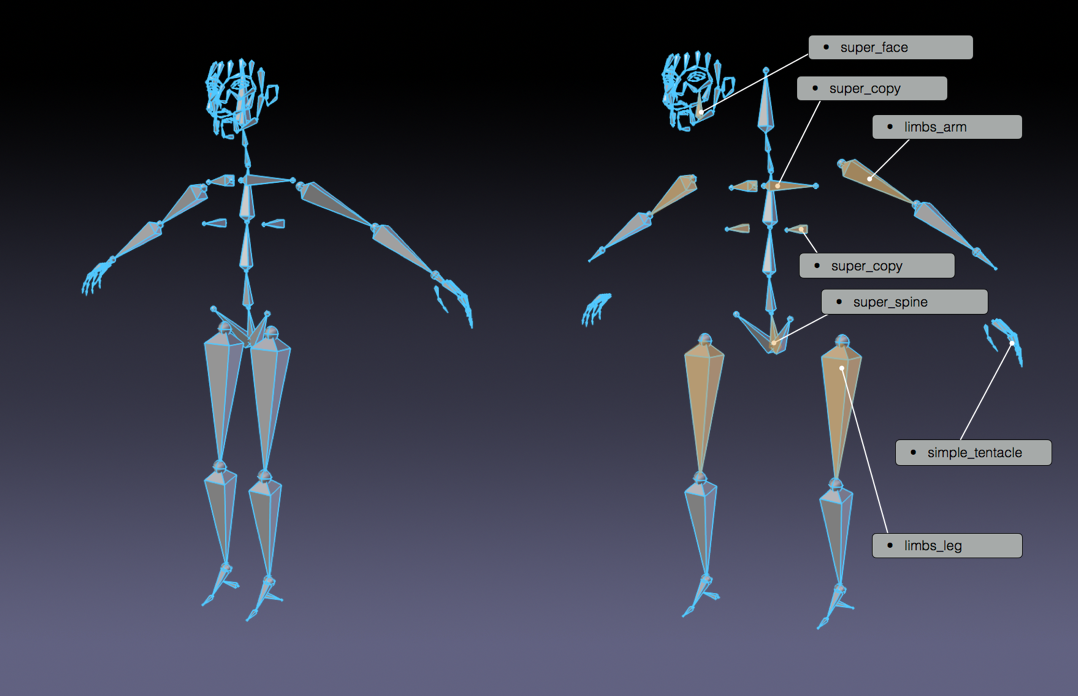
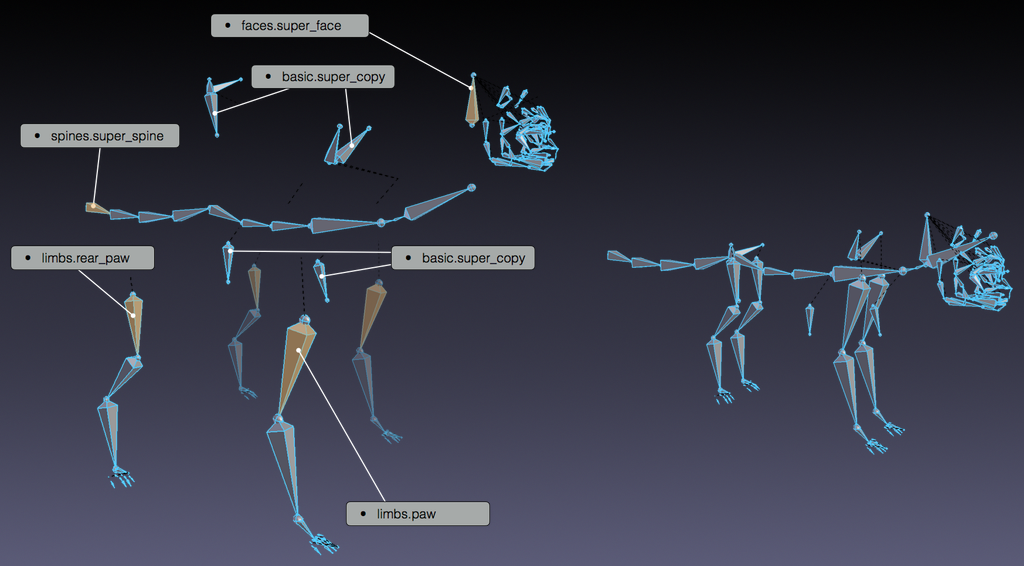
- Les méta-rigs Rigify sont divisés en plusieurs sous-rigs
Un méta-rig est un assemblage de chaînes osseuses. Une chaîne d’os est identifiée par l’attribut Connected (Connecté). Les chaînes d’os peuvent en plus être connectées entre elles en les parentant sans utiliser l’attribut Connected (c’est-à-dire en utilisant l’option Keep Offset pendant la parentalité).
- Un attribut personnalisé est défini sur le premier os de la chaîne du sous-rig
Chaque premier os d’une chaîne d’os possède un attribut personnalisé qui est une propriété personnalisée Rigify qui identifie le type de sous-ossature. Au moment de la génération du rig, Rigify déterminera quels contrôles et quels os de déformation seront créés en traitant le méta-rig du premier os au dernier de chaque chaîne.
Méta-rig humain divisé par échantillons.
- De nouveaux méta-rigs sont créés en assemblant des échantillons de sous-rigs
Puisqu’un méta-rig n’est qu’un ensemble de sous-rigs, de nouveaux méta-rigs peuvent être construits en assemblant des sous-rigs de différentes manières. De cette façon, un nombre infini de méta-rigs peuvent être construits à partir des mêmes blocs de rigging.
Méta-rig humain divisé par échantillons.
- Toute la mécanique, les os de déformation et le widget sont créés en un seul clic
Le méta-rig contient plus d’informations que les os visualisés. En fait, au moment de la génération, Rigify identifiera chaque type de sous-rig et, en fonction des options sélectionnées, créera toutes les commandes, commutateurs et os déformants sophistiqués en un seul clic.
Création d’un nouveau Meta-rig
Ajouter un nouvel objet Armature
Référence
- Mode
Mode Objet
- Menu
- Raccourci
Maj-A
Construire votre propre méta-rig à partir de zéro nécessite de travailler avec un objet Armature. Ajoutez simplement un seul os à partir du menu Add (Ajouter).
Astuce
At this stage naming the newly added armature « meta-rig » is a good idea. You can do it at any time (or not at all) but it’s suggested to do it before going on so it will always be clear on which armature you have to work when editing the meta-rig structure.
Édition de l’armature
Maintenant qu’il y a un objet Armature pour travailler – avec l’armature sélectionnée – entrez dans le mode Édition d’armature. Construire une méta-rig à partir de zéro en mode édition peut être effectué de deux manières :
Ajout d’échantillons de rig.
Création de chaînes osseuses.
Ajout d’échantillons (Basique)
Adding samples in Edit Mode is a good way to start building a meta-rig. This way you can become familiar with the available building blocks and how they are meant to be used. To add a rig sample:
Allez dans l’onglet Armature.
Faites défiler jusqu’au panneau Rigify.
Sélectionnez un échantillon dans la liste.
Cliquez sur le bouton Add sample (Ajouter un échantillon).
Éditez la position des os pour qu’elle corresponde à votre personnage.
Pour la liste des échantillons disponibles, consultez la page Types de Rigs.
Utilisation des types d’installation (Avancé)
Create your bone chains in Edit Mode.
Assign the correct rig type to the first bone of each chain in Pose Mode.
Note
Chaque sous-rig a un nombre requis d’os en entrée. Si vous ne savez pas comment utiliser les propriétés des types de rig, ajoutez un échantillon de rig à votre armature pour voir comment il est censé être utilisé.
Os Root (racine) personnalisé
If the meta-rig contains a bone called « root », it is used as the root control bone instead of creating a new one. This allows changing the rest position of the root bone, assigning a custom widget, or adding custom properties to the bone.
L’os racine personnalisé ne doit avoir aucun parent et utiliser le type de sous-installation basic.raw_copy ou aucun.
Layers, Bone Groups & Selection Sets
Armature Layers are usually used to isolate bones. Rigify can take advantage of armature layer to generate extra features and the user interface for the final rig. Rigify layers are displayed in a vertical layout inside their own separate panel named Rigify Layer Names.
The first column shows the layer number.
The second column is a display toggle.
This toggle controls the armature layer visibility. It has the same effect of enabling/disabling the layer visibility from the top armature layers menu. It is just redrawn here for a simplicity.
The third column sets a specific layer name to be used to build the rig UI of the final rig. If set, a button with the specified name will be created in the
rig_ui_templateto control the visibility of this specific armature layer. If layer contains at least one bone but its name field is empty, a button with no name will be created in the rig UI.The fourth column defines in which UI row the layer button will be created.
This numbers define the layer ordering in the UI and will ignore the effective layer number. If two layer have the same row number their UI buttons will be created in the same row.
The fifth column is a toggle for the selection set.
If checked a selection set with that name will be created and associated to the final rig.
The sixth column defines the Rigify Bone Grouping.
If Rigify Bone Groups are set, the user can make the association between the bones on the layer and the specified bone group from the list. The controls on the final rig will inherit the bone grouping through this value.
The seventh column displays – if set – the associated bone group name.
In order to use the Bone Groups in the Rigify Layer Names fields, Rigify Bone Groups must be set through the specific panel. Usually this panel is displayed just above Rigify Layer Names panel.
Rigify Bone Groups are used to define bone colors on the final rig. The top two rows of the Rigify Bone Groups panel are used to define the bone colors general behavior. Usually color themes use a gradient of colors to define the different bone states: default, selected and active. When multiple color themes are used in the same rig, identifying which bone is selected or active can be tricky since each color will have its corresponding state.
To override this behavior Rigify Bone Groups unifies the active and selected states with the same color. This is defined by two values:
- Couleurs Sélectionnées/Actives unifiées
When this option is active adding a bone group in the list will always keep the colors consistent. When a color scheme is added as from a theme, the color scheme is loaded as is. Click on the Apply button to force the system to unify selected and active colors.
- Couleurs Sélectionnées/Actives
This two color fields define respectively Selected and Active colors. By default Rigify reads this colors from the theme defined by the user in the Blender preferences. This way the Selected/Active colors can always have a predictable and consistent behavior in the UI. The colors can be customized by clicking on the relative color field. To reset them to the Blender current theme value just click on the button with the update icon.
Bone Groups can be added and deleted as done in the general Bone Group panel
by clicking on the + or - buttons.
All Bone Groups can be deleted at once by clicking on the Specials menu.
To add the predefined Rigify Default Bone Groups list click on Add Standard button.
Pour ajouter un thème spécifique avec sa propre palette de couleurs, sélectionnez-le dans la liste et cliquez sur le bouton Add From Theme (Ajouter depuis le thème).