Structure
Splines
Splines are a substructure of curves and are the individual elements that make curve objects. A curve object can be composed of several different splines, just like mesh objects can have different discontinuous meshes under the same object. A spline defines the shape of the curve and can be transformed by altering its Control Points. Splines come in three distinct types, which are described in Spline Types. Each spline type has a slightly different algorithm for computing how bends in the spline are represented.
Splines have their own separate properties from curves and can be altered by selecting the spline in Edit Mode and using the Active Spline panel.
Spline Types
Poly
Poly splines are the most simple spline type as they do not interpolate the shape of the curve between control points.
Poly Curves are used when converting meshes to curves. Because they do not interpolate the shape, Poly splines are able to give an accurate representation of the original mesh object.
This is the primary use case of splines, most of the time Bézier or NURBS splines are used instead; both of which interpolate the shape and give smooth results.
Bézier
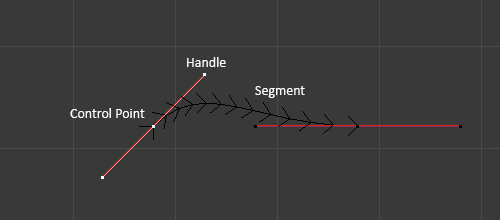
The main elements used in editing Bézier curves are the control points and handles. A segment (the actual curve) is found between two control points. The handles define the curvature of the segment.
In the image below, the control points can be found in the middle of the pink line, while the handles comprise the extensions from the control point. The arrows visualize the normals of the curve, which indicate i.e. the direction and the tilt.

Bézier Curve in Edit Mode.
Handle Types
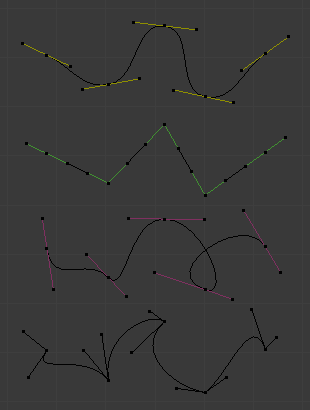
There are four Bézier curve handle types. They can be accessed by pressing V and selecting from the list that appears, or by pressing the appropriate hotkey combination.

Bézier Curve Handle Types.
- Automatic (yellow handles)
- This handle has a completely automatic length and direction which is set by Blender to ensure the smoothest result. These handles convert to Aligned handles when moved.
- Vector (green handles)
- Both parts of a handle always point to the previous handle or the next handle which allows you to create curves or sections thereof made of straight lines or with sharp corners. Vector handles convert to Free handles when moved.
- Aligned (purple handles)
- These handles always lie in a straight line, and give a continuous curve without sharp angles.
- Free (black handles)
- The handles are independent of each other.
NURBS
N.U.R.B.S. is the abbreviation for Non-Uniform Rational B-Splines. One of the major differences between Bézier objects and NURBS objects is that Bézier curves are approximations. For example, a Bézier circle is an approximation of a circle, whereas a NURBS circle is an exact circle. NURBS theory can be a very complicated topic. For an introduction, please consult the Wikipedia page.
NURBS spline control points are different than other spline types because they have a special weight property. This weight property controls how much influence the control point has on the surface. This weight should not be confused with the Goal Weight, which is used only for soft body simulations. The NURBS control point weight can be adjusted in the W number field of the Transform panel.
注釈
If all the control points have the same Weight then each effectively cancels each other out. It is the difference in the weights that cause the curve to move towards or away from a control point.