File Formats
参考
Media Formats for technical information about supported file formats.
Image Output
When rendering a single frame, the output should be a single image format and not a video. Several image formats are available, PNG being the default.
Images can also be used for rendering animations which has a couple advantages. For example, when rendering animations to image file formats the render job can be canceled and resumed at the last rendered frame by changing the frame range. This is useful if the animation takes a long time to render and the computers resources are needed for something else.
Images can then be encoded to a video by adding the rendered image sequence into the Video Sequencer and choosing an appropriate Video Output.
ちなみに
Rendered image sequences can be played back in the Animation Player.
Video Output
Encoding Panel
Reference
- Panel
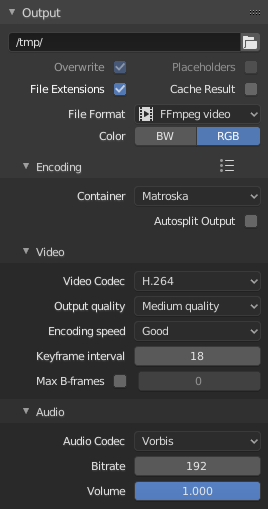
Encoding panel.
Here you choose which video container, codec, and compression settings you want to use. With all of these compression choices, there is a trade-off between file size, compatibility across platforms, and playback quality.
ちなみに
When you view the System Console,
you can see some of the output of the encoding process.
You will see even more output if you execute Blender as blender -d.
- Presets
You can use the presets, which choose optimum settings for you for that type of output.
- Container
Video container or file type. For a list of all available options, see video formats.
- Autosplit Output
If your video is huge and exceeds 2GiB, enable Autosplit Output. This will automatically split the output into multiple files after the first file is 2GiB in size.
Video
- Video Codec
Chooses the method of compression and encoding. For a list of all available options see video formats.
注釈
Standards
Some containers and codecs are not compatible with each other, so if you are getting errors check that your container and codec are compatible. Like containers and codecs are sometimes not compatible with each other, some codecs do not work with arbitrary dimensions. So, try to stick with common dimensions or research the limitations of the codec you are trying to use.
- Output Quality
These are preset Rate.
- Encoding Speed
Presets to change between a fast encode (bigger file size) and more compression (smaller file size).
- Keyframe Interval
The number of pictures per Group of Pictures. Set to 0 for "intra_only", which disables inter-frame video. A higher number generally leads to a smaller file but needs a higher-powered device to replay it.
- Max B-frames
Enables the use of B‑frames.
- Interval
The maximum number of B‑frames between non-B-frames.
Rate
- Bitrate
Sets the average bit rate (quality), which is the count of binary digits per frame. See also: FFmpeg -b:v.
- Rate
Video files can use what is called variable bit rate (VBR). This is used to give some segments of the video less compressing to frames that need more data and less to frames with less data. This can be controlled by the Minimum and Maximum values.
- Buffer
The decoder bitstream buffer size.
Mux
Multiplexing is the process of combining separate video and audio streams into a single file, similar to packing a video file and MP3 audio file in a zip-file.
- Rate
Maximum bit rate of the multiplexed stream.
- Packet Size
Reduces data fragmentation or muxer overhead depending on the source.
Audio
- Audio Codec
Audio format to use. For a list of all available options, see video formats.
- Bitrate
For each codec, you can control the bit rate (quality) of the sound in the movie. Higher bit rates are bigger files that stream worse but sound better. Use powers of 2 for compatibility.
- Volume
Sets the output volume of the audio.
Tips
ちなみに
The choice of video format depends on what you are planning to do.
It's not recommended to render directly to a video format in the first instance. If a problem occurs while rendering, the file might become unplayable and you will have to re-render all frames from the beginning. If you first render out a set of static images such as the default PNG format or the higher-quality OpenEXR (which can retain HDR pixel data), you can combine them as an Image Strip in the Video Sequence Editor (VSE). This way, you can easily:
Restart the rendering from the place (the frame) where any problem occurred.
Try out different video encoding options in seconds, rather than minutes or hours as encoding is usually much faster than rendering the 3D scene.
Enjoy the rest of the features of the VSE, such as adding Image Strips from previous renders, audio, video clips, etc.
ちなみに
You shouldn't post-process a lossy-compressed file as the compression artifacts may become visible. Lossy compression should be reserved as a final 'delivery format'.