Timeline(タイムライン)
The Timeline editor, identified by a clock icon, is used for manipulating keyframes and scrubbing the Playhead.

Timeline(タイムライン)。
The Timeline gives the user a broad overview of a scene's animation, by showing the current frame, the keyframes of the active object, the start and end frames of your animation sequence, as well as markers set by the user.
The Timeline includes Transport Controls, to play, pause, and skip through an animation sequence.
It also includes tools for manipulating Keyframes, Keying Sets, and Markers.
メインビュー
The main Timeline region displays the animation frames over time.

Here you can see the Keyframes (diamond shapes), Playhead (blue handle), Scrollbar (along the bottom).
ビューの調整
The Timeline can be panned by holding MMB, then dragging the area left or right.
You can zoom the Timeline by using Ctrl-MMB, the mouse Wheel, or pressing NumpadMinus and NumpadPlus.
You can also use the scrollbars, located at the bottom or the right of the editor, to pan and zoom the view.
プレイヘッド
The Playhead is the blue vertical line with the current frame number at the top.

プレイヘッド。
The Playhead can be set or moved to a new position by pressing or holding LMB in scrubbing area at the top of the timeline.
The Playhead can be moved in single-frame increments by pressing Left or Right, or you can jump to the beginning or end frame by pressing Shift-Left or Shift-Right.
Frame Range(フレーム範囲)
By default, the Frame Range is set to start at frame 1 and end at frame 250. You can change the frame range in the top right of the Timeline header, or in the Output Properties.
Keyframes(キーフレーム)
For the active and selected objects, keyframes are displayed as diamond shapes.
You can click to select one at a time, or select several by holding Shift, or by dragging a box around the keyframes. You can then move single keys by dragging them, and you can move multiple keys by pressing G and scale them with S.
Only Selected Channels can be enabled. . For Armatures, this will display the object keyframes, and the keyframes for the active and selected pose bones.
Markers(マーカー)
詳細については Markers page を参照してください。
ヘッダー
ポップオーバー
Playback(再生) ポップオーバー

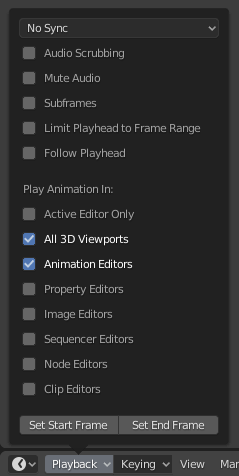
The Playback popover contains options controlling the animation playback.
- Sync(シンク)

3D Viewport(3Dビューポート) の赤い FPS 表示。
When you play an animation, the frame rate is displayed at the top left of the 3D Viewport. If the scene is detailed and playback is slower than the set Frame Rate, these options are used to synchronize the playback.
- Play Every Frame(毎フレーム再生)
Plays every frame even if playback is slow.
- Frame Dropping(コマ落とし)
Playback(再生)がシーンのフレームレートよりも遅くなった場合、フレームをを飛ばします。
- Sync to Audio(音声に同期)
Playback(再生)が遅すぎてオーディオとの同期を維持できない場合、フレームを飛ばします。
- Audio(オーディオ)
- Scrubbing(スクラビング)
If your animation has sound, this option plays bits of the sound wave while you move the Playhead with LMB or keyboard arrows.
- Mute(無効化)
Mute the sound from any audio source.
- Playback(再生)
- Limit Playback to Frame Range
Don't allow selecting frames outside of the playback range using the mouse.
- Follow Current Frame(現在のフレームに追従)
Animation editors can be setup to always follow the time indicator as animation is being played back. Following will be done when animating and changing frame: When the cursor reaches the end of the screen, the next range of frames of the same width will be displayed.
- Play In(再生先)
- Active Editor
While playing, updates the Timeline, if Animation Editors and All 3D Viewports disabled.
- 3D Viewport(3Dビューポート)
While playing, updates the 3D Viewport and the Timeline.
- Animation Editors
While playing, updates the Timeline, Dope Sheet, Graph Editor, Video Sequencer.
- Image Editor(画像エディター)
The Image editor in Mask mode.
- Properties Editor
When the animation is playing, this will update the property values in the UI.
- Movie Clip Editor(動画クリップエディター)
While playing, updates the Movie Clip Editor.
- Node Editors
While playing, updates the Node properties for the node editors.
- Video Sequencer(ビデオシーケンサー)
While playing, updates the Video Sequencer.
- Show(表示)
- Subframes(サブフレーム)
現在のシーンサブフレームを表示して変更できるようにします。
Keying(キーイング) ポップオーバー

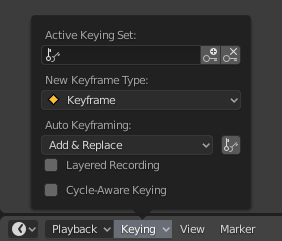
Keying(キーイング) ポップオーバーには、Keyframe(キーフレーム) の挿入に関係するオプションがあります。
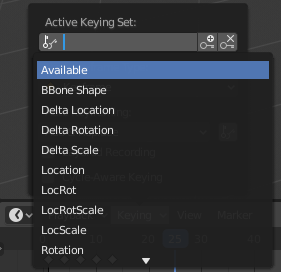
- Active Keying Set(アクティブなキーイングセット)

Timeline(タイムライン)のKeying Set(キーイングセット)。
Keying Sets are a set of keyframe channels in one. They are made so the user can record multiple properties at the same time. With a keying set selected, when you insert a keyframe, Blender will add keyframes for the properties in the active Keying Set. There are some built-in keying sets, LocRotScale, and also custom keying sets. Custom keying sets can be defined in the panels .
- Insert Keyframes (plus icon)
Insert keyframes on the current frame for the properties in the active Keying Set.
- Delete Keyframes (minus icon)
Delete keyframes on the current frame for the properties in the active Keying Set.
- New Keyframe Type(新規キーフレームタイプ)
Keyframe Types on insertion.
- Cycle-Aware Keying(ループ対応キー挿入)
Trivially cyclic curves に対して Keyframe(キーフレーム) を挿入する時、Cycle の整合性を保ったままハンドルが適用されます。(既存の Cycle を微調整する際にとても便利です):
キー挿入を Cycle の基本周期の外側で行った際に、周期の内側へのキー挿入に変換されます。
終了キーの1つを上書きすると、それに応じてもう片方が更新されます。
In addition, when adding a new curve into an action with a Manual Frame Range and Cyclic Animation enabled, the curve is automatically made cyclic with the period matching the frame range. For convenience this check and conversion is also done before adding the second keyframe to such a curve.
Auto Keying Popover

Timeline(タイムライン)のAuto Keyframe(自動キーフレーム)。
The record button (⏺) enables Auto Keyframe: It will add and/or replace existing keyframes for the active object when you transform it in the 3D Viewport. For example, when enabled, first set the Playhead to the desired frame, then move an object in the 3D Viewport, or set a new value for a property in the UI.
When you set a new value for the properties, Blender will add keyframes on the current frame for the transform properties. Other use cases are Fly/Walk Navigation to record the walk/flight path and Lock Camera to View to record the navigation in camera view.
注釈
Note that Auto Keyframe only works for transform properties (objects and bones), in the 3D Viewport (i.e. you can't use it e.g. to animate the colors of a material in the Properties...).
- Add & Replace / Replace
This controls how the auto keyframe mode works. Only one mode can be used at a time.
- Add & Replace(追加と置換)
Add or replace existing keyframes.
- Replace(置き換え)
既存 Keyframe(キーフレーム) への置き換えのみを行います。
- Only Active Keying Set(アクティブキーイングセットのみ)
When enabled, new keyframes for properties will be inserted into the active Keying Set.
- Layered Recording(レイヤーレコーディング)
Adds a new NLA Track and strip for every loop/pass made over the animation to allow non-destructive tweaking.
Header Controls
The Timeline header controls.

Timeline header controls.
1. Popovers for Playback and Keying, 2. Transport Controls, 3. Frame Controls
トランスポート コントロール
These buttons are used to set, play, rewind, the Playhead.

トランスポート コントロール。
- Jump to Start (❙⏴) Shift-Left
This sets the cursor to the start of frame range.
- Jump to Previous Keyframe (◆⏴) Down
This sets the cursor to the previous keyframe.
- Rewind (◀) Shift-Ctrl-Spacebar
This plays the animation sequence in reverse. When playing the play buttons switch to a pause button.
- Play (▶) Spacebar
This plays the animation sequence. When playing the play buttons switch to a pause button.
- Jump to Next Keyframe (⏵◆) Up
This sets the cursor to the next keyframe.
- Jump to End (⏵❙) Shift-Right
This sets the cursor to the end of frame range.
- Pause (⏸) Spacebar
This stops the animation.
フレームコントロール
- Current Frame(現在のフレーム) Alt-Wheel
The current frame of the animation/playback range. Also the position of the Playhead.
- Preview Range (clock icon)
This is a temporary frame range used for previewing a smaller part of the full range. The preview range only affects the viewport, not the rendered output. See Preview Range.
- Start Frame(開始フレーム)
The start frame of the animation/playback range.
- End Frame(最終フレーム)
The end frame of the animation/playback range.

