Snapping(スナップ)
参照
- Mode(モード)
Object Mode(オブジェクトモード)、Edit Mode(編集モード)、Pose Mode(ポーズモード)
- ヘッダー
- ショートカットキー
Shift-Tab
Snapping lets you easily align objects and mesh elements to others. It can be toggled by clicking the magnet icon in the 3D Viewport's header, or more temporarily by holding Ctrl.

3D Viewport(3Dビューポート)ヘッダーの磁石アイコン(有効な場合は青)。
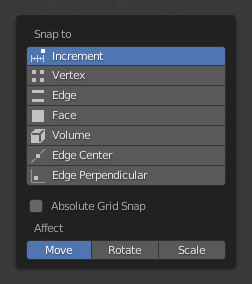
Snap(スナップ) メニュー。
Snap To(スナップ先)
参照
- Mode(モード)
Object Mode(オブジェクトモード)、Edit Mode(編集モード)、Pose Mode(ポーズモード)
- ヘッダー
- ショートカットキー
Shift-Ctrl-Tab
Determines the target which the selection will be snapped to.
- Increment(増分)
Snaps to grid points. When in Orthographic view, the snapping increment changes depending on the zoom level.
注釈
By default, this option won't snap to the grid that's displayed in the viewport, but an imaginary grid with the same resolution that starts at the selection's original location. In other words, it lets you move the selection in "increments" of the grid cell size.
If you want to snap to the viewport grid instead, you can enable Absolute Grid Snap (see below).
- Vertex(頂点)
Snaps to the nearest vertex of a mesh object.
- Edge(辺)
Snaps to the nearest point on the nearest edge.
- Face Project
Snaps to the face by projecting the current point on the nearest face. This snap mode will snap geometry to both visible and occluded. This snap mode is useful for retopologizing.
- Face Nearest
Snaps to the nearest surface in world space. This snap mode will only snap geometry to visible (non occluded) geometry.
- Volume(ボリューム)
Snaps to regions within the volume of the first object found below the mouse cursor. Unlike the other options, this option controls the depth (i.e. Z coordinates in current view space) of the transformed element. By toggling Snap Peel Object (see below), target objects will be considered as a whole when determining the volume center.
- Edge Center(辺の中心)
Snaps to the centerpoint of the nearest edge.
- Edge Perpendicular(辺と直交する点)
Snaps to a specific point on the nearest edge so that the line from the selection's original location (indicated by a white cross) to its new location is perpendicular to that edge.
ちなみに
Multiple snapping modes can be enabled at once using Shift-LMB.
Snap With(スナップ方法)
参照
- Mode(モード)
Object Mode(オブジェクトモード)、Edit Mode(編集モード)、Pose Mode(ポーズモード)
- ヘッダー
- ショートカットキー
Shift-Ctrl-Tab
Determines what part of the selection will coincide with the target. (The rest of the selection will follow along.)
- Active(アクティブ)
Snaps using the origin (in Object Mode) or center (in Edit Mode) of the active element.
- Median(中点)
Snaps using the median of the selection.
- Center(中心)
Snaps using the current transformation center (another word for the pivot point). This option is especially useful in combination with the 3D Cursor for choosing the snapping point completely manually.
- Closest(近接)
Snaps using the vertex that's closest to the target.
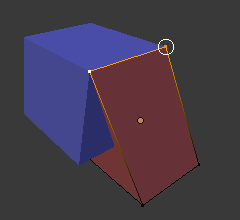
Closest(近接)。 |
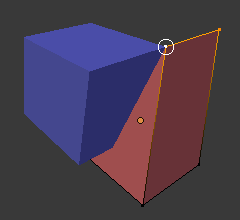
Active(アクティブ)。 |
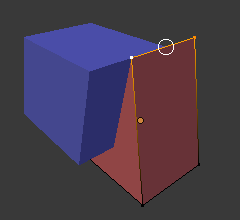
Median(中点)。 |
Target Selection
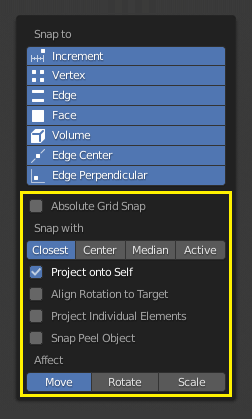
As seen in the yellow highlighted area in the image above, besides the snap target, additional controls are available to alter snap behavior. These options vary between mode (Object and Edit) as well as snap target. The available options are:
- Include Active
Only available in Edit Mode. Allows snapping mesh elements to other elements of the same mesh.
This checkbox is ignored if Proportional Editing is enabled.
- Include Edited Edit Mode
Snap onto non-active objects in Edit Mode.
- Include Non-Edited Edit Mode
Snap onto objects not in Edit Mode.
- Exclude Non-Selectable
Snap only onto objects that are selectable.
- Absolute Grid Snap(絶対グリッドスナップ)
Only available if Snap To Increment is enabled. Snaps to the grid, instead of snapping in increments relative to the current location.
- Backface Culling(裏面を非表示)
Exclude back-facing geometry from snapping.
- Align Rotation to Target(ターゲットに回転を揃える)
Rotates the selection so that its Z axis gets aligned to the normal of the target.
- Project Individual Elements(個々の要素を投影)
Only available if Snap To Face is enabled. Rather than the default behavior where only the "Snap With" point gets snapped to the target and the rest of the selection follows along (maintaining the original shape), this option makes each object (in Object Mode) or vertex (in Edit Mode) snap to a target independently of the others, which may cause the selection's shape to change.
This can be used for bending a flat sheet so it snugly fits against a curved surface, for example.
- Snap to Same Target Face Nearest
Snap only to target that source was initially near.
- Face Nearest Steps Face Nearest
Number of steps to break transformation into for face nearest snapping. This option is only available in Edit mode.
- Snap Peel Object(皮オブジェクトにスナップ)
Only available if Snap To Volume is enabled. Consider objects as a whole when finding volume center.
Affect(影響)
Specifies which transformations are affected by snapping. By default, snapping only happens while moving something, but you can also enable it for rotating and scaling.
複数のスナップターゲット
While you're transforming a selection with snapping enabled, you can press A whenever there's a highlighted snap target to mark it. With multiple such targets marked, the selection will then be snapped to their average location.
Marking a target more than once will give it more weight.
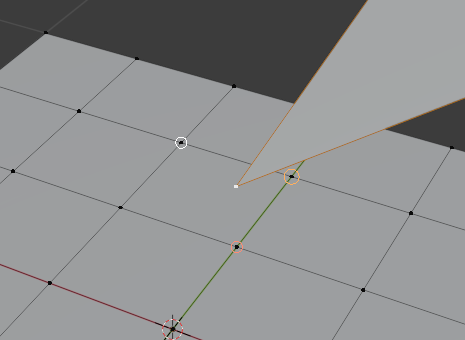
複数のスナップターゲット。