Bone Positioning Guide
Face Bones
Start by identifying basic face landmarks to follow as guide for bones placement.
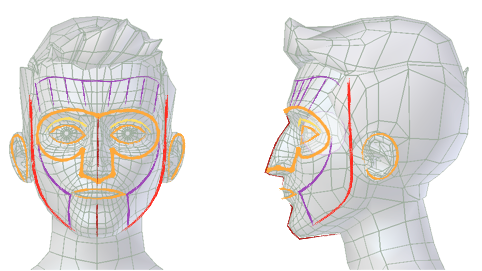
Basic Face Landmarks.
Orange lines represent bones that should be placed in closed loops.
Yellow lines represent bones whose position depends on surrounding bone loops.
Red lines represent outer edge bones.
Purple lines represent bridging bones used to cover deforming flesh.
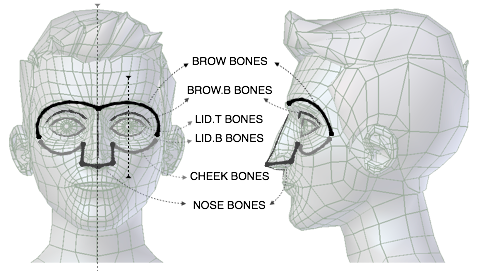
Eyes-Nose Landmarks.
The eyes-nose loop area is split in different parts identified by bone names. Follow the image to place the bones.
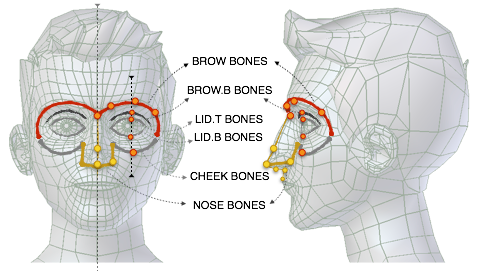
Eyes-Nose Bone Positions.
팁
Brow Placement
Keeping aligned the mid bones in “brow”, “brow.b”, “lid.t”, “lid.t” and cheek will give better results after rig generation.
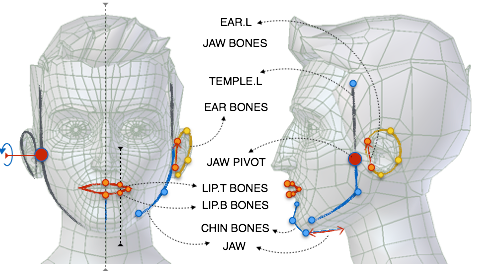
Jaw-Ear Bone Positions.
Also the jaw-ear area is split in different parts identified by bone names. Follow the image to place the bones.
팁
Jaw Placement
Try to place “ear.L” bone covering the part of the ear attached to the mandible (lower jaw). Do the same with temple bone trying to cover the part you don’t want to move with the jaw, this way you will also determine the jaw pivot position.
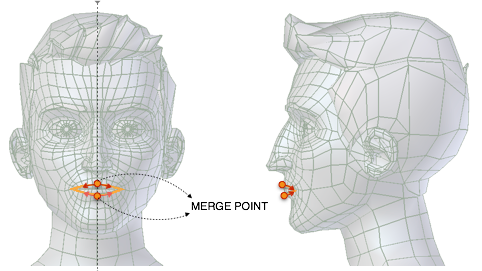
Lips Merge Point.
경고
While moving the face bones it is necessary to preserve merge points, i.e. whenever heads or tails of two or more bones overlap at the same point, they should still do so after repositioning. Tearing a merge point apart may result in multiple controls being created instead of one, or even the generation of errors.
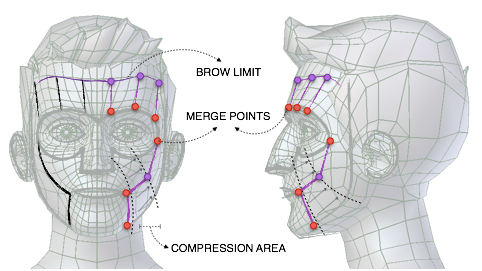
Face Stretcher Bones.
After the main face bones are placed use the cheek bone to connect the eye-nose area to the jaw mouth area. Then do the same with the brow area. This process will automatically define face muscles compression areas.
Position the eye bones in the eye pivot point facing right toward the face on the Y axis.
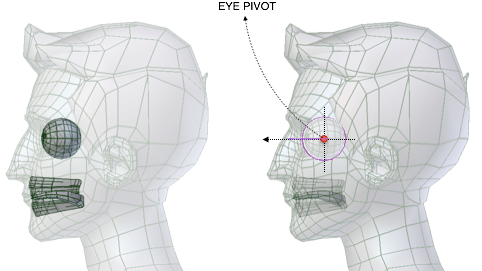
Eyes Pivot Position.
팁
Eye Pivot
If your eye has a spherical shape you can define its pivot by entering Edit Mode. Select two opposite vertices on the center meridian – or the opposite poles – and snapping the cursor to selection by pressing . If your eye is a complete sphere and its location it’s not applied, then you can just use its center of mass.
Finally position the teeth bones on your teeth geometry and the tongue bone chain as described in the figure.
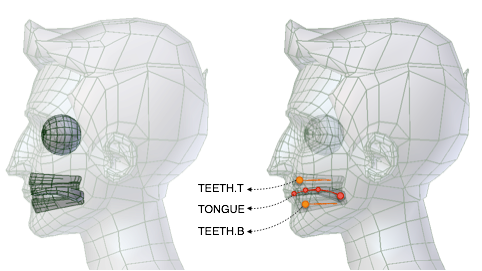
Mouth and Teeth Positions.
팁
Tongue
The tongue will work better if the bones are aligned at the symmetry line.
Before generating the rig ensure the face master bone is facing upward.
Torso Bones
Start by identifying on your character basic torso zones to follow as guide for bones placement.
Head, chest and pelvis are rigid zones, so they require less bones. Having a good edge loop placement around zone boundaries on your model will help in having correct deformation after armature binding.
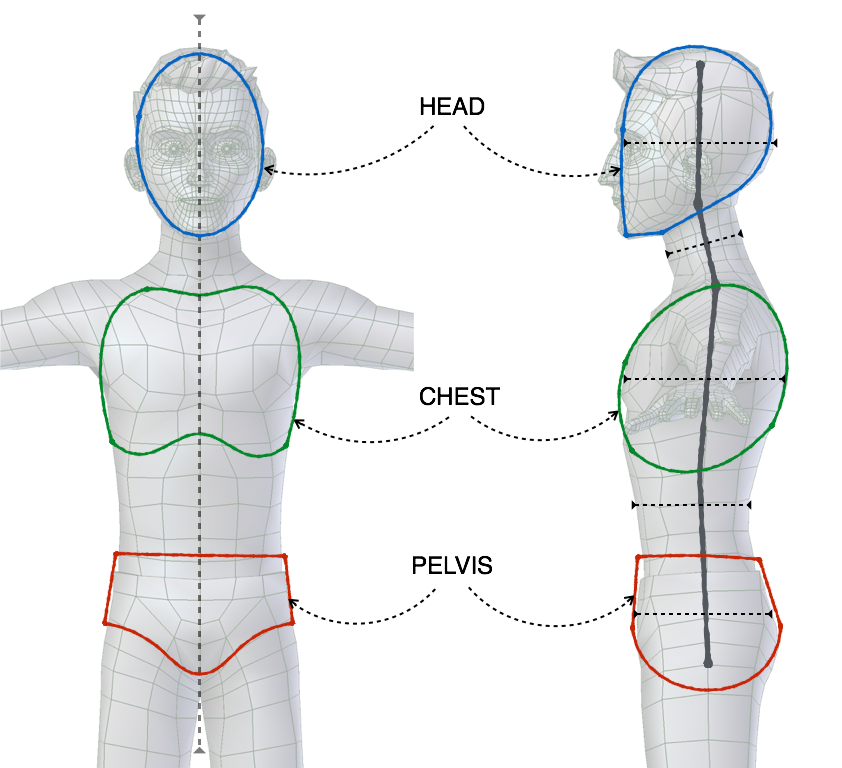
Torso Landmarks.
Starting from the side view, place the main spine bones trying to use one bone for the rigid areas and two for the flexible ones. In addition to the main spine, the torso is provided with additional pelvis bones (to oppose the leg bending), two breast controls and two shoulder bones.
Even if the pelvis bones will not appear in the final rig as controls, they will contribute to deformation.
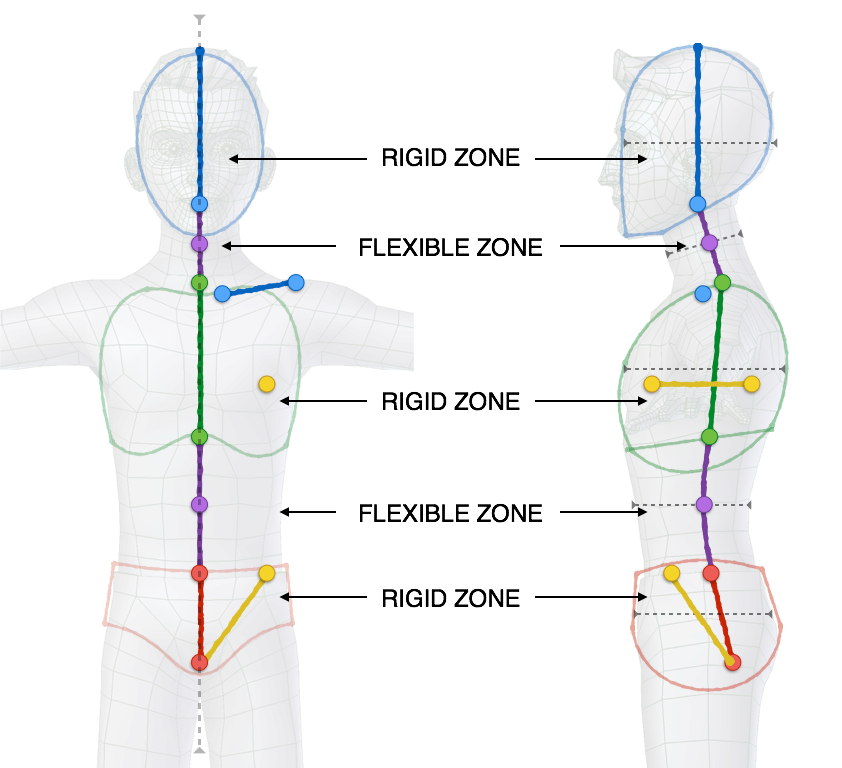
Torso Bones Positioning.
팁
Bone Placement
Try to keep the spine as centered as possible inside the mesh bounding volume, just apply a slight offset toward the back. In a similar way, consider the shoulder bones as general deformers; placing it too forward – where the collar bone should be – could cause undesired deformations.
Limbs Bones
While placing the arm bones try to start having a straight line that goes from the shoulder to the hand in both front and top view. After this is done just add a slight bend to the elbow. This can be easily done by going in the top view, entering armature Edit Mode and sliding the bone junction between forearm and upper_arm slightly toward the world’s Y axis.
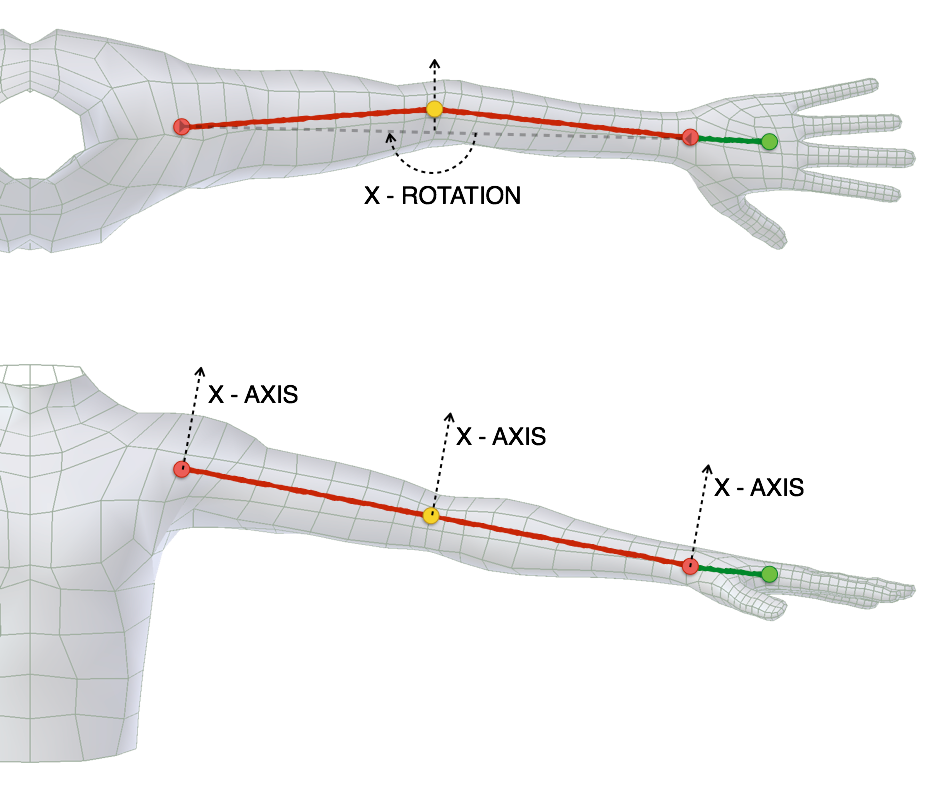
Arm Bones Positioning.
For the leg you can follow a similar process. Start by aligning the leg bones creating a straight line from the hips to the ankle, then place the foot and the toe accordingly. Remember to add a slight bend to the knee. This can be easily done by going in the side view, entering armature Edit Mode and sliding the bone junction between thigh and shin slightly toward the world’s Y axis.
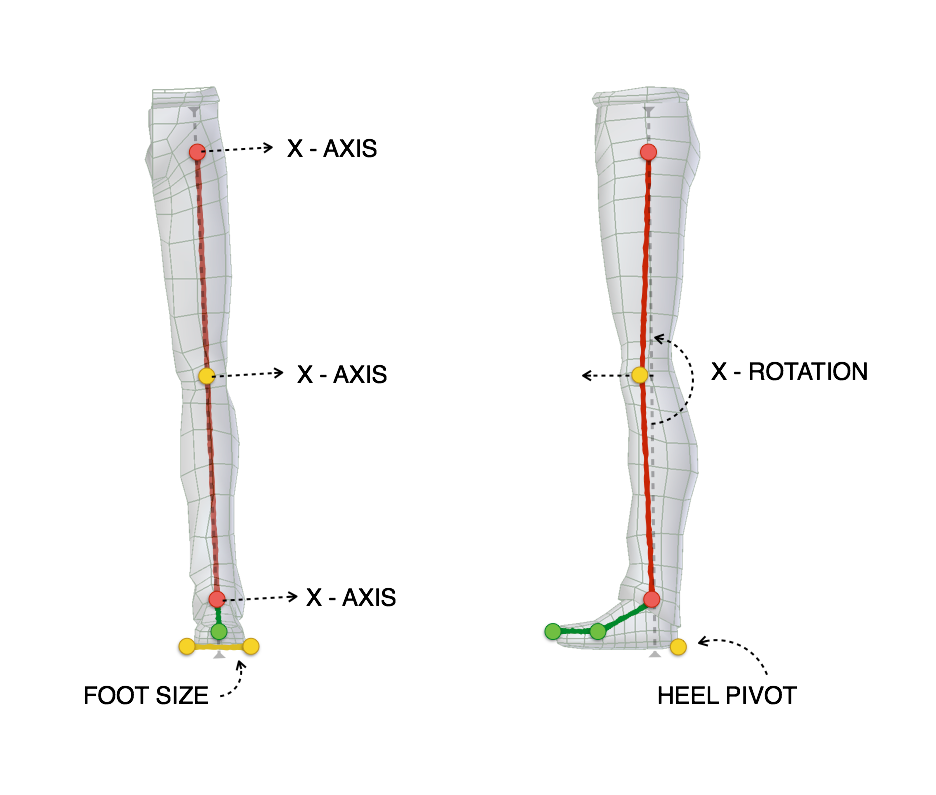
Leg Bones Positioning.
Finally align the heel bone by going in the front view and placing the head and tail to fill the foot size from side to side. Then, in the side view, align the bone at the point where the heel just touches the ground floor.
참고
From version 0.5 and above there is no more need of manual bone rolls alignment. The generate function will take care of that for you by evaluating it from bend axis; just insert a slight bend in your limb and it’s done! If you need more control on the orientation, follow the guidelines described in Advanced Usage.
Fingers Bones
Start by placing, finger by finger, all the knuckles in place.
팁
Fingers Placement
An easy and effective method to do this operation is to select on the mesh the corresponding edge loop in Edit Mode and use the Cursor to Selection snap. Then you can snap the bone to the corresponding loop using the Selection to Cursor snap.
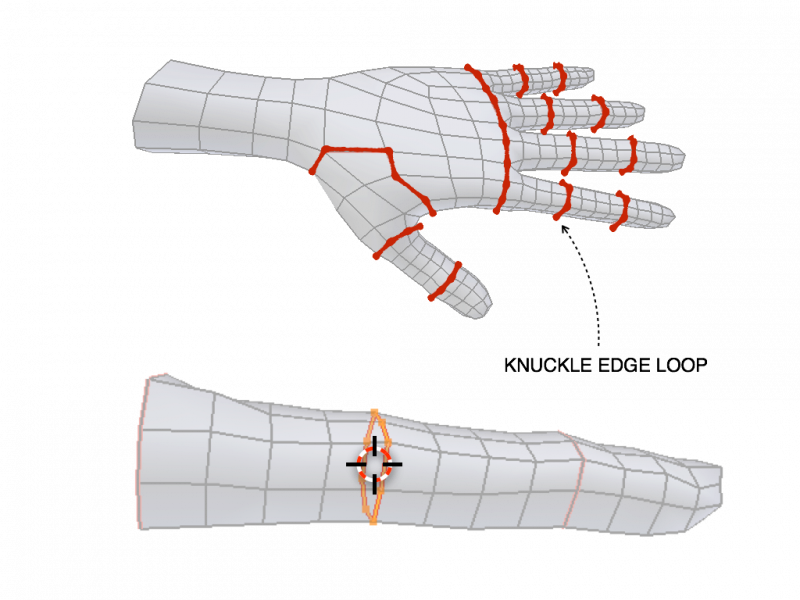
Knuckles Edge Loops and Cursor Snapping.
Finalize the positioning by taking care of bone rolls (the X axis is set as bend axis).
팁
Bone Roll
Finger axis alignment can be easily be made consistent by selecting all the finger bones and recalculating the bone rolls .
Thumb may require more tweaking depending on your character’s mesh topology, usually is a good starting point.
Once your bone rolls are consistent, try generating the rig and scaling the finger master controls. This should cause the fingers to curl. If they are rotating on the wrong axis, change the Bend Rotation Axis parameter on the first finger’s parameters under Rigify Type.
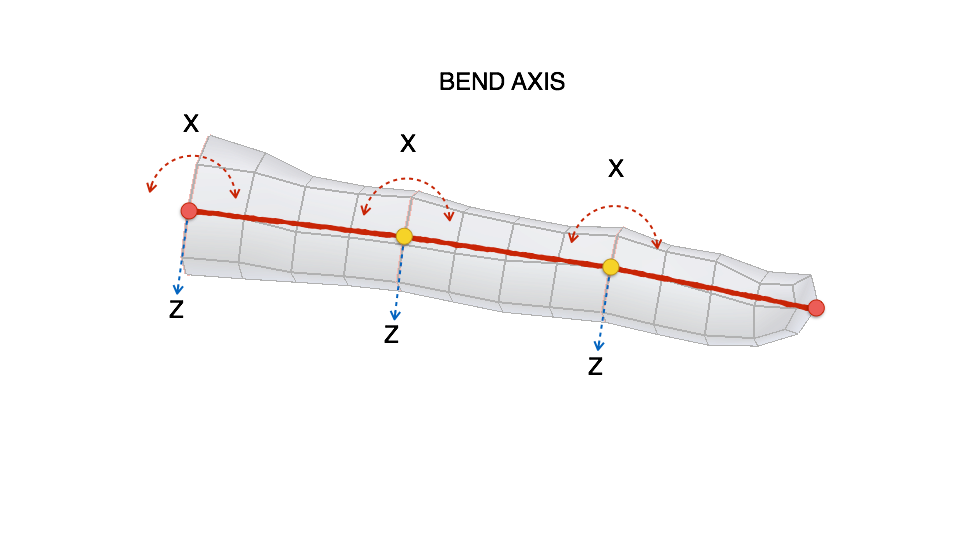
Fingers Bend Axis.
When the fingers are in place proceed placing the palm bones.
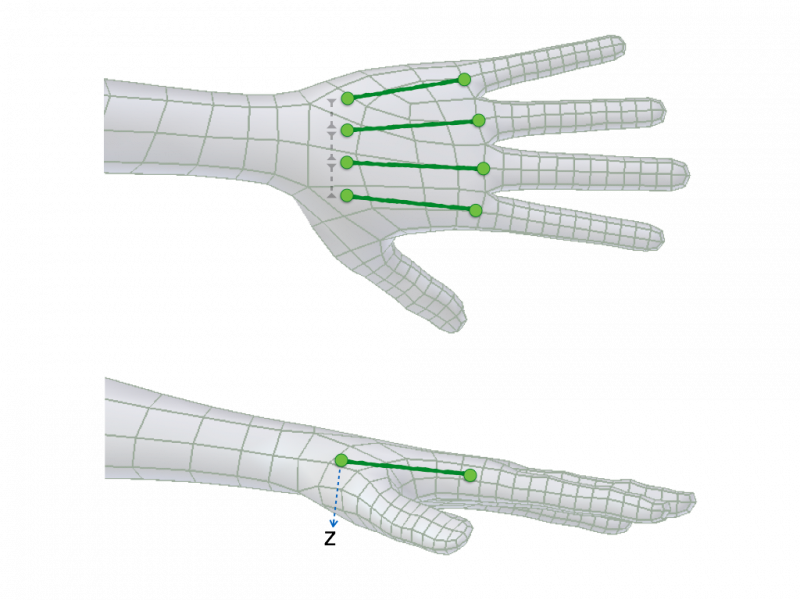
Palm Alignment.
팁
Palm Placement
Try to keep palm bones’ heads at a little distance between each other. This distance is required for Rigify to define the palm controls hierarchy. Palm axis alignment can be easily done by selecting all the palm bones and recalculating the bone rolls .
더 보기
For more detailed information on bones and rolls refer to the Bone Structure and Bone Roll.