Ambient Occlusion
Ambient Occlusion is a sophisticated ray-tracing calculation which simulates soft global illumination shadows by faking darkness perceived in corners and at mesh intersections, creases, and cracks, where ambient light is occluded, or blocked.
There is no such thing as AO in the real world; AO is a specific not-physically-accurate (but generally nice-looking) rendering trick. It basically samples a hemisphere around each point on the face, sees what proportion of that hemisphere is occluded by other geometry, and shades the pixel accordingly.
It is got nothing to do with light at all; it is purely a rendering trick that tends to look nice because generally in real-world surfaces that are close together (like small cracks) will be darker than surfaces that do not have anything in front of them, because of shadows, dirt, etc.
The AO process, though, approximates this result; it is not simulating light bouncing around or going through things. That is why AO still works when you do not have any lights in the scene, and it is why just switching on AO alone is a very bad way of «lighting» a scene.
You must have ray tracing enabled as a Render panel option in the Shading section for this to work.
You must have an ambient light color set as you desire. By default, the ambient light color (world) is black, simulating midnight in the basement during a power outage. Applying that color as ambient will actually darken all colors. A good outdoor mid-day color is RGB(0.9, 0.9, 0.8) which is a whitish yellow sunny kind of color on a bright-but-not-harshly-bright day.
Options
The World panel with ambient color sliders highlighted.
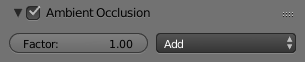
- Factor
- The strength of the AO effect, a multiplier for addition.
Ambient Occlusion is composited during the render. Two blending modes are available:
- Add
- The pixel receives light according to the number of non-obstructed rays. The scene is lighter. This simulates global illumination.
- Multiply
- Ambient occlusion is multiplied over the shading, making things darker.
Nota
If Multiply is chosen, there must be other light sources; otherwise the scene will be pitch black. In the other two cases the scene is lit even if no explicit light is present, just from the AO effect. Although many people like to use AO alone as a quick shortcut to light a scene, the results it gives will be muted and flat, like an overcast day. In most cases, it is best to light a scene properly with Blender’s standard lamps, then use AO on top of that, set to Multiply, for the additional details and contact shadows.
The Gather panel contains settings for the ambient occlusion quality. Note that these settings also apply to Environment Lighting and Indirect Lighting.
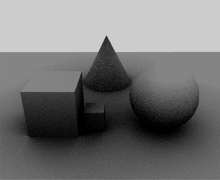
Ambient occlusion has two main methods of calculation: Raytrace and Approximate.
Gather
Raytrace
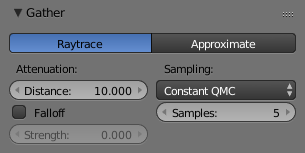
The Ambient Occlusion panel, Raytrace method.
The Raytrace method gives the more accurate, but also the more noisy results. You can get a nearly noiseless image, but at the cost of render time… It is the only option if you want to use the colors of your sky’s texture.
- Attenuation
- Length of rays defines how far away other faces may be and still have an occlusion effect. The longer this distance, the greater impact that far away geometry will have on the occlusion effect. A high Distance value also means that the renderer has to search a greater area for geometry that occludes, so render time can be optimized by making this distance as short as possible for the visual effect that you want.
Sampling
- Sampling Method
- Constant QMC
- The base Quasi-Monte Carlo, gives evenly and randomly distributed rays.
- Adaptive QMC
An improved method of QMC, that tries to determine when the sample rate can be lowered or the sample skipped, based on its two settings:
- Threshold
- The limit below which the sample is considered fully occluded («black») or un-occluded («white»), and skipped.
- Adapt to Speed
- A factor to reduce AO sampling on fast-moving pixels. As it uses the Vector render pass, that must also be enabled (see render passes page).
Nota
About QMC
See also the ray-traced shadows page for more info about the Quasi-Monte Carlo sampling method.
- Constant Jittered
The historical sample method, more prone to «bias» artifacts…
- Bias
The angle (in radians) the hemisphere will be made narrower (i.e. the hemisphere will no longer be a real hemisphere: its section will no longer be a semicircle, but an arc of a circle of: pi - bias radians).
The bias setting allows you to control how smooth «smooth» faces will appear in AO rendering. Since AO occurs on the original faceted mesh, it is possible that the AO light makes faces visible even on objects with «smooth» on. This is due to the way AO rays are shot, and can be controlled with the Bias slider. Note that while it might even happen with QMC sampling methods, it is much more visible with the Constant Jittered one and anyway, you have no Bias option for QMC.
24×24 UV Sphere with Bias: 0.05 (default). Note the facets on the sphere’s surface even though it is set to smooth.
Raising the Bias to 0.15 removes the faceted artifacts.
- Samples
The number of rays used to detect if an object is occluded. Higher numbers of samples give smoother and more accurate results, at the expense of slower render times. The default value of 5 is usually good for previews. The actual number of rays shot out is the square of this number (i.e.*Samples* at 5 means 25 rays). Rays are shot at the hemisphere according to a random pattern (determined by the sample methods described above); this causes differences in the occlusion pattern of neighboring pixels unless the number of shot rays is big enough to produce good statistical data.

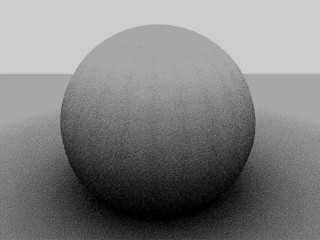
Ambient Occlusion with 3 Samples.

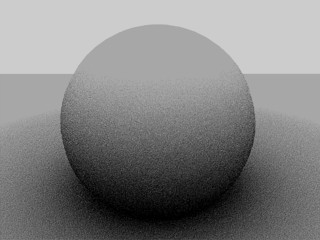
Ambient Occlusion with 6 Samples.
Ambient Occlusion with 12 Samples.
Approximate
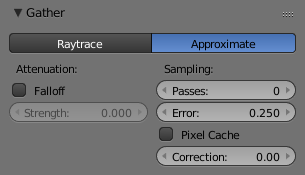
The Ambient Occlusion panel, Approximate method.
The Approximate method gives a much smoother result for the same amount of render time, but as its name states, it is only an approximation of the Raytrace method, which implies it might produce some artifacts and it cannot use the sky’s texture as the base color.
This method seems to tend to «over-occlude» the results. You have two complementary options to reduce this problem:
- Passes
- Set the number of pre-processing passes, between (0 to 10) passes. Keeping the pre-processing passes high will increase render time but will also clear some artifacts and over-occlusions.
- Error
- This is the tolerance factor for approximation error (i.e. the max allowed difference between approximated result and fully computed result). The lower, the slower the render, but the more accurate the results… Ranges between (0.0 to 10.0), defaults to 0.250.
- Pixel Cache
- When enabled, it will keep values of computed pixels to interpolate it with its neighbors. This further speeds up the render, generally without visible loss in quality…
- Correction
- A correction factor to reduce over-occlusion. Ranges between (0.0 to 1.0) correction.
Common Settings
- Falloff
When activated, the distance to the occluding objects will influence the «depth» of the shadow. This means that the further away the occluding geometry is, the lighter its «shadow» will be. This effect only occurs when the Strength factor is higher than 0.0. It mimics light dispersion in the atmosphere…
- Strength
- Controls the attenuation of the shadows enabled with Use Falloff. Higher values give a shorter shadow, as it falls off more quickly (corresponding to a more foggy/dusty atmosphere). Ranges from (0.0 to 10.0), default is 0.0, which means no falloff.
Technical Details
Ambient occlusion is calculated by casting rays from each visible point, and by counting how many of them actually reach the sky, and how many, on the other hand, are obstructed by objects.
The amount of light on the point is then proportional to the number of rays which have «escaped» and have reached the sky. This is done by firing a hemisphere of shadow rays around. If a ray hits another face (it is occluded) then that ray is considered «shadow», otherwise it is considered «light». The ratio between «shadow» and «light» rays defines how bright a given pixel is.
Hints
Ambient occlusion is a ray-tracing technique (at least with the Raytrace method), so it tends to be slow. Furthermore, performance severely depends on octree size, see the rendering chapter for more information.