Python Console
The Python Console is a quick way to execute commands, with access to the entire Python API, command history and auto-complete.
Its a good way to explore possibilities, which can then be pasted into larger scripts.
Introduction
Accessing Built-in Python Console
By pressing Shift-F4 in any Blender Editor type (3D View, Timeline, etc.) you can change it to a Console Editor.
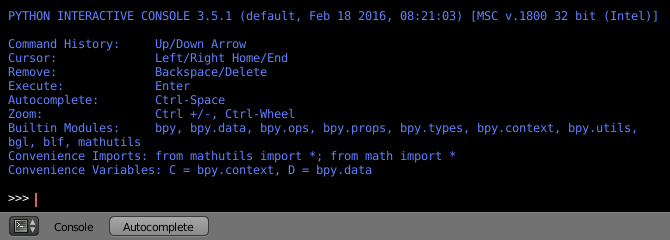
The command prompt is typical for Python 3.x,
the interpreter is loaded and is ready to accept commands at the prompt >>>.
First Look at the Console Environment
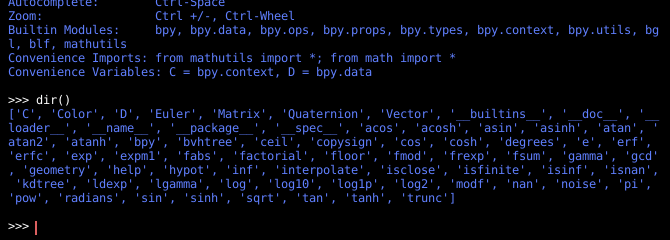
To check what is loaded into the interpreter environment, type dir()
at the prompt and execute it.
Auto Completion
Now, type bpy. and then press Ctrl-Spacebar and you will see the Console
auto-complete feature in action.
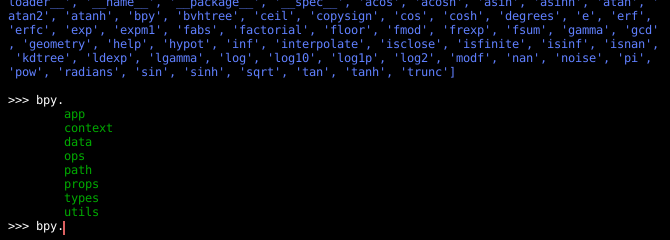
You will notice that a list of sub-modules inside of bpy appear. These modules encapsulate all
that we can do with Blender Python API and are very powerful tools.
Lets list all the contents of bpy.app module.
Notice the green output above the prompt where you enabled auto-completion.
What you see is the result of auto completion listing.
In the above listing all are module attributed names,
but if you see any name end with (, then that is a function.
We will make use of this a lot to help our learning the API faster.
Now that you got a hang of this, lets proceed to investigate some of modules in bpy.
Before Tinkering with the Modules
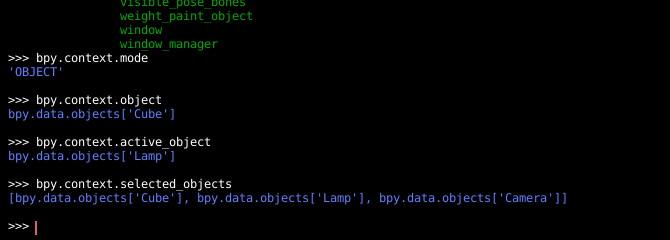
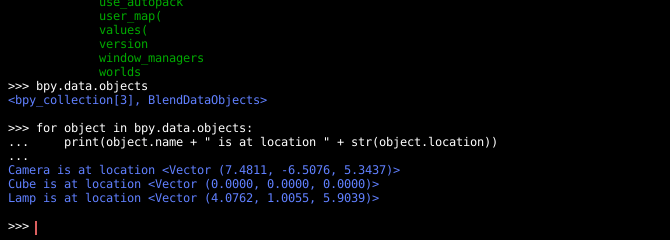
If you look at the 3D View in the default Blender scene, you will notice three objects: Cube, Lamp and Camera.
- All objects exist in a context and there can be various modes under which they are operated upon.
- At any instance, only one object is active and there can be more than one selected object.
- All objects are data in the blend-file.
- There are operators/functions that create and modify these objects.
For all the scenarios listed above (not all were listed, mind you…)
the bpy module provides functionality to access and modify data.
Examples
bpy.context
Примечание
For the commands below to show the proper output, make sure you have selected object(s) in the 3D View.
Try It Out!
- bpy.context.mode
- Will print the current 3D View mode (Object, Edit, Sculpt, etc.).
- bpy.context.object or bpy.context.active_object
- Will give access to the active object in the 3D View.
Change X location to a value of 1:
bpy.context.object.location.x = 1
Move object from previous X location by 0.5 unit:
bpy.context.object.location.x += 0.5
Change X, Y, Z location:
bpy.context.object.location = (1, 2, 3)
Change only the X, Y components:
bpy.context.object.location.xy = (1, 2)
Data type of object’s location:
type(bpy.context.object.location)
Now that is a lot of data that you have access to:
dir(bpy.context.object.location)
bpy.context.selected_objects- Will give access to a list of all selected objects.
Type this and then press Ctrl-Spacebar:
bpy.context.selected_objects
To print out the name of first object in the list:
bpy.context.selected_objects[0]
The complex one… But this prints a list of objects not including the active object:
[obj for obj in bpy.context.selected_objects if obj != bpy.context.object]
bpy.data
bpy.data has functions and attributes that give you access to all the data in the blend-file.
You can access following data in the current blend-file: objects, meshes, materials, textures, scenes, screens, sounds, scripts, etc.
That is a lot of data.
Try It Out!
Exercise
After Return twice it prints the names of all objects belonging to the Blender scene with name «Scene»:
for obj in bpy.data.scenes['Scene'].objects: print(obj.name)
Unlink the active object from the Blender scene named „Scene“:
bpy.data.scenes['Scene'].objects.unlink(bpy.context.active_object)
bpy.data.materials['Material'].shadows

bpy.data.materials['Material'].shadows = False
bpy.ops
The tool system is built around the concept of operators. Operators are typically executed from buttons or menus but can be called directly from Python too.
See the bpy.ops API documentation for a list of all operators.
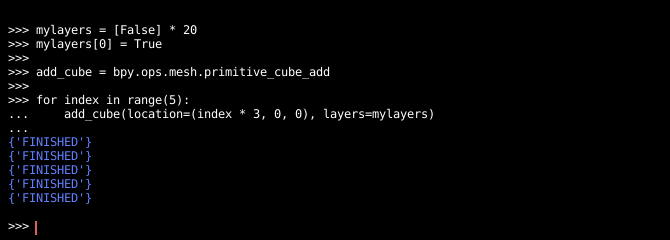
Lets create a set of five Cubes in the 3D View. First, delete the existing Cube object by selecting it and pressing X.
Try It Out!
The following commands are used to specify that the objects are created in layer 1. So first we define an array variable for later reference:
mylayers = [False] * 20
mylayers[0] = True
We create a reference to the operator that is used for creating a cube mesh primitive:
add_cube = bpy.ops.mesh.primitive_cube_add
Now in a for loop, we create the five objects like this (in the screenshot above, another method is used): Press Return twice after entering the command at the shell prompt:
for index in range(5):
    add_cube(location=(index * 3, 0, 0), layers=mylayers)
Usage
Aliases
Some variables and modules are available for convenience:
C: Quick access tobpy.context.D: Quick access tobpy.data.bpy: Top level Blender Python API module.
Key Bindings
- Up / Down – Cycle command history.
- Left / Right – Cursor motion.
- Ctrl-Left / Ctrl-Right – Cursor motion, by word.
- Backspace / Delete – Erase characters.
- Tab – Indent.
- Shift-Tab – Unindent.
- Ctrl-Backspace / Ctrl-Delete – Erase words.
- Ctrl-Spacebar – Auto complete.
- Return – Execute command.
- Shift-Return – Add to command history without executing.
- Ctrl-C – Copy the selection.
- Ctrl-V – Paste into the command line.