Timeline Editor
The Timeline editor, identified by a clock icon, is not much of an editor, but more used to view information and control animation playback.

The Timeline.
The Timeline is one of an animator’s most useful tools as it can give a broad overview of a scene’s animation. The Timeline can communicate the current time frame, either in frames or in seconds, where the keyframes are of the active object, the start and end frames of your animation, markers, etc.
The Timeline has Player Controls, to play, pause the animation, and to skip though parts of the scene.
It also has some tools for Keyframes, Keying Sets, and Markers.
Main View
The main Timeline region displays the animation frames over time.

Timeline main view.
Adjusting the View
The Timeline can be panned by holding MMB, then dragging the area left or right.
You can zoom the Timeline by using Ctrl-MMB, the mouse Wheel, or pressing NumpadMinus and NumpadPlus.
Time Cursor
The Time Cursor is the green line, it is used to set and display the current time frame.

Time Cursor.
The Time Cursor can be set or moved to a new position by pressing or holding LMB in the Timeline editor.
The current frame or second can be displayed on the Time Cursor, check the View menu for settings.
The Time Cursor can be moved in steps by pressing Left or Right, or in steps of 10 frames by pressing Shift-Up or Shift-Down.
Playback/Rendering Range
By default, the Playback/Rendering Range (Frame Start 1 to Frame End 200) is a lighter shade of gray. The start and end frame can be set to the Time Cursor by pressing S or E. The Playback Range can also be set by pressing P then drawing a box.
Keyframes
For the active and selected objects, keyframes are displayed as a yellow line. For Armatures, the object keyframes and the pose bones keyframes are drawn.
Only Selected Channels can be enabled. . For Armatures, this will draw the object keyframes, and the keyframes for the active and selected pose bones.
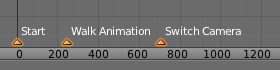
Markers
See the Markers page for more information.
Header
Menus
View Menu
The View Menu controls what you see, and what it looks like.
- Show Seconds Ctrl-T
- Whether to show the time in the X axis and the Time Cursor as frames (based on the FPS) or as seconds.
- Lock Time to Other Windows
- It synchronizes the horizontal panning and scale of the current editor with the other editors (Graph, Dope Sheet, NLA) when this option is set. That way you always have these editors showing an identical part of the time you work on.
- Show Frame Number Indicator
- This will draw the current frame or seconds on the Time Cursor.
- Only Keyframes from Selected Channels
- For Armatures, this will draw the object keyframes, and the keyframes for the active and selected pose bones.
- Cache
- Show Cache
Show all enabled types.
Softbody, Particles, Cloth, Smoke, Dynamic Paint, Rigid Body.

Timeline Cache.
- View All Home
- Maximize the area based on the Animation Range.
- View Frame Numpad0
- Centers the Timeline to the Time cursor.
- Bind Camera to Markers Ctrl-B
- This is used switch cameras during animation. It binds the active camera to the selected markers. First select a camera. Then select the marker(s). Then use the tool.
Markers Menu
Markers are used to denote frames with key points or significant events within an animation. Like with most animation editors, markers are shown at the bottom of the editor.
Markers in animation editor.
For descriptions of the different marker tools see Editing Markers.
Header Controls
The Timeline header controls.

Timeline header controls.
Range Control
- Use Preview Range (clock icon)
- This is an alternative range used to preview animations. This works for the UI playback, this will not work for rendering an animation. See Preview Range.
- Lock Time Cursor to Playback Range (padlock icon)
- This limits the Time Cursor to the Playback Range.
Frame Control
- Start Frame
- The start frame of the animation/playback range.
- End Frame
- The end frame of the animation/playback range.
- Current Frame Alt-Wheel
- The current frame of the animation/playback range. Also the position of the Time Cursor.
Player Control
These buttons are used to set, play, rewind, the Time Cursor.

Player controls.
- Jump to start (⏮) Shift-Ctrl-Down, Shift-Left
- This sets the cursor to the start of frame range.
- Jump to previous keyframe (⏪) Down
- This sets the cursor to the previous keyframe.
- Rewind (◀) Shift-Alt-A
- This plays the animation sequence in reverse. When playing the play buttons switch to a pause button.
- Play (▶) Alt-A
- This plays the animation sequence. When playing the play buttons switch to a pause button.
- Jump to next keyframe (⏩) Up
- This sets the cursor to the next keyframe.
- Jump to end (⏭) Shift-Ctrl-Up, Shift-Right
- This sets the cursor to the end of frame range.
- Pause (⏸) Alt-A
- This stops the animation.
Synchronize Playback
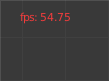
3D View red FPS.
When you play an animation, the FPS is displayed at the top left of the 3D View. If the scene is detailed and playback is slower than the set Frame Rate (see Dimensions Panel), these options are used to synchronize the playback.
- No Sync
- Do not sync, play every frame.
- Frame Dropping
- Drop frames if playback is too slow. This enables Frame Dropping from the Playback Menu.
- AV-sync
- (Audio/Video Synchronization). Sync to audio clock, dropping frames if playback is slow. This enables AV-sync and Frame Dropping from the Playback Menu.
Keyframe Control
- Auto Keyframe

Timeline Auto Keyframe.
The record button (red dot) enables something called Auto Keyframe: It will add and/or replace existing keyframes for the active object when you transform it in the 3D View.
For example, when enabled, first set the Time Cursor to the desired frame, then move an object in the 3D View, or set a new value for a property in the UI.
When you set a new value for the properties, Blender will add keyframes on the current frame for the transform properties. Other use cases are Fly/Walk Mode to record the walk/flight path and Lock Camera to View to record the navigation in camera view.
- Auto Keying Set (red record icon)
- When enabled Auto Keyframe will insert new keyframes for the properties in the active Keying Set.
- Layered (two keys icon)
- Adds a new NLA Track and strip for every loop/pass made over the animation to allow non-destructive tweaking.
Примечание
Note that Auto Keyframe only works for transform properties (objects and bones), in the 3D Views (i.e. you can’t use it e.g. to animate the colors of a material in the Properties editor…).
- Keyframe Type
- Keyframe Types on insertion.
- Active Keying Set

Timeline Keying Sets.
Keying Sets are a set of keyframe channels in one. They are made so the user can record multiple properties at the same time. With a keying set selected, when you insert a keyframe, Blender will add keyframes for the properties in the active Keying Set. There are some built-in keying sets, LocRotScale, and also custom keying sets. Custom keying sets can be defined in the panels .
- Insert Keyframes (key icon)
- Insert keyframes on the current frame for the properties in the active Keying Set.
- Delete Keyframes (striked through key icon)
- Delete keyframes on the current frame for the properties in the active Keying Set.