Skeleton
参考
- 模式
所有模式
- 面板
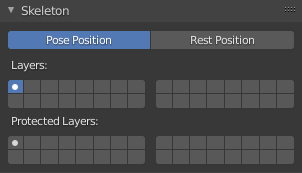
Skeleton panel.
In this panel you can arrange sets of bones into different layers for easier manipulation.
- 姿态位置
单选按钮可在姿态位置和静置位置之间切换。
在 编辑模式 中,您总是可以看到骨架处于静置位置,在 物体模式 和 姿态模式 中,默认情况下,您可以看到它们处于 姿态位置 (即在 姿态模式 中转换)。如果您希望看到它在所有模式下处于静置位置,请选择 静置位置。
- Armature Layers
Each armature has 32 layers to organize armatures by "regrouping" them into sets of bones. Only bones in active layers will be visible/editable, but they will always be effective (i.e. move objects or deform geometry), whether in an active layer or not. This property changes which layers are visible in the 3D Viewport. To show several layers at once, Shift-LMB on the desired layers to view. To move bones to a given layer, use Change Bone Layers.
- Protected Layers
You can lock a given bone layer for all Proxies of your armature, i.e. all bones in this layer will not be editable.
Note
Protected Layers in proxy are restored to proxy settings on file reload and undo.