Texture & Texture Mask
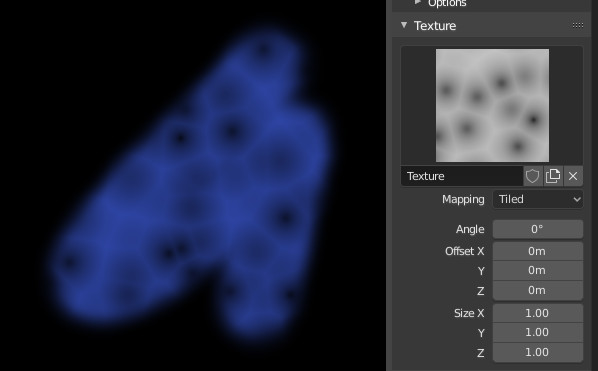
This page covers both the Texture and Texture Mask panels. Add a Texture to the brush to control the color of the brush. A Texture Mask is used to control the strength of the brush. Both the Texture and Texture Mask offer the same settings.

Example of the Texture panel and a textured brush in use.
- 纹理
在绘制模式中,纹理被用作颜色源,而在雕刻模式则是用来确定画笔的强度。
Any image texture or procedural texture can be assigned in the texture and texture mask panels. Textures can be further edited in the properties editor (Click the properties icon for quick access)
Tip
It's recommended to load all needed images ahead of time as image textures into Blender. Then they can be easily selected by clicking on the texture and picking it from the data-block popup. Textures can also be appended/linked from other Blender files.
- Mapping & Mask Mapping
How the texture is applied to the brush stroke.
Tip
It is recommended to set this to Area Plane or View Plane for the most common behavior. Ideally match this setting with the Sculpt Plane setting if in sculpt mode.
- 视图面:
If View Plane is enabled, the current viewing angle is used to project the brush texture onto the model. This is especially useful for projection painting.
- 区域面:
Projects the brush texture along the local surface normal, which keeps the texture from stretching on steep angles. This is an ideal default for most brushes.
- 平铺:
The Tile option repeats the texture across the screen, so moving the brush will not change where the texture is applied. The Tile option is most useful with tileable images, rather than procedural textures.
- 3D:
3D 选项允许笔刷充分利用程序纹理。此模式使用顶点坐标而不是笔刷位置来确定要使用的纹理区域。
This option is not available for the Texture Mask.
- 随机:
Picks a random texture coordinate to sample from for each step of the stroke.
- 镂版:
This is the ideal option for stamping textures for projection painting. Stencil mapping works by projecting the texture from the camera space on the mesh or canvas. Painting is applied only inside the boundaries of the stencil. The stencil is displayed as a screen space overlay on the viewport. To transform the stencil texture use the following shortcuts (Hold Alt for the Texture Mask):
移动 RMB
缩放 Shift-鼠标右键
旋转 Ctrl-鼠标右键
While using stencil scaling, X and Y are used to constrain the scaling to one axis. Pressing one of the buttons twice reverts to unconstrained scaling.
- 图像宽高比
恢复原始图像的长宽比,以重置缩放引入的拉伸,(仅图像纹理。)如果在 调整上一步操作 面板中启用了相关的刷子纹理的平铺和缩放值,该操作可以使用。
- 重置变换
恢复钢网的位置。
- 压力遮罩
Only available for the Texture Mask. It allows to clip the mask result based on pressure.
- 关闭:
Disabled.
- 渐变:
Fades out the mask effect on higher pressure.
- 截止:
Expands the used values from the image based on stylus pressure.
- 角度 Ctrl-F
This is the rotation angle of the texture brush. It can be changed interactively via Ctrl-F in the 3D Viewport. While rotating the angle via the hotkey you can enter a value numerically as well.
- 变向
Texture angle follows the direction of the brush stroke. Useful for stamping textures repeatedly along the stroke. Not available with 3D, Tiled, or Stencil Mapping types. The shortcut is not available in Sculpt mode.
- 随机
Angle is randomized on each step of the stroke. Not available with 3D, Tiled, or Stencil Mapping types. The shortcut is not available in Sculpt mode.
- 随机角
限制随机偏差范围。
- 偏移 X, Y, Z
纹理贴图在X,Y和Z轴上的位置偏移。
- 大小 X, Y, Z
Set the scale of the texture in each axis.
- 样本偏差 雕塑模式 。
Value added to texture samples. This can be used if the midlevel of a height map is not correct.
- Vector Displacement Sculpt Mode
Use the color channels to displace geoemtry in 3 vectors.
Note
This is only supported for the Draw brush with Area Plane mapping enabled.