时间线#
The Timeline editor is used to jump to different frames, manipulate keyframes, and control animation playback.
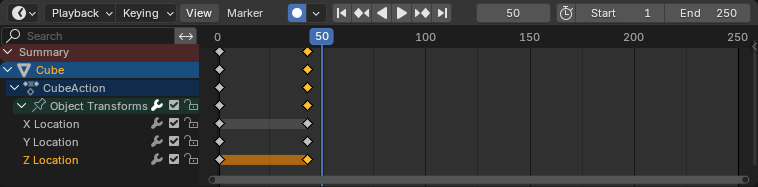
时间线。#
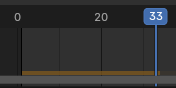
主视图#
The X axis represents time, with the numbers 0/50/100/... being frame numbers. The blue line is the Playhead indicating the current frame, and the diamond shapes are Keyframes, points where you specified a certain value for a certain property at a certain time.
调整视图#
Panning is done by dragging MMB.
Zooming is done by dragging Ctrl-MMB, rolling the mouse Wheel, or pressing NumpadMinus/NumpadPlus.
You can also use the scrollbars located at the bottom and the right of the editor.
播放头#
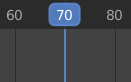
播放头。#
The Playhead is the blue vertical line showing the current frame number.
It can be moved to a new position by clicking or dragging LMB in the scrubbing area at the top.
You can also move it in single-frame increments by pressing Left or Right, or jump to the beginning or end frame by pressing Shift-Left or Shift-Right.
帧范围#
The Frame Range determines the length of the scene's animation. By default, it's set to start at frame 1 and end at frame 250. You can change this using the Start/End inputs in the Timeline header, or in the Output Properties.
关键帧#
By default, the timeline only shows keyframes for selected items. You can make it show all keyframes by unchecking .
You can click a keyframe to select it (and deselect all others), or click it while holding Shift to add it to the selection (or remove it if it was already selected). You can also drag a box to select multiple keyframes in one go.
To move the selected keyframes, simply drag one of them. Alternatively, you can press G, move the mouse, and click LMB to confirm (or RMB to cancel). You can also press S to scale the keyframes in relation to the Playhead.
标记#
有关详细信息,请参阅 标记页面。
标题栏#

Popovers for Playback and Keying; transport controls; and frame controls#
菜单#
回放弹出菜单#
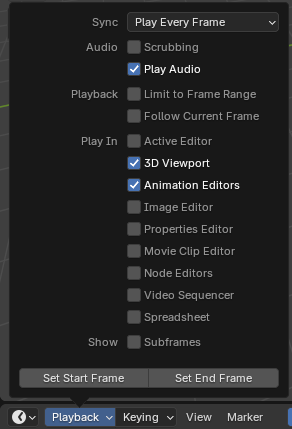
- 同步
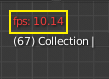
3D视图红色帧速率(FPS)。#
If animation playback can't keep up with the desired Frame Rate, the actual frame rate (shown in the top left corner of the 3D Viewport) will turn red, and the Sync option determines how the situation should be handled.
- 播放每一帧
Play every frame, even if this results in the animation playing slower than intended.
- 丢帧
如果播放速度慢于场景的帧频,则丢帧。
- 同步到音频
如果播放速度太慢而无法与音频保持同步,则丢帧。
- 音频
- 拖擦播放
Play bits of the sound in the animation (if there is any) while you drag the Playhead around.
- Play Audio
Uncheck to mute all sound.
- 回放
- Limit to Frame Range
Don't allow moving the Playhead outside of the Frame Range using the mouse.
- 跟随当前帧
Automatically pan the view to catch up when the Playhead goes off screen.
- 播放位置
Which editors to update on each animation frame. If an editor is unchecked, it'll only be updated once playback stops (with some exceptions where it'll update on each frame anyway).
- 显示
- 子帧
显示并允许更改当前场景子帧。
- Set Start/End Frame
Set the scene's start/end frame to the current frame. If the Preview Range is active (see Frame Controls), that one is changed instead.
插帧弹出菜单#
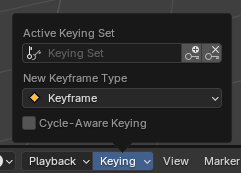
插帧 弹出菜单包含影响关键帧插入的选项。
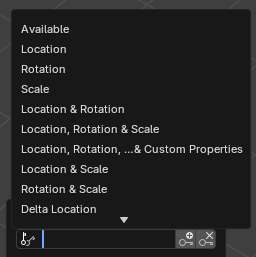
- 活动插帧集
时间线插帧集。#
A Keying Set is a named collection of animatable properties. If you select one and then press I while not hovering over any input field, Blender will create keyframes for the properties in that keying set.
If you don't have a keying set selected, you'll get keyframes on a default set of properties instead (e.g. Location/Rotation/Scale for objects).
There are a number of predefined keying sets, but you can also create your own in the Keying Sets panel.
- Insert Keyframes (plus icon) I
Insert keyframes on the current frame.
- Delete Keyframes (cross icon) Alt-I
Delete keyframes on the current frame.
- 新建关键帧类型
The keyframe type for newly created keyframes.
- 循环感知插帧
当将关键帧插入 简单循环曲线 时,将应用特殊处理来保持循环完整性(在调整已建立的循环时最有用):
如果在循环的主时间范围之外尝试键插入,则将其重新映射回范围内。
当覆盖其中一个结束键时,另一个也会相应地更新。
In addition, when adding a new curve into an action with a Manual Frame Range and Cyclic Animation enabled, the curve is automatically made cyclic with the period matching the frame range. For convenience, this check and conversion is also done before adding the second keyframe to such a curve.
Auto Keying#
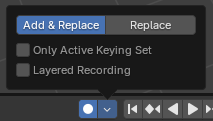
Auto Keying button.#
When the record button (⏺) is enabled, Blender will automatically create keyframes on the current frame whenever you transform an object or bone in the 3D Viewport (or change one of its transform properties in the Properties Editor).
One special use case is to record a camera path as you fly through the scene. See Fly/Walk Navigation.
Note
Auto Keying only works for transform properties (Location, Rotation, Scale). It won't create a keyframe if you change, say, the color of a material -- you still have to do that manually.
- 模式
- 添加&替换
Add or replace keyframes as needed.
- 替换
仅替换已有的关键帧。
- 仅活动插帧集
By default, Auto Keying will create keyframes even for properties that are not in the active keying set. Use this checkbox to change that.
- 分层记录
Adds a new NLA Track for every pass made over the animation to allow non-destructive tweaking.
菜单#
视图菜单#
- 调整上一步操作
显示一个弹出面板,用于更改上次完成的操作的属性。请参阅: 调整上一步操作 。
- 通道
Show or hide the Channels region (the tree of objects and animatable properties on the left).
- 框显全部 Home
Pans and zooms the view so that all keyframes are visible.
- 转到当前帧 Numpad0
将播放头置于时间线中心。
- 显示标记
Shows the Markers region (if any markers are defined). When disabled, the Marker Menu is also hidden and marker operators are not available in this editor.
- 显示为秒 Ctrl-T
Shows the time on the X axis and the Playhead as timestamps instead of frame numbers. A timestamp such as
01:03+02means "1 minute, 3 seconds, 2 frames."- 同步可见范围
Synchronizes the horizontal panning and scale of the editor with other time-based editors that also have this option set. That way, they always show the same section of time.
- 仅显示选中
Only show keyframes related to the selected items. This could be objects, bones, nodes, and so on.
- 仅显示错误信息
Only show curves and drivers that are disabled or have errors. Useful for debugging.
- 缓存
- 显示缓存
Which simulation caches to show on the timeline.
Baked simulations will be shown as fully opaque, cached simulations will be slightly transparent, and invalid caches will be slightly transparent with dark diagonal stripes.
时间线缓存。#
- 面光
Area controls. See the user interface documentation for more information.
Marker Menu#
Markers are used to denote frames with key points or significant events within an animation. Like in most animation editors, they're shown at the bottom of the Timeline.

Markers in an animation editor.#
有关不同标记工具的说明,请参阅 编辑标记。
播放控制#
These buttons are used to set the current frame and control playback.

传输控制。#
- 跳转到开头(❙⏴) Shift-Left
Sets the Playhead to the start of the frame range.
- 跳转到前一关键帧(◆⏴) Down
Moves the Playhead to the previous keyframe.
- 倒放 (◀) Shift-Ctrl-空格键
Starts playing the animation in reverse.
- 播放 (▶) 空格键
Starts playing the animation.
- 跳转到下一个关键帧(⏵◆) Up
Moves the Playhead to the next keyframe.
- 跳到结尾(⏵❙) Shift-Right
Sets the Playhead to the end of the frame range.
- 暂停 (⏸) 空格键
Stops playing the animation.
帧控制#
- 当前帧 Alt-Wheel
The number of the frame that's currently being displayed in the 3D Viewport. This is also the location of the Playhead.
- Use Preview Range (clock icon)
The Preview Range is an alternative Frame Range that you can use for focusing on a particular part of the animation. It lets you repeatedly play a short segment without having to manually rewind or change the frame range of the entire scene.
This range only affects the preview in the 3D Viewport; it doesn't affect rendering.
The boundaries of the Preview Range are shown in dark orange. You can quickly configure and enable it by pressing P and dragging a box. To disable it, you can press Alt-P.
- Start/End Frame
The start/end frame of the scene (or the preview range, if active).