The vital functions
Relevant to Blender v2.31
Loading files
Blender uses the .blend file format to save nearly everything: Objects, scenes, textures, and even all your user interface window settings.
To load a Blender file from disk, press F1. The focused window then temporarily transforms into the File Selection Window as shown in Figure 18. The bar on the left can be dragged with LMB for scrolling. To load a file, select it with LMB and press ENTER, or simply click it with MMB.
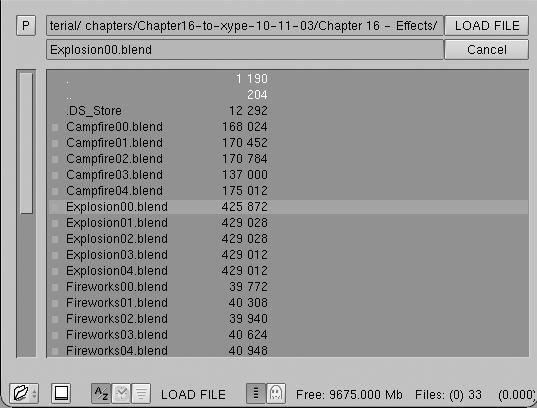
The upper text box displays the current directory path, and the lower one contains the selected filename. The P button (PKEY) moves you up to the parent directory and the button with the dash maintains a list of recently used paths. On Windows operating systems, the latter also contains a list of all drives (C:, D:, etc).
 | Blender expects that you know what you are doing! When you load a file, you are not asked to save unsaved changes to the scene you were previously working on: completing the file load dialog is regarded as being enough confirmation that you didn't do this by accident. Make sure that you save your files. |
Saving files
Saving files is like loading files: When you press F2, the focused window temporarily changes into a File Selection Window, as shown in Figure 19. Click the lower edit box to enter a filename. If it doesn't end with ".blend," the extension is automatically appended. Then press ENTER to write the file. If a file with the same name already exists, you will have to confirm that you want to save the file at the overwrite prompt.
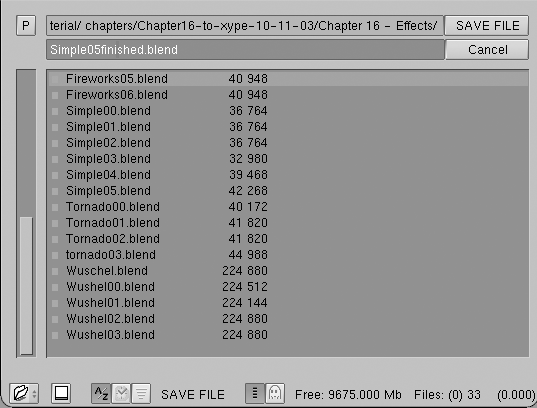
The save dialog contains a little feature to help you to create multiple versions of your work: Pressing NUM+ or NUM- increments or decrements a number contained in the filename. To simply save over the currently loaded file and skip the save dialog, press CTRL-W instead of F2 and just confirm at the prompt.
Rendering
This section will give you only a quick overview of what you'll need in order to render your scene. You'll find a detailed description of all options in the chapter called Rendering.
The render settings are in the Scene Context and
Rendering Buttons Sub-context
(Figure 20) which is reached by clicking
the
 , or
by pressing F10.
, or
by pressing F10.

For now we are only interested in the Format Panel. The size (number of pixels horizontally and vertically) and file format of the image to be created are picked here. You can set the size using the SizeX and SizeY buttons. Clicking the selection box below (in Figure 20, "Targa" is chosen) opens a menu with all available output formats for images and animations. For still images we might choose Jpeg, for example.
Now that the settings are complete, the scene may be rendered by hitting the RENDER button in the Render Panel or by pressing F12. Depending on the complexity of the scene, this usually takes between a few seconds and several minutes, and the progress is displayed in a separate window. If the scene contains an animation, only the current frame is rendered. (To render the whole animation, see the Section called Rendering Animations in the chapter called Rendering.)
If you don't see anything in the rendered view, make sure your scene is constructed properly. Does it have lighting? Is the camera positioned correctly, and does it point in the right direction? Are all the layers you want to render visible?
| A rendered image is not automatically saved to disk. If you are satisfied with the rendering, you may save it by pressing F3 and using the save dialog as described in the Section called Saving files. The image is saved in the format you selected previously in the DisplayButtons. |
 | File Extensions |
|---|---|
Blender does not add the type extension automatically to image files! You should type the extension explicitly, if you need it. |
User preferences and Themes
Blender has a few options that are not saved with each file, but which apply to all of a user's files instead. These preferences primarily concern user interface handling details, and system properties like mouse, fonts, and languages.
As the user preferences are rarely needed, they are neatly hidden behind the main menu. To make them visible, pull down the window border of the menu (usually the topmost border in the screen). The settings are grouped into seven categories which can be selected with the violet buttons shown in Figure 21.

Because most buttons are self-explanatory or display a helpful tool-tip if you hold the mouse still over them, we won't describe them in detail here. Instead, we will just give you an overview of the preference categories:
- View & Controls
Settings concerning how the user interface should react to user input, such as which method of rotation should be used in 3D views. Here you can also activate 3-button mouse emulation if you have a two-button mouse. MMB can then be input as ALT-LMB.
- Edit Methods
Lets you specify the details for the workings of certain editing commands like duplicate.
- Language & Fonts
Select an alternative TrueType font for display in the interface, and choose from available interface languages.
- Themes
Since version 2.30 Blender allows the utilization of Themes to define custom interface colors. You can create and manage themes from here.
- Auto Save
Auto saves can be set so that you will have an emergency backup in case something goes wrong. These files are named Filename.blend1, Filename.blend2, etc.
- System & OpenGL
You should consult this section if you experience problems with graphics or sound output, or if you don't have a numerical keypad and want to emulate it (for laptops). Furthermore here you can set the light scheme for Solid and shaded draw modes.
- File Paths
Choose the default paths for various file load dialogs.
Setting the default scene
You don't like Blender's default window set-up, or want specific render settings for each project you start, or you want to save your Theme? No problem. You can use any scene file as a default when Blender starts up. Make the scene you are currently working on the default by pressing CTRL-U. The scene will then be copied into a file called .B.blend in your home directory.
You can clear the working project and revert to the default scene anytime by pressing CTRL-X. But remember to save your changes to the previous scene first!