Node Luminance Key
Node Luminance Key.
Le node Luminance Key détermine les objets d’arrière-plan objets en avant-plan par différence des niveaux de la luminance (brillance).
Stock footage of explosions, smoke or debris are normally shot against a solid, dark background rather than a green screen. This node can separate the foreground effect from the background. It can also be used for sky replacement for overexposed or gray skies that aren’t suitable for chroma keying.
Astuce
Dans la composition d’une séquence de quelque chose qui émet de la lumière et possède un arrière-plan sombre, comme le feu, un Node Mix utilisant un opérateur Screen ou Add va produire de meilleurs résultats.
Entrées
- Image
- Entrée images standard.
Propriétés
- Limit
- High
- Determines the lowest values that are considered foreground. (Which is supposed to be – relatively – light: from this value to 1.0.)
- Low
- Determines the highest values that are considered to be background objects. (Which is supposed to be – relatively – dark: from 0.0 to this value.)
Note
Les niveaux de brillance entre les deux valeurs forment un gradient de transparence entre les objets d’avant-plan et d’arrière-plan.
Sorties
- Image
- Image with an alpha channel adjusted for the keyed selection.
- Matte
- Un masque alpha de la clé en noir et blanc.
Exemple
For this example the model was shot against a white background. Using the Luminance Key node, we get a matte out where the background is white, and the model is black; the opposite of what we want. If we wanted to use the matte, we have to switch the white and the black. How to do this? Color Ramp node to the rescue – we set the left color to White Alpha 1.0, and the right color to be Black Alpha 0.0. Thus, when the Color Ramp gets in black, it spits out white, and vice versa. The reversed mask is shown; her white outline is usable as an alpha mask now.
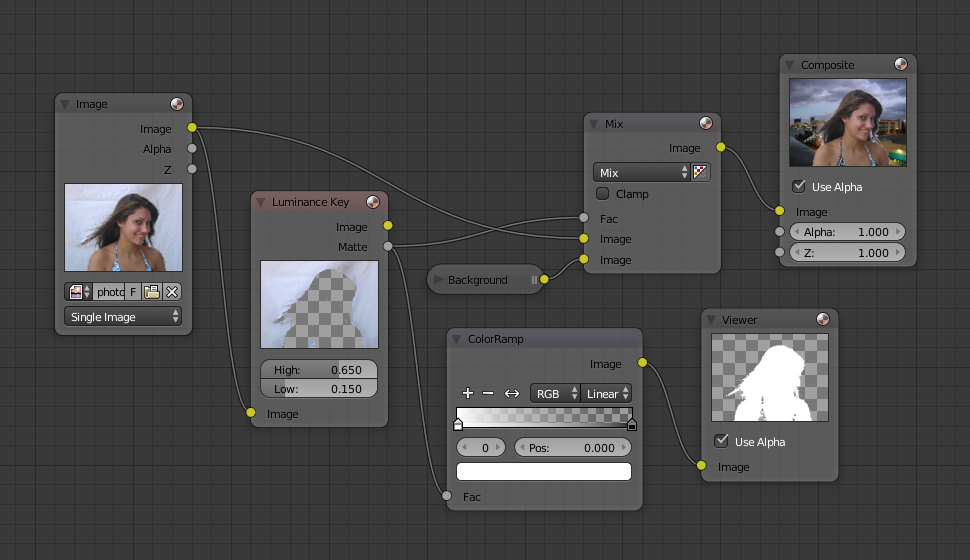
Using Luma Key with a twist.
Maintenant to mélanger, nous n’avons pas vraiment besoin du node Alpha Over ; nous ajustona simplement les nodes d’entrée. Comme ous pouvez le vopir, pusique le matte est blanc (1.0) là où nous ne voulons pas utiliser l’image du modèle, vous alimentons la photo de l’arrière-plan vers la prise du bas (rappelez-vous que le node mix utilise la prise du haut où le facteur est à 0.0, et la prise du bas où le facteur est à 1.0). l’alimentation de notre photo d’origine dans la prise du haut signifie qu’elle sera utilisée où le node Luminabce Key a craché du noir. Voilà, notre modèle est téléporté d’Atlanta à bord d’un navire de croisière amarré à Miami.