Snapping
There are two types of snap operations that you can use in Blender. The first type snaps your selection or cursor to a given point while the second type is used during transformations (move, rotate, scale) and snaps your selection to elements within the scene.
Transform Snapping
Référence
- Mode
Mode Objet, Édition et Pose
- Entête
- Raccourci
Maj-Tab
The ability to snap objects and mesh element to various types of scene elements during a transformation is available by toggling the magnet icon in the 3D View’s header buttons.
Icône aimant dans l’entête de la Vue 3D (bleu si activé).
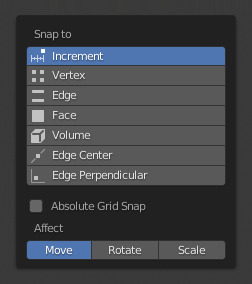
Snap Element
Référence
- Mode
Mode Objet, Édition et Pose
- Entête
- Raccourci
Maj-Ctrl-Tab
Menu Snap Element.
- Increment
Clipser aux points de grille. En mode Orthographique, l’incrément de clipsage change selon le niveau de zoom.
Note
Dans ce contexte la grille ne que la grille visuelle est affiché. La clipsable va utiliser la résolution de la grille affichée, mais toutes les transformations sont en rapport avec la position initiale (avant l’opération snap).
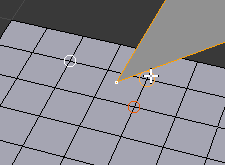
- Vertex
Clipser aux sommets des objets mesh.
- Edge
Clipser aux arêtes des objets mesh.
- Face
Snaps to the surfaces of faces in mesh objects; This is useful for retopologizing.
- Volume
Snaps to regions within the volume of the first object found below the mouse cursor. Unlike the other options, this one controls the depth (i.e. Z coordinates in current view space) of the transformed element. By toggling the button that appears to the right of the snap target menu (see below), target objects will be considered as a whole when determining the volume center.
- Edge Center
Snaps to the middle of an edge. This snap element only pertains to mesh objects.
- Edge Perpendicular
Snaps to the nearest vertex in an edge that makes a perpendicular angle. This snap element only pertains to mesh objects.
Astuce
Multiple snapping modes can be enabled at once by Shift-LMB the different snapping elements.
Snap Target
Référence
- Mode
Mode Objet, Édition et Pose
- Entête
- Raccourci
Maj-Ctrl-Tab
Snap target options become active when either Vertex, Edge, Face, or Volume is selected as the snap element. These determine what part of the selection snaps to the target objects.
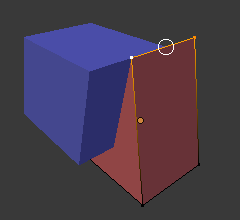
- Active
Déplace l’élément actif (somme en Mode Édition, objet en Mode Objet) vers la cible.
- Median
Déplace l’élément médian de la sélection vers la cible.
- Center
Moves the current transformation center to the target. Can be used with 3D cursor to snap with an offset.
- Closest
Déplace le point le plus proche de la sélection vers la cible.
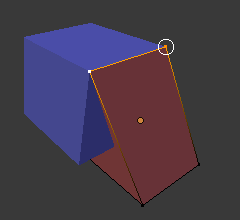
Closest.¶ |

Active.¶ |
Median.¶ |
Additional Snap Options
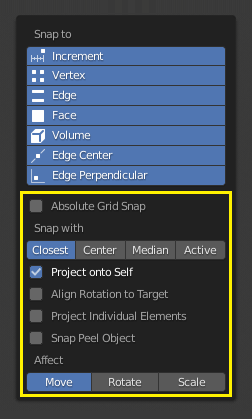
As seen by the yellow highlighted areas in the image above, besides the snap target, additional controls are available to alter snap behavior. These options vary between mode (Object and Edit) as well as Snap Element. The four options available are:
- Absolute Grid Snap
Available only for the increase option. Snap to grid, instead of snapping in increments relative to the current location.
- Backface Culling
Exclude back facing geometry from snapping.
- Project Onto Self
Available only in editing mode for Vertices, Edges, Faces and Volume. Snaps elements to its own mesh.
- Align Rotation to Target
Available for Vertices, Edges, Faces and Volume. When the Snap Affects Rotation, this align rotation with the snapping target.
- Project Individual Elements
Available for snap to Faces. Project individual elements on the surface of other objects.
- Snap Peel Object
Available for snap to Volume. Consider objects as whole when finding volume center.
- Affect
Limits the effect of the snap to the transformation type.
Multiple Snap Targets
Multiple snapping targets.
Once transforming a selection with Snapping on (not just when holding Ctrl), you can press A to mark the current snapping point, then proceed to mark as many other snapping points as you wish and the selection will be snapped to the average location of all the marked points.
Marking a point more than once will give it more weight in the averaged location.