Subdivision Surface Modifier
The Subdivision Surface modifier (often shorten to «Subdiv») is used to split the faces of a mesh into smaller faces, giving it a smooth appearance. It enables you to create complex smooth surfaces while modeling simple, low-vertex meshes. It avoids the need to save and maintain huge amounts of data, and gives a smooth «organic» look to the object.
As with any modifier, order of execution (position in the modifier stack) has an important bearing on the results.
Keep in mind that this is a different operation than its companion, Smooth Shading. You can see the difference between the two in the grid image below.
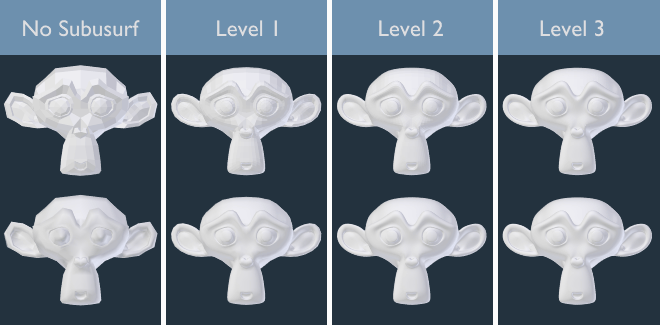
Subdivision levels 0 to 3, without and with Smooth Shading.
Dica
The Subdivision Surface modifier does not allow you to edit the new subdivided geometry without applying it, but the Multiresolution modifier does (in Sculpt Mode).
Nota
This modifier uses the OpenSubdiv library as a backend.
Opções
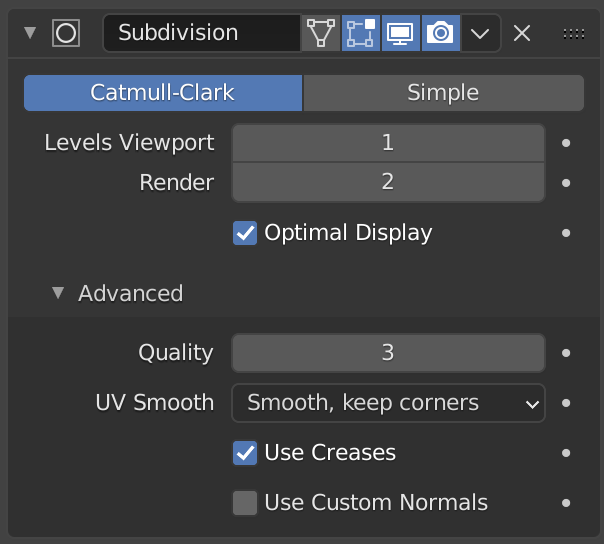
The Subdivision Surface modifier.
- Catmull-Clark
A opção padrão, subdivide e suaviza as superfícies. De acordo com a página do Wikipedia, a «fórmula de visual arbitrário foi escolhida por Catmull e Clark baseado na aparência estética da superfície resultante ao invés de uma derivação matemática.»
- Simples
Only subdivides the surfaces, without any smoothing (the same as the Subdivide operator, in Edit Mode). Can be used, for example, to increase base mesh resolution when using displacement maps.
- Levels Viewport, Render
The number of subdivision levels shown in the 3D Viewport or the final render.
Aviso
Higher levels of subdivisions results in more vertices, which means higher memory consumption (both system RAM, and video memory for display). This can cause Blender to hang or crash if not enough memory is available.
Dica
The right combination of these settings will allow you to keep a fast and lightweight approximation of your model when interacting with it in the 3D Viewport, but use a higher quality version when rendering.
Be careful not to set the Viewport subdivisions higher than the Render subdivisions, this would mean that the quality in the 3D Viewport will be higher than the rendered.
- Otimizar exibição
When rendering the wireframe of this object, the wires of the new subdivided edges will be skipped (only displays the edges of the original geometry).
Avançado
- Use Limit Surface
Places vertices at the surface that would be produced with infinite levels of subdivision (smoothest possible shape).
- Qualidade
When Use Limit Surface is enabled this property controls how precisely vertices are positioned on the limit surface (relatively to their theoretical position of an infinitely subdivided mesh). It can be lowered to get a better performance.
Using higher values does not necessarily mean real improvement in quality, ideal results might be reached well before the maximum Quality value.
Nota
This value can affect the accuracy of Edge Creases; using a higher Quality value will allow for a wider range of crease values to work accurately.
- UV Smooth
Controls how subdivision smoothing is applied to UVs.
- None
UVs remain unchanged.
- Keep Corners
UV islands are smoothed, but their boundary remain unchanged.
- Keep Corners, Junctions
UVs are smoothed, corners on discontinuous boundary and junctions of three or more regions are kept sharp.
- Keep Corners, Junctions, Concave
UVs are smoothed, corners on discontinuous boundary, junctions of three or more regions and darts and concave corners are kept sharp.
- Keep Boundaries
UVs are smoothed, boundaries are kept sharp.
- Todos
UVs and their boundaries are smoothed.
- Boundary Smooth
Controls how open boundaries (and corners) are smoothed.
- Todos
Smooth boundaries, including corners.
- Keep Corners
Smooth boundaries, but corners are kept sharp.
- Use Creases
Use the Pesos de influência nos vincos das arestas values stored in edges to control how smooth they are made.
- Use Custom Normals
Interpolates existing Custom Split Normals of the resulting mesh.
Atalhos de Teclado
To quickly add a Subdivision Surface modifier to one or more objects, select the object(s) and press Ctrl-1. That will add a Subdivision Surface modifier with Viewport subdivisions set to 1. You can use other numbers too, such as Ctrl-2, Ctrl-3, etc, to add a modifier with that number of subdivisions. Adding a Subdivision Surface modifier in this fashion will not modify the Render subdivisions.
If an object already has a Subdivision Surface modifier, doing this will simply change its subdivision level instead of adding another modifier.
Controle
Subdivisão Catmull-Clark arredonda arestas, e geralmente isso não é o que você quer. Existem diversas soluções que permitem você controlar a subdivisão.
Pesos de influência nos vincos das arestas
Weighted edge creases for subdivision surfaces allows you to change the way the Subdivision Surface modifier subdivides the geometry to give the edges a smooth or sharp appearance.
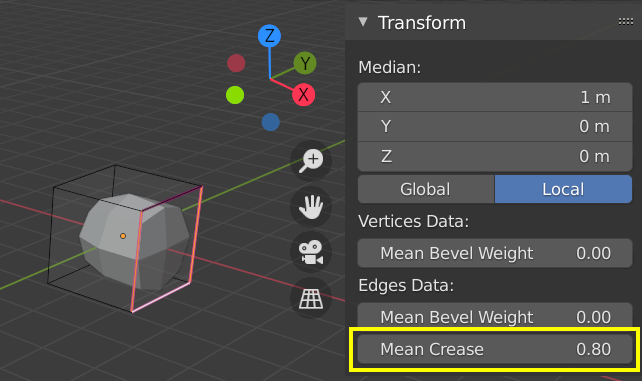
Um cubo subdividido com bordas vincadas.
The crease weight of selected edges can be changed in the Transform panel, Sidebar of the 3D Viewport. The scale-like dedicated tool Shift-E can also be used to adjust the crease weight. A higher value makes the edge «stronger» and more resistant to the smoothing effect of subdivision surfaces.
Anéis de arestas
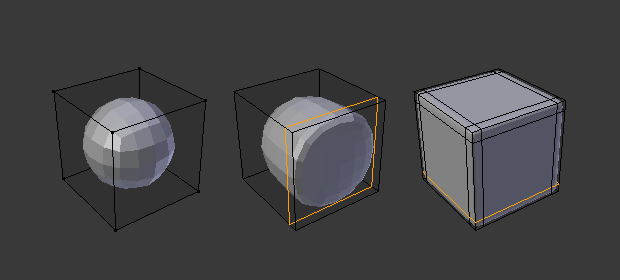
Cubo Subdivisão Nível 2, o mesmo com um Anel de Arestas extra, e o mesmo com seis Anéis de Arestas extra.
The Subdivision Surface modifier demonstrates why good, clean topology is so important. As you can see in the figure, it has a drastic effect on a default cube. Until you add in additional loops (with e.g. Loop Cut and Slide), the shape is almost unrecognizable as a cube.
A mesh with deliberate topology has good placement of edge loops, which allow the placement of more loops (or their removal) to control the sharpness/smoothness of the resultant mesh.
Known Limitations
Normais Não-Contíguas
O sistema de subdivisão do Blender produz boas malhas subdividas suaves, mas qualquer face subdividida (isto é, qualquer pequena face criada pelo algoritmo a partir de uma única face da malha original), compartilha a orientação geral normal da face original.
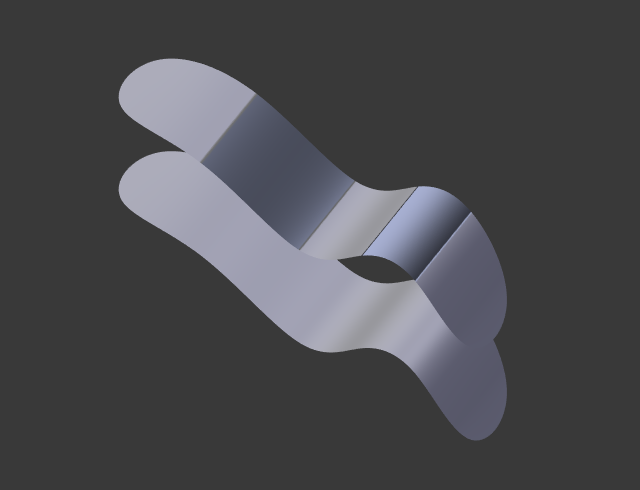
Comparação de boas normais e normais ruins. |
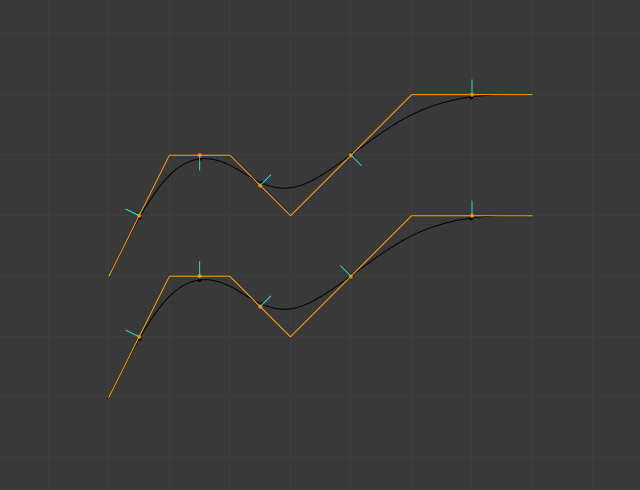
Side view of image on the left. |
Mudanças abruptas das normais podem produzir ranhuras pretas feias mesmo quando essas normais viradas não são problema para a forma.
A quick way to fix this is to use Blender’s Recalculate Normals operation in Edit Mode.
If you still have some ugly black gouges you will have to manually flip the normals.