Панель инструментов (toolbar)
- Нажимать W
Perform a multiple actions; first of it can be select images and by consequence their associated strip. Second it can move strips using the same principles as the Move tool. Using the shortcut W, will cycle between this tool and other sub-tools described below.
- Select Box B
Selects images within a rectangular box drawn in the Preview area.
To use the tool, LMB and drag within the preview area to draw a rectangle, releasing the mouse confirms the selection.
You can also just LMB to preform a normal single item selection.
- Курсор (сursor)
Changes the location of the 2D-Курсор (2D cursor).
To use the tool, LMB within the preview area to move the cursor to that position. You can also click and drag to interactively position the cursor.
The movement of the cursor can be constrained along the global/local X or Y axis by pressing X or Y, pressing the hotkeys will cycle between global/local orientations and disabling constraints.
Holding Shift will move the cursor in smaller increments for more precision. You may also type in an exact amount to move for absolute precision.
While the operation is running a message will display in the header indicating the distance in pixels the cursor has moved in each of the cardinal directions. The third number, between parenthesis, is the Euclidean distance the cursor has moved.
- Переместить (move) G
Changes the location of the selected image by adjusting the strip’s Position properties.
To use the tool, LMB on the image and drag it to the desired position. If Active Tools is enabled, you can also move the image by dragging the gizmo.
The movement of the image can be constrained along the global/local X or Y axis by pressing X or Y, pressing the hotkeys will cycle between global/local orientations and disabling constraints.
Holding Shift will move the image in smaller increments for more precision. You may also type in an exact amount to move for absolute precision.
While the operation is running a message will display in the header indicating the distance in pixels the image has moved in each of the cardinal directions. The third number, between parenthesis, is the Euclidean distance the image has moved.
- Вращать (rotate) R
Moves the selected image’s in a circle about the Pivot Point by adjusting the strip’s Rotation property. By default, the image will rotate around its median but this can be changed by changing the Pivot Point.
To use the tool, LMB on the image and drag it (in a circle) to the desired position. The further away the mouse cursor is from the Pivot point, the slower the rotation movement is. You can also use the Arrow-keys to move the handle very precisely. If Active Tools is enabled, you can also rotate the image by dragging the gizmo.
Holding Shift will rotate the image in smaller increments for more precision. You may also type in an exact amount to move for absolute precision.
While the operation is running a message will display in the header indicating the amount of rotation in the scene’s rotation unit.
- Масштабировать (scale) S
Changes the size of the image by adjusting the strip’s Scale properties. The scaling use the Pivot Point as reference. So, for example, if the Pivot Point is set to 2D Cursor, scaling down a strip will also move the strip in the direction of the 2D cursor.
To use the tool, LMB on the image and drag it to the desired size. The further away the mouse cursor is initially from the Pivot point, the more precise the scaling is. You can also use the Arrow-keys to adjust the scale very precisely. If Active Tools is enabled, you can also scale the image by dragging the gizmo.
The scale of the image can be constrained along the global/local X or Y axis by pressing X or Y, pressing the hotkeys will cycle between global/local orientations and disabling constraints.
Holding Shift will scale the image in smaller increments for more precision. You may also type in an exact amount to scale for absolute precision.
The amount of scaling is relative meaning a scale value of 0.4 will scale the image to 40% of its size.
While the operation is running a message will display in the header indicating the amount the image has been scaled in each of the cardinal directions.
- Трансформировать (transform)
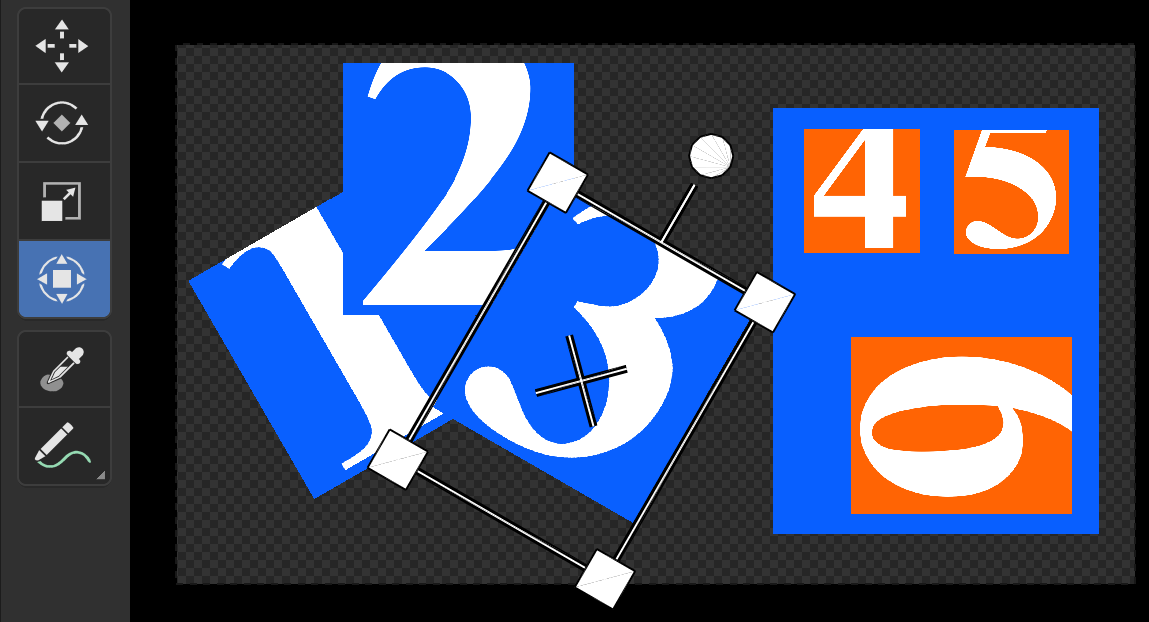
Supports any combination of the moving, rotating, scaling at the same time. In the figure below, the Transform tool is enabled and strip 3 selected.

Инструмент преобразования
With the four squares at the corners of the strip, you can scale the strip. The circle on top is for rotating and the crosshair in the middle is for moving the strip.
- Семплировать (sample)
Used to sample a pixel’s color from the preview.
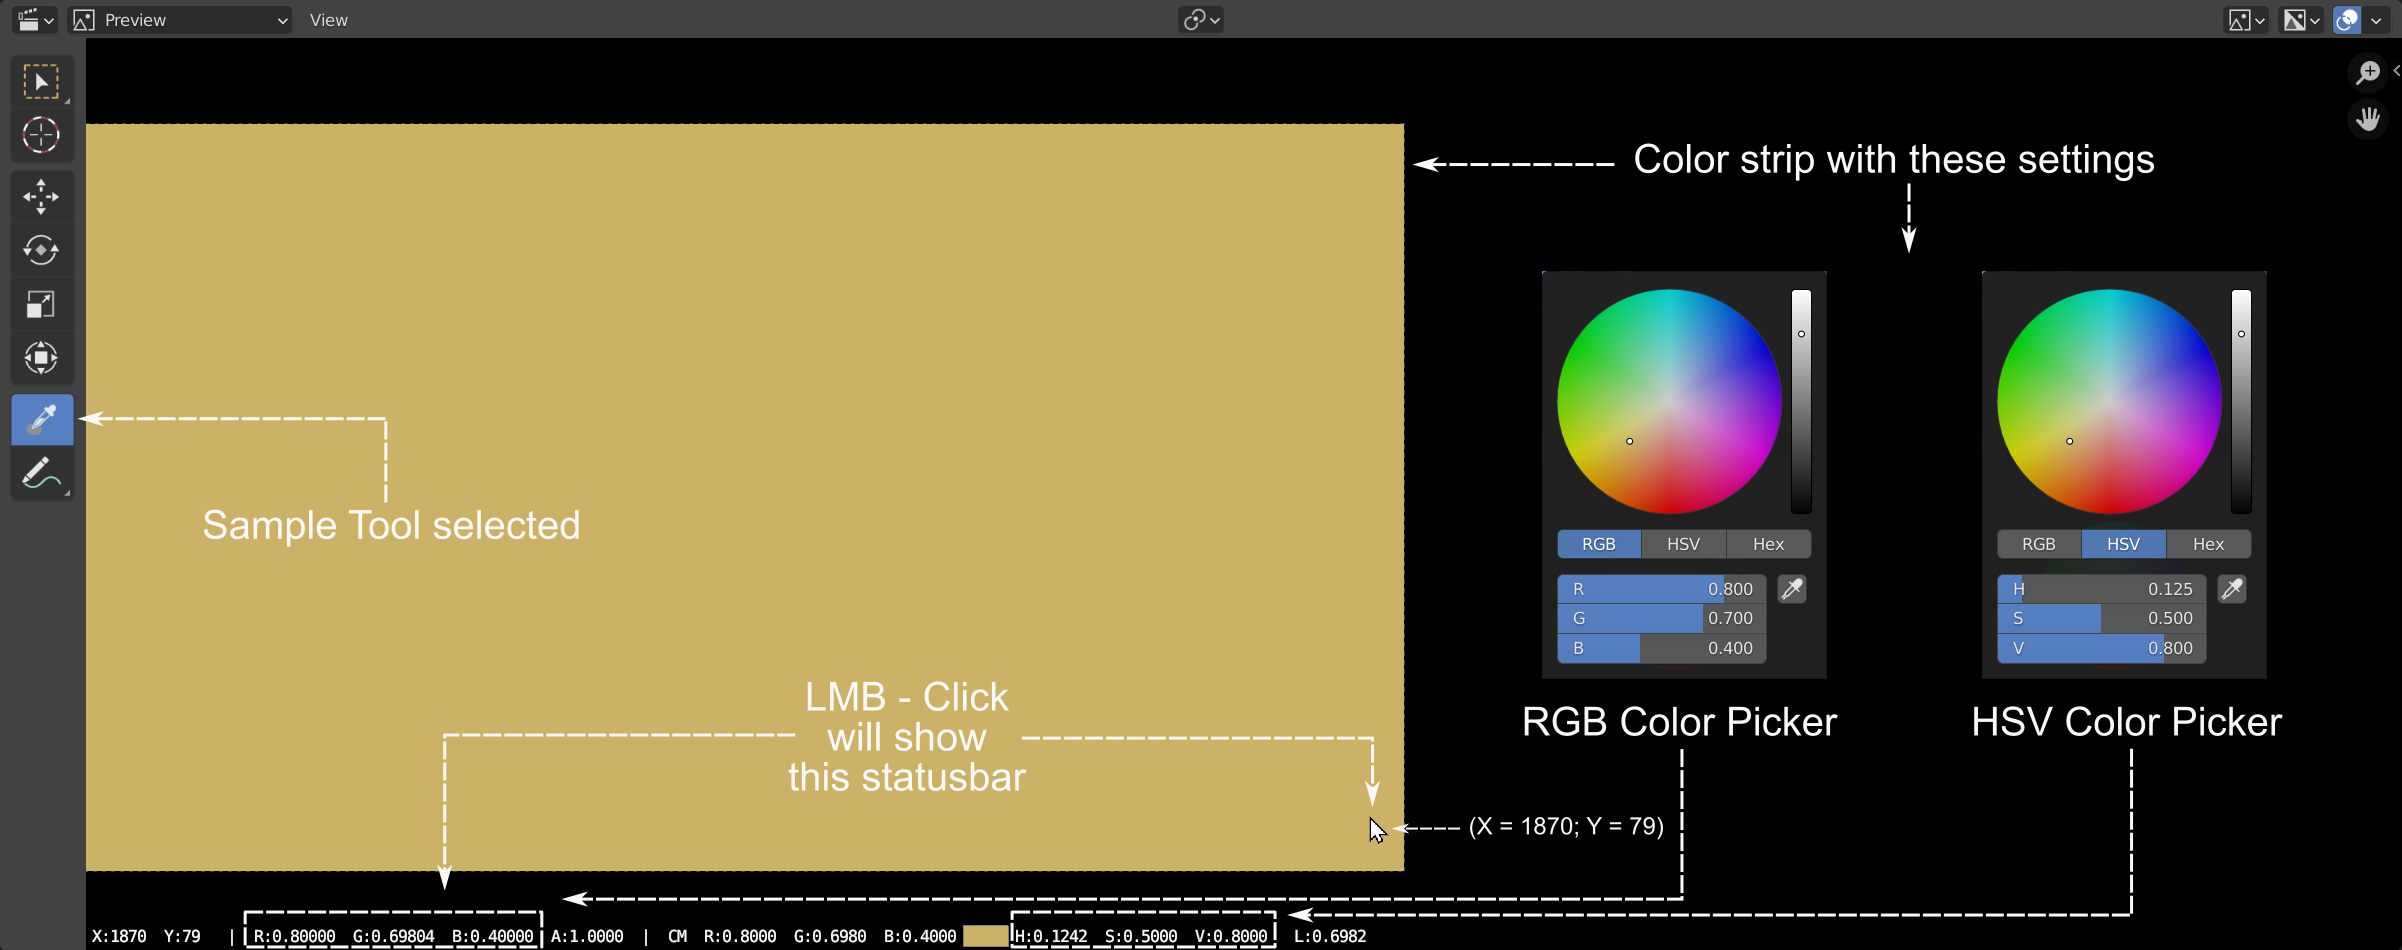
To use the Sample tool, LMB anywhere in the preview. Information about the pixel under the mouse cursor is shown in an overlay at the bottom of the editor.
In the order of appearance, the following information is shown:
The X and Y coordinates of the clicked pixel. Remember that the left bottom corner is location (0, 0).
The values for the red, green, and blue component as from the color picker.
The alpha value of the pixel.
The color-managed values of the red, green, and blue component (the color as you see in the preview).
The hue, saturation, value, and luminance equivalent values of the color-managed values.

Пример использования инструмента.
- Аннотации (annotate)
Рисование пометок от руки.
- Линия аннотации (annotate line)
Рисует пометку в виде прямой линии.
- Многоугольник аннотации (annotate polygon)
Рисование пометки в виде ломаной линии.
- Ластик аннотаций (annotate eraser)
Стирание предыдущих нарисованных пометок.