Cấu Hình Thiết Bị Ngoại Vi -- Configuring Peripherals
Hiển Thị -- Displays
Chúng tôi đề đạt là bạn nên sử dụng một màn hình hỗ trợ độ phân giải cao toàn phần (full HD). Bố trí đa màn hình cũng được hỗ trợ, và bạn có thể cấu hình không gian làm việc của mình dàn trải trên nhiều màn hình cùng một lúc.
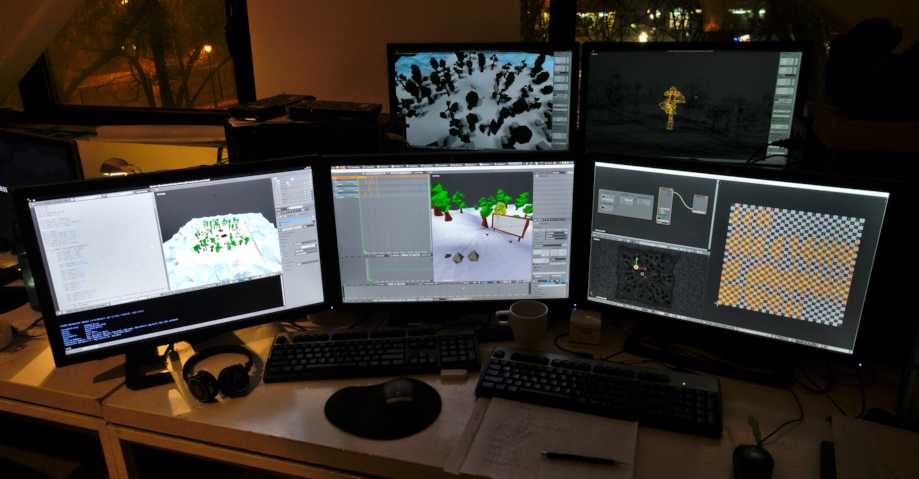
Ví dụ về sự hỗ trợ đa màn hình của Blender.
Thiết Bị Đầu Vào -- Input Devices
Blender hỗ trợ nhiều loại thiết bị đầu vào khác nhau:
Bàn phím (khuyến nghị: bàn phím có bàn phím số riêng, bố trí tiếng Anh sẽ là bàn phím hoạt động tốt nhất)
Chuột (đề cử: chuột 3 nút với bánh xe cuộn)
Thiết bị NDOF (còn được gọi là Chuột 3D)
Bảng Đồ Họa -- Graphic Tablets
Ghi chú
Nếu bạn không có, hoặc thiếu một thiết bị đầu vào, chẳng hạn như chuột hoặc bàn số riêng biệt, thì Blender có thể thay đổi bố trí phím -- keymap của nó để mô phỏng những thiết bị này. Những sắp đặt nhằm bật những cấu hình này lên có thể tìm thấy trong Cấu Hình Đầu Vào -- Input Preferences.
Chuột -- Mouse
Mô Phỏng Nút của Chuột -- Mouse Button Emulation
Nếu bạn không có chuột với 3 nút bấm thì bạn cần phải mô phỏng nó bằng cách tiếp cận tùy chọn về mô phỏng chuột, được nhắc đến trong Cấu Hình -- Preferences của hệ thống.
Bảng sau đây cho thấy các tổ hợp sử dụng:
Chuột 3 Nút |
NCT (LMB) |
NCG (MMB) |
NCP (RMB) |
|---|---|---|---|
Chuột 2 Nút |
NCT (LMB) |
Alt-NCT (LMB) |
NCP (RMB) |
Bàn Phím -- Keyboard
Mô Phỏng Bàn Phím Số -- Numpad Emulation
Nếu bạn không có bàn phím số riêng ở bên cạnh bàn phím của mình thì bạn có thể mô phỏng nó (sử dụng các số ở dòng trên cùng của bàn phím, song nên nhớ, việc làm này sẽ tắt khả năng truy cập nhanh cho chức năng đổi tầm nhìn của tầng lớp đi).
Xem thêm
Xin đọc thêm về Mô Phỏng Bàn Phím Số -- Numpad Emulation trong bài Cấu Hình -- Preferences.
Bàn Phím Không Phải Tiếng Anh -- Non-English Keyboards
Nếu bạn sử dụng bàn phím với bố trí trong một ngôn ngữ khác, không phải là tiếng Anh, bạn vẫn có thể tận dụng lợi thế bằng cách chuyển máy tính sang bố trí của Vương Quốc Anh (ỤK) hoặc Hoa Kỳ (US), miễn là bạn làm việc với Blender.
Ghi chú
Bạn còn có thể thay đổi bố trí phím mặc định và các bố trí phím nóng mặc định trong Cấu Hình -- Preferences, song, bản hướng dẫn sử dụng này sẽ giả định là bạn hiện đang sử dụng bố trí phím mặc định đã sắp đặt trước.
Bảng Đồ Họa -- Graphic Tablets
Bạn có thể sử dụng bảng đồ họa để điều khiển con trỏ chuột bằng cây bút, một phương pháp nhập liệu truyền thống. Phương pháp này là phương pháp mà các nghệ sĩ sơn vẽ vốn cảm thấy gần gũi và quen thuộc. Bên cạnh đó, những thiết bị này còn cho phép họ điều khiển một số chức năng bổ sung như điều khiển độ nhạy cảm về áp lực (ấn mạnh xuống thì được nét đậm hơn chẳng hạn).
Ghi chú
Nếu bạn đang sử dụng một bảng đồ họa, chứ không dùng chuột, và độ nhạy cảm về áp lực không hoạt động đúng đắn, thì hãy thử đặt con trỏ chuột vào cửa sổ Blender, sau đó rút phích cắm của máy tính bảng đồ họa của bạn ra, rồi cắm phích điện lại. Việc làm này có thể giúp cải thiện được tình huống.
NDOF (Chuột 3D) -- NDOF (3D Mouse)
3D mice or NDOF devices are hardware that you can use to navigate a scene in Blender. Currently only devices made by 3Dconnexion are supported. These devices allow you to explore a scene, as well as making Fly/Walk Navigation easier. Settings to control how the NDOF device interacts with the 3D Viewport can be configured in the User Preference. These settings can also be accessed using the NDOF-Menu button on the NDOF device to open a popup menu to adjust the settings directly from the 3D Viewport.
Xem thêm
Xin xem bài Cấu Hình Đầu Vào -- Input Preference để biết thêm thông tin về cách cấu hình các thiết bị ngoại vi.
Head-Mounted Displays (Virtual Reality)
HMDs make it possible to place users in an interactive, virtual environment. Attached to the head, they track head movements to project a seemingly surrounding world onto small screens in front of the user's eyes. If the system works well, they experience the virtual environment as if they were really inside of it.
Supported Platforms
Virtual reality support in Blender is implemented through the multi-platform OpenXR standard. This standard is new and therefore support for it is still limited.
Platform |
Operating System |
Notes |
|---|---|---|
Windows |
Requires the Windows 10 May 2019 Update (1903) |
|
Windows |
||
GNU/Linux |
Not recommended for general use yet |
Getting Started
The following subsections describe how an HMD can be set up for usage with the supported platforms. If this is not done, Blender will report an error when trying to start a virtual reality session.
Windows Mixed Reality
To check if a PC meets the requirements to run Windows Mixed Reality, Microsoft offers the Windows Mixed Reality PC Check application.
Make sure the Windows 10 May 2019 Update (1903) is installed.
If the system meets all requirements, the Mixed Reality Portal should already be installed. It is also available in the Microsoft Store. On first use it will guide through some setup steps.
Launch the Mixed Reality Portal. Click the menu button
...in the lower left corner. In the menu it opens, select the Set up OpenXR. Windows Mixed Reality is now ready to be used with OpenXR.
For more information, refer to Windows' Getting Started Guide for Windows Mixed Reality and OpenXR.
Oculus Rift
Oculus only provides prototype OpenXR support. To use it, Blender has to be started in a special way, as described below.
Download and install the Oculus Rift software.
Start Blender by double clicking the
blender_oculusscript inside the installation directory. It will open a command-line window with further information.
Monado
Monado is a free and open source XR platform for Linux. It is not yet ready for production usage and should only be used for testing purposes.
There are packages available for Debian based distributions. For others it has to be compiled from source, which in this case is not recommended for people with little experience in compiling software. Follow the Getting Started Guides from Monado to do so nevertheless.
Completing the Setup
Inside Blender, the VR Scene Inspection add-on needs to be enabled to access virtual reality features.