简介
第一步是展开网格。在网格编辑结束,面数足够的情况下,你想要展开UV。如果对已经展开UV的模型添加面或者细分现有面,Blender会自动为你添加这些新的面,不过你得做额外的映射或编辑。这种情况下,可以使用UV贴图来引导修改新增的几何元素。
关于UV
UV中的每一点对应网格上的一个顶点。连接UV的线条对应网格上的边。UV上的每个面对应一个网格面。
Each face of a mesh can have many UV textures. Each UV texture can have an individual image assigned to it. When you unwrap a face to a UV texture in the UV Editor, each face of the mesh is automatically assigned four UV coordinates: These coordinates define the way an image or a texture is mapped onto the face. These are 2D coordinates, which is why they are called UV, to distinguish them from XYZ coordinates. These coordinates can be used for rendering or for real-time viewport display as well.
在Blender中,可以为一个面关联一个独立的图像。UV坐标定义图像如何映射到面。然后图像可以用于渲染或实时显示。在3D视图中选择 面选择 模式,才能指定图像或修改活动网格物体对应的UV坐标。这样一个面可以有多张UV贴图。角色前额的面要用到面部贴图, 同时 也用到头皮/头发贴图。
这些将在下一节详述。
入门
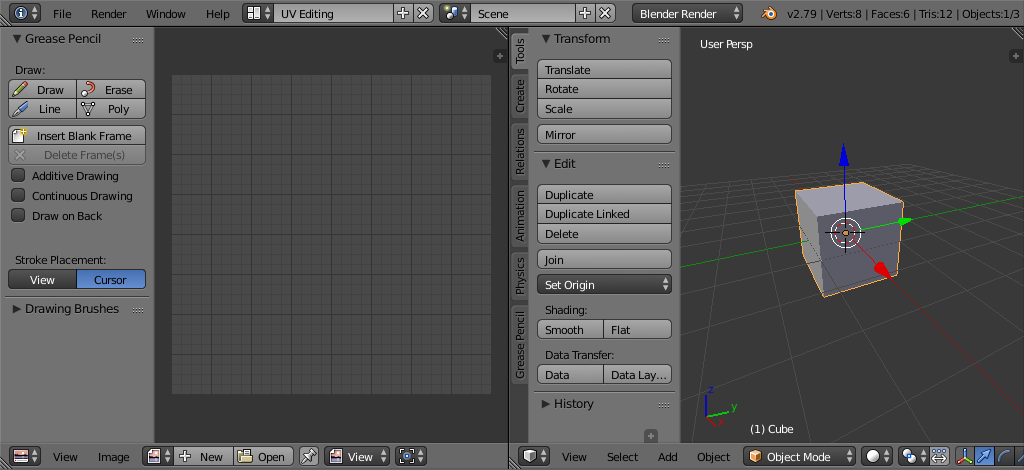
UV编辑屏幕布局。
By default, meshes are not created with UVs. First you must map the faces, then you can edit them. The process of unwrapping your model is done within Edit Mode in the 3D Viewport. This process creates one or more UV Islands in the UV Editor.
To begin, choose the UV Editing workspace from the selection list at the top of your screen in the Preferences header. This sets one of the areas to show you the UV Editor, and the other area to the 3D View.
进入 编辑模式,因为所有的展开工作都要在编辑模式下。你可以使用顶点、面或边选择模式。
工作流程
The process for unwrapping is straightforward, but there are a lot of options available, each of which dramatically affect the outcome of the unwrap. By understanding the meaning behind the options, you will become more efficient at unwrapping.
流程如下:
- 如有必要,标记缝合线。
- 选择所有网格元素。
- 从UV展开菜单选择合适的UV映射方法。
- 调整展开设置。
- Add a test image to see if there will be any distortion. See Applying Images to UVs.
- Adjust UVs in the UV editor. See Editing UVs.