UV & 纹理空间
UV 贴图
参考
- 模式:
所有模式
- 面板:

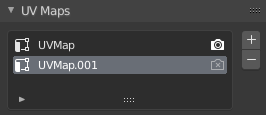
The UV Maps panel in the Mesh tab.
If you have an active object, inside the Properties Editor, on the Object Data tab, the UV maps panel contains a List view that lists the UV maps created for this mesh.
If you have the UV Editor open, you will see the currently selected UV map.
- 激活渲染
Click the camera icon to enable that UV texture for rendering. If no other map is explicitly specified.
- 添加
+ Clicking the Add button duplicates the selected UV map or creates a new UV map if the list is empty.
- 移除
- Clicking the Remove button will remove the selected UV map.
See also
Note that each texture can be mapped to a specific UV layout.
纹理空间
参考
- 模式:
所有模式
- 面板:
These are settings of the Texture Space used by generated texture mapping. The visualization of the texture space can be activated in the 视图显示.
- 自动纹理空间
Adjusts the active object's texture space automatically when transforming the object.
- 位置、尺寸
If the texture space is not calculated automatically then you can define the location and size of the texture space relative to the base object. These can also be adjusted from the 3D Viewport, see Editing for more information.
- 纹理网格
Use another mesh for texture indices, the vertex of the two objects must be perfectly aligned. Otherwise the UV map will be distorted. Note that, this is only for mesh objects.
- 匹配纹理空间
Modifies the Location and Size to match the objects bounding box. This disables Auto Texture Space. Note that, this is only for curve objects.
编辑
参考
- 模式:
物体模式和编辑模式
- 菜单:
To modify the texture space from the 3D Viewport, enable Edit Texture Space while transforming an object.
访问
The automatically calculated UV map can be accessed by an object's material through the Generated output of the 纹理坐标节点. This output can then be used to map any texture onto an object.
Tip
Generated texture spaces do not have rotation support, to overcome this, a 映射节点 can be used to rotate the UV map.