Object Modes

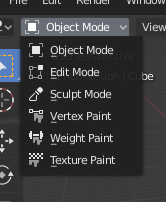
The Mode select menu.
Modes are an object-oriented feature, which means that the available modes vary depending on the selected active object's type -- most of them only enable the default Object Mode (like cameras, lights, etc.).
Each mode is designed to edit an aspect of the selected object. See Tab. tab-view3d-modes below for details.
You set the current mode in the Mode selector of 3D Viewport header (see Fig. The Mode select menu.).
Modes can affect many things in Blender:
They can modify the panels and/or controls available in some Properties tabs.
They can modify the behavior of the whole editor, like e.g. the UV Editor and 3D Viewport.
They can modify the available header tools (menus and/or menu entries, as well as other controls...). For example, in the 3D Viewport, the Object menu in Object Mode changes to a Mesh menu in Edit Mode (with an active mesh object!), and a Paint menu in Vertex Paint Mode...
They can modify the available shortcuts.
Object Mode List
Icon |
Name |
Details |
|---|---|---|
The default mode, available for all object types, as it is dedicated to Object data-block editing (e.g. position, rotation, size). |
||
A mode available for all renderable object types, as it is dedicated to their "shape" Object Data data-block editing (e.g. vertices/edges/faces for meshes, control points for curves/surfaces, strokes/points for Grease Pencil, etc.). |
||
A mesh-only mode, that enables Blender's mesh 3D-sculpting tool. |
||
A mesh-only mode, that allows you to set your mesh's vertices colors (i.e. to "paint" them). |
||
A mesh-only mode, dedicated to vertex group weighting. |
||
A mesh-only mode, that allows you to paint your mesh's texture directly on the model, in the 3D Viewport. |
||
A mesh-only mode, dedicated to particle systems, useful with editable systems (hair). |
||
An armature only mode, dedicated to armature posing. |
||
A Grease Pencil only mode, dedicated to create Grease Pencil strokes. |
Note
The cursor becomes a brush in Paint and Sculpt Modes.
We will not go into any more detail on mode usages here, because they are dealt with in their own sections.
Hint
If you are reading this manual and some button or menu option is referenced that does not appear on your screen, it may be that you are not in the proper mode for that option to be valid.
Multi-Object Editing
Edit and Pose Modes support editing of multiple objects at once.
This is convenient if you want to perform the same edits on multiple objects or want to animate multiple characters at once.
To use edit multiple objects at once, simply select multiple objects and enter the mode.
The Outliner can also be used to add/remove objects while you are in a mode, by setting or clearing the mode from the context menu, or Ctrl-LMB clicking on the objects data icon.
Only the active object will be used to display properties such as shape keys, UV layers, etc.
Selecting any element from an object will set this as the active object.
There are limits to the kinds of operations that can run on multiple objects.
You can't for example create an edge that has vertices from different objects.
Transferring Objects
Reference
- Mode
所有模式
- Shortcut
Alt-Q
Adds the object under the mouse to the current mode and removes the Active object. Use this operator to quickly switch between multiple objects without having to first go to Object Mode. When accessed from a menu, an Eyedropper is used to select the object to add to current mode.


