Add-ons
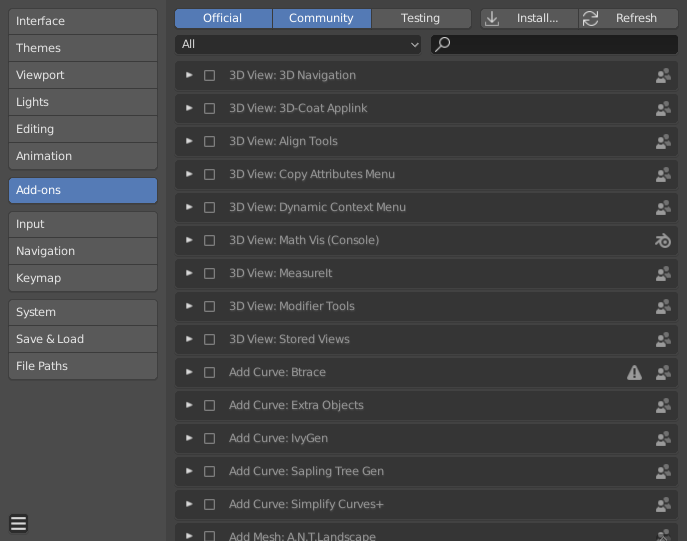
The Add-ons section lets you manage secondary scripts, called «Add-ons» that extends Blender’s functionality. In this section you can search, install, enable and disable Add-ons.

Blender Preferences Add-ons section.
Finding Add-ons
- Searching
- Blender comes with some pre-installed Add-ons already, ready to be enabled. But you can also add your own, or any interesting ones you find on the web.
- Supported Level
Blender’s add-ons are split into two groups depending on who writes/supports them:
- Official: Add-ons that are written by Blender developers.
- Community: Add-ons that are written by people in the Blender community.
- Categories
- Add-ons are divided into categories by what areas of Blender they affect.
Enabling and Disabling
Enable and disable an add-on by checking or unchecking the box to the right of the add-on you chose, as shown in the figure below.

Enabling an add-on.
The add-on functionality should be immediately available.
Nota
Add-ons that activate or change multiple hotkeys have a special system of activation. or example, with the «UI: Pie Menu Official» add-on for each menu there’s a selection box to activate the menu and its hotkey.
Truco
If the Add-on does not activate when enabled, check the Console window for any errors that may have occurred.
3rd Party Add-ons
There are hundreds of add-ons that are not distributed with Blender and are developed by others. To add them to the list of other add-ons they must be installed into Blender.
To install these use the Install… button and
use the File Browser to select the .zip or .py add-on file.
Now the add-on will be installed, however not automatically enabled. The search field will be set to the add-on’s name (to avoid having to look for it), Enable the add-on by checking the enable checkbox.
- Refresh
- Scans the Add-on Directory for new add-ons.
Truco
User-Defined Add-on Path
You can also create a personal directory containing new add-ons and configure your files path in the File Paths section of the Preferences. To create a personal script directory:
- Create an empty directory in a location of your choice (e.g.
my_scripts). - Add a subdirectory under
my_scriptscalledaddons(it must have this name for Blender to recognize it). - Open the File Paths section of the Preferences.
- Set the Scripts file path to point to your script directory (e.g.
my_scripts). - Save the preferences and restart Blender for it to recognize the new add-on location.
Now when you install add-ons you can select the Target Path when installing 3rd party scripts. Blender will copy newly installed add-ons under the directory selected in your Preferences.
Add-on Information
You can click the arrow at the left of the add-on box to see more information, such as its location, a description and a link to the documentation. Here you can also find a button to report a bug specific of this add-on.
Add-on Preferences
Some add-ons may have there own preferences which can be found in the Preferences section of the add-on information box.
Some add-ons use this section for example to enable/disable certain functions of the add-on. Sometimes these might even all default to off. So it is important to check if the add-on enabled has any particular preferences.