Timeline
The Timeline editor, identified by a clock icon, is used for manipulating keyframes and scrubbing the Playhead.

La Timeline.
The Timeline gives the user a broad overview of a scene’s animation, by showing the current frame, the keyframes of the active object, the start and end frames of your animation sequence, as well as markers set by the user.
The Timeline includes Transport Controls, to play, pause, and skip through an animation sequence.
It also includes tools for manipulating Keyframes, Keying Sets, and Markers.
Vue principale
The main Timeline region displays the animation frames over time.

Here you can see the Keyframes (diamond shapes), Playhead (blue handle), Scrollbar (along the bottom).
Ajustement de la vue
The Timeline can be panned by holding MMB, then dragging the area left or right.
You can zoom the Timeline by using Ctrl-MMB, the mouse Wheel, or pressing NumpadMinus and NumpadPlus.
You can also use the scrollbars, located at the bottom or the right of the editor, to pan and zoom the view.
Playhead
The Playhead is the blue vertical line with the current frame number at the top.

Tête de lecture.
The Playhead can be set or moved to a new position by pressing or holding LMB in scrubbing area at the top of the timeline.
The Playhead can be moved in single-frame increments by pressing Left or Right, or you can jump to the beginning or end frame by pressing Shift-Left or Shift-Right.
Frame Range
By default, the Frame Range is set to start at frame 1 and end at frame 250. You can change the frame range in the top right of the Timeline header, or in the Output Properties.
Keyframes
For the active and selected objects, keyframes are displayed as diamond shapes.
You can click to select one at a time, or select several by holding Shift, or by dragging a box around the keyframes. You can then move single keys by dragging them, and you can move multiple keys by pressing G and scale them with S.
Only Selected Channels can be enabled. . For Armatures, this will display the object keyframes, and the keyframes for the active and selected pose bones.
Marqueurs
Voir la page des Marqueurs pour plus d’informations.
Header (Entête)
Menus Popovers
Popover Playback

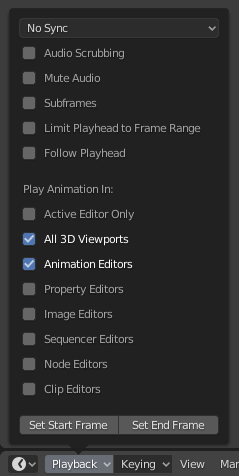
The Playback popover contains options controlling the animation playback.
- Sync

FPS en rouge dans la Vue 3D.
When you play an animation, the frame rate is displayed at the top left of the 3D Viewport. If the scene is detailed and playback is slower than the set Frame Rate, these options are used to synchronize the playback.
- Play Every Frame
Plays every frame even if playback is slow.
- Frame Dropping
Défausser des trames si la lecture devient plus lente que le débit de trame de la scène.
- Sync to Audio
Supprimer des images si la lecture devient trop lente pour rester synchronisée avec l’audio.
- Audio
- Scrubbing
If your animation has sound, this option plays bits of the sound wave while you move the Playhead with LMB or keyboard arrows.
- Mute
Mute the sound from any audio source.
- Playback
- Limit Playback to Frame Range
Don’t allow selecting frames outside of the playback range using the mouse.
- Follow Current Frame
Animation editors can be setup to always follow the time indicator as animation is being played back. Following will be done when animating and changing frame: When the cursor reaches the end of the screen, the next range of frames of the same width will be displayed.
- Play In
- Active Editor
While playing, updates the Timeline, if Animation Editors and All 3D Viewports disabled.
- 3D Viewport
While playing, updates the 3D Viewport and the Timeline.
- Animation Editors
While playing, updates the Timeline, Dope Sheet, Graph Editor, Video Sequencer.
- Image Editor
The Image editor in Mask mode.
- Properties Editor
When the animation is playing, this will update the property values in the UI.
- Éditeur Movie Clip
While playing, updates the Movie Clip Editor.
- Node Editors
While playing, updates the Node properties for the node editors.
- Video Sequencer
While playing, updates the Video Sequencer.
- Show
- Subframes
Afficher et autoriser le changement de la sous-trame de la scène courante.
Keying Popover

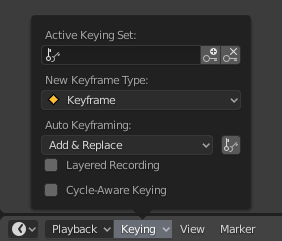
Le menu Keying contient des options qui affectent l’insertion de trame clé.
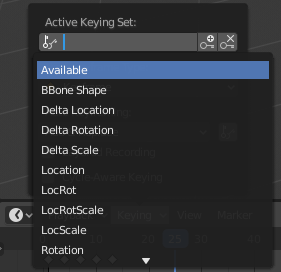
- Active Keying Set

Timeline Keying Sets.
Keying Sets are a set of keyframe channels in one. They are made so the user can record multiple properties at the same time. With a keying set selected, when you insert a keyframe, Blender will add keyframes for the properties in the active Keying Set. There are some built-in keying sets, LocRotScale, and also custom keying sets. Custom keying sets can be defined in the panels .
- Insert Keyframes (plus icon)
Insert keyframes on the current frame for the properties in the active Keying Set.
- Delete Keyframes (minus icon)
Delete keyframes on the current frame for the properties in the active Keying Set.
- New Keyframe Type
Types de trame clé on insertion.
- Cycle-Aware Keying
À l’insertion de trames clés dans des courbes trivialement cycliques, un traitement spécial est appliqué pour préserver l’intégrité du cycle (le plus utile lors du peaufinage d’un cycle établi) :
Si une insertion de clé est tentée en dehors de la plage de temps principale du cycle, elle est réaffectée dans la plage.
Lors de l’écrasement d’une des clés terminales, l’autre est mise à jour en conséquence.
In addition, when adding a new curve into an action with a Manual Frame Range and Cyclic Animation enabled, the curve is automatically made cyclic with the period matching the frame range. For convenience this check and conversion is also done before adding the second keyframe to such a curve.
Auto Keying Popover

Auto Keyframe dans la Timeline.
The record button (⏺) enables Auto Keyframe: It will add and/or replace existing keyframes for the active object when you transform it in the 3D Viewport. For example, when enabled, first set the Playhead to the desired frame, then move an object in the 3D Viewport, or set a new value for a property in the UI.
When you set a new value for the properties, Blender will add keyframes on the current frame for the transform properties. Other use cases are Fly/Walk Navigation to record the walk/flight path and Lock Camera to View to record the navigation in camera view.
Note
Note that Auto Keyframe only works for transform properties (objects and bones), in the 3D Viewport (i.e. you can’t use it e.g. to animate the colors of a material in the Properties…).
- Add & Replace / Replace
This controls how the auto keyframe mode works. Only one mode can be used at a time.
- Add & Replace
Add or replace existing keyframes.
- Replace
Ne remplacer que les trames clés existantes.
- Only Active Keying Set
When enabled, new keyframes for properties will be inserted into the active Keying Set.
- Layered Recording
Adds a new NLA Track and strip for every loop/pass made over the animation to allow non-destructive tweaking.
Header Controls
The Timeline header controls.

Timeline header controls.
1. Popovers for Playback and Keying, 2. Transport Controls, 3. Frame Controls
Contrôles de défilement
These buttons are used to set, play, rewind, the Playhead.

Contrôles de défilement.
- Jump to Start (❙⏴) Shift-Left
This sets the cursor to the start of frame range.
- Jump to Previous Keyframe (◆⏴) Down
This sets the cursor to the previous keyframe.
- Rewind (◀) Shift-Ctrl-Spacebar
This plays the animation sequence in reverse. When playing the play buttons switch to a pause button.
- Play (▶) Spacebar
This plays the animation sequence. When playing the play buttons switch to a pause button.
- Jump to Next Keyframe (⏵◆) Up
This sets the cursor to the next keyframe.
- Jump to End (⏵❙) Shift-Right
This sets the cursor to the end of frame range.
- Pause (⏸) Spacebar
This stops the animation.
Contrôle de trames
- Current Frame Alt-Molette
The current frame of the animation/playback range. Also the position of the Playhead.
- Preview Range (clock icon)
This is a temporary frame range used for previewing a smaller part of the full range. The preview range only affects the viewport, not the rendered output. See Preview Range.
- Start Frame
The start frame of the animation/playback range.
- End Frame
The end frame of the animation/playback range.

