Mix ノード
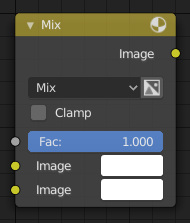
Mix ノード。
Mix ノード は、2つの入力イメージの個々に対応するピクセルへ作用することで、イメージのミックスを行います。シェーダおよびテクスチャのコンテキストでは "MixRGB" と呼ばれます。
入力
- Factor
- ノードが出力イメージに与える影響の量をコントロールします。
- Image
- 背景イメージです。このイメージのサイズと解像度が、出力イメージの大きさを決定します。
- Image
- 前景イメージです。
プロパティ
- Mix
ブレンドタイプは、選択メニューから選べます。各ブレンドモードの詳細については、Color Blend Modes を参照してください。
Add、Subtract、Multiply、Screen、Divide、Difference、Darken、Lighten、Overlay、Dodge、Color Burn、Hue、Saturation、Value、Color、Soft Light、Linear Light
- Use Alpha
- Color and Alpha アイコンをクリックして有効にすると、2 番目のイメージの Alpha チャンネルがミキシングに使用されます。無効化するとデフォルトでは、アイコンの背景が明るい灰色になります。背景イメージの Alpha チャンネルは常に使用されます。
- Clamp
- 色の最大値が 1 を超えないように制限します。
出力
- Image
- 標準のイメージ出力です。
例
以下は、一般的なミックスモードを使用したサンプルで、色またはチェッカーとマスクを混合しています。
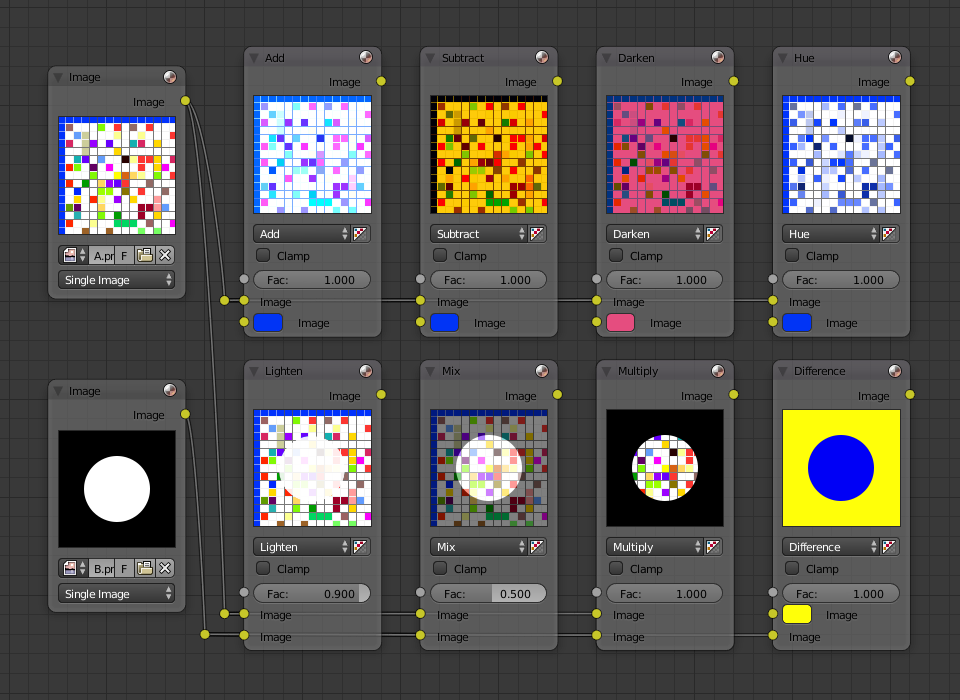
上記の混合方法の説明は、Mix ノードを効果的に使用するのに役立ちます:
- Add
- 青に青を加えると青が維持されますが、赤に青を加えると紫になります。白は、既に青の量がいっぱいなので、白のままになります。イメージの色をシフトするために使用します。青い色味を加えると、イメージは冷たい感じになります。
- Subtract
- 白から青を取り除く、赤と緑が残り、合成結果は黄色になります。紫から青を取り除くと赤になります。イメージを彩度を下げるために使用します。黄色を取り除くと、イメージが青くなり、より憂鬱な感じになります。
- Multiply
- 黒 (0.00) に何を掛けても、黒になります。何に対しても、白 (1.00) を掛けると変化がありません。ゴミを隠したり、白黒のイメージへ色付けするために使用します。
- Hue
- 選択されているもの以外のすべての色を無視した、イメージ内の色の量を表示します: これにより ('Black & Hue' スタイルの) モノクロ画像が作成できます。
- Mix
- 2 つのイメージを結合し、それをを平均します。
- Lighten
- 漂白剤のように、白をより白くします。マスクと併用することで少し明るいイメージにします。
- Difference
- 色を取り出します。黄色を白に変えるのに必要な色は青です。これを使用することで、非常によく似た 2 つのイメージを比較し、片方がどのような処理を経てもう片方のイメージになったのかを確認できます。つまり、イメージの変更ログのようなものです。これにより、イメージへ盗難検出のための透かし(Watermark images 参照)を入れることができます。
- Darken
- 色を設定すると、バラ色のメガネを通して世界を見ているような感じになります。
Contrast Enhancement
RGB Curve の一般的な 2 つの用途とその効果 (Darken と Contrast Enhancement) を次の小さなマップに示します。それぞれのカーブの効果と、それらが等しく Mix された結果を確認できます。
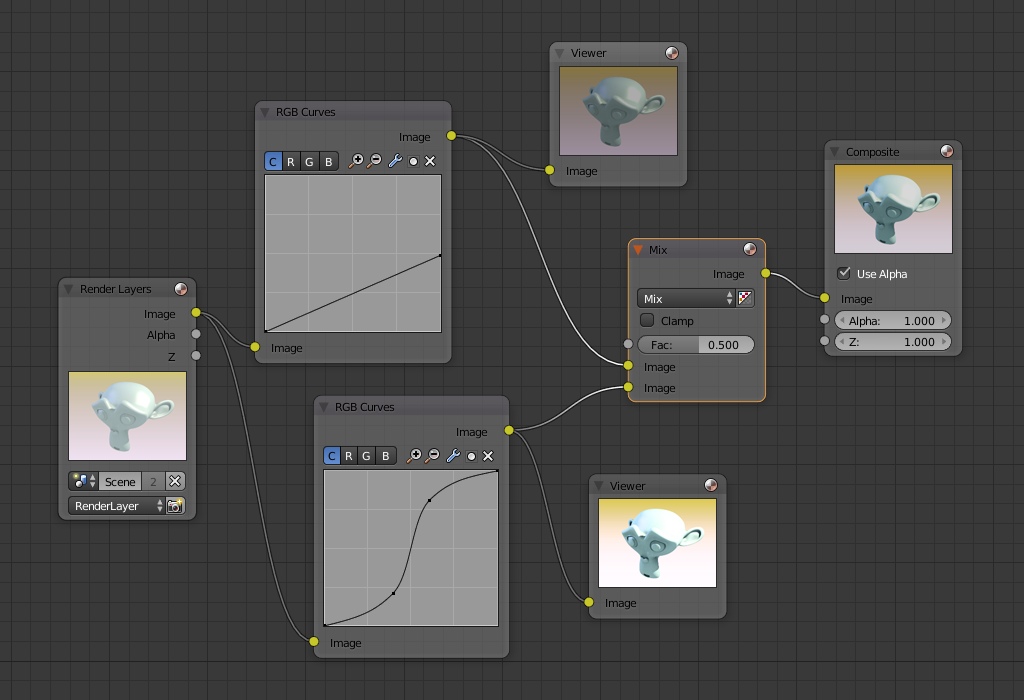
"Darken" 、"Enhance Contrast" および "Mix" ノードを使用したコンポジットのノード設定例。
ご覧の通り、元々のマジックモンキーは光量が多すぎて露出過多です。それを直すためには、イメージを暗くし、コントラストを高める必要があります。
In the top RGB curve, Darken, only the right side of the curve was lowered; thus, any X input along the bottom results in a geometrically less Y output. The Enhance Contrast RGB (S-shaped) curve scales the output such that middle values of X change dramatically; namely, the middle brightness scale is expanded, and thus, whiter whites and blacker blacks are output. To make this curve, simply click on the curve and a new control point is added. Drag the point around to bend the curve as you wish. The Mix node combines these two effects equally, and Suzanne feels much better.
Watermark Images
In the old days, a pattern was pressed into the paper mush as it dried, creating a mark that identified who made the paper and where it came from. The mark was barely perceptible except in just the right light. Probably the first form of subliminal advertising. Nowadays, people watermark their images to identify them as personal intellectual property, for subliminal advertising of the author or hosting service, or simply to track their image's proliferation throughout the web. Blender provides a complete set of tools for you to both encode your watermark and to tell if an image has your watermark.
Encoding your Watermark in an Image
First, construct your own personal watermark. You can use your name, a word, or a shape or image not easily replicated. While neutral gray works best using the encoding method suggested, you are free to use other colors or patterns. It can be a single pixel or a whole gradient; it is up to you. In the example below, we are encoding the watermark in a specific location in the image using the Translate node; this helps later because we only have to look at a specific location for the mark. We then use the RGB to BW node to convert the image to numbers that the Map Value node can use to make the image subliminal. In this case, it reduces the mark to one-tenth of its original intensity. The Add node adds the corresponding pixels, making the ones containing the mark ever-so-slightly brighter.
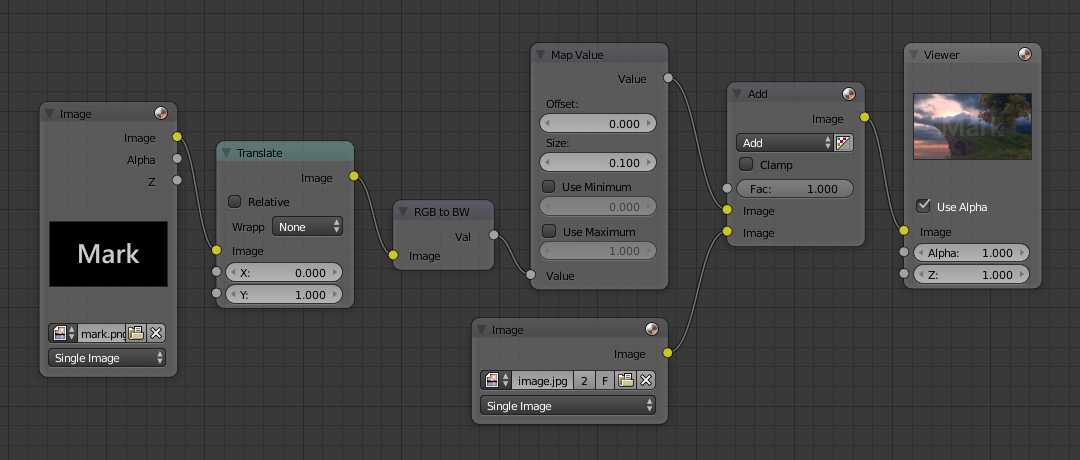
Embedding your mark in an image using a mark and specific position.
Of course, if you want people to notice your mark, do not scale it so much, or make it a contrasting color. There are also many other ways, using other mix settings and fancier rigs. Feel free to experiment!
ヒント
Additional uses
You can also use this technique, using settings that result in visible effects, in title sequences to make the words appear to be cast on the water's surface, or as a special effect to make words appear on the possessed girl's forearm.
Decoding an Image for your Watermark
When you see an image that you think might be yours, use the node map below to compare it to your stock image (pre-watermarked original). In this map, the Mix node is set to Difference, and the Map Value node amplifies any difference. The result is routed to a viewer, and you can see how the original mark clearly stands out.
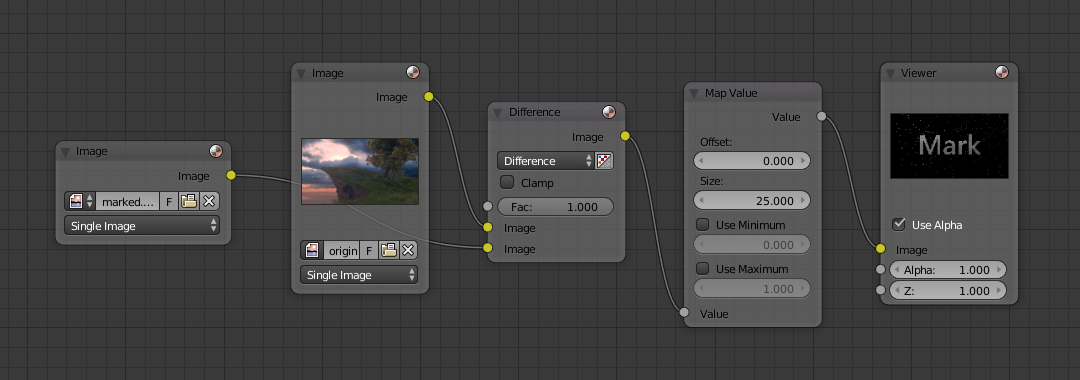
Checking an image for your watermark.
Various image compression algorithms lose some of the original; the difference shows as noise.
Experiment with different compression settings and marks to see which works best for you by
having the encoding map in one scene, and the decoding map in another.
Use them while changing Blender's image format settings,
reloading the watermarked image after saving, to get an acceptable result.
In the example above, the mark was clearly visible all the way up to JPEG compression of 50%.