Вступ – Introduction
Перший крок – це розгортання вашої сіті. Ви схочете розгорнути, коли відчуєте, що ваша сіть завершена з очікуваною кількістю потрібних граней. Якщо ви здійсните додання граней або підподілення граней, коли модель вже розгорнута, то Blender додасть ці нові грані для вас, але вам можливо знадобиться здійснити додаткове розкладання або редагування. У такий спосіб ви можете використовувати зображення текстури UV як орієнтир для змін геометрії.
Про UVи – About UVs
Кожна точка в розкладці UV відповідає вершині сіті. Лінії, що сполучають UVи, відповідають ребрам сіті. Кожна грань у розкладці UV відповідає грані сіті.
Each face of a mesh can have many UV textures. Each UV texture can have an individual image assigned to it. When you unwrap a face to a UV texture in the UV Editor, each face of the mesh is automatically assigned four UV coordinates: These coordinates define the way an image or a texture is mapped onto the face. These are 2D coordinates, which is why they are called UV, to distinguish them from XYZ coordinates. These coordinates can be used for rendering or for real-time viewport display as well.
Every face in Blender can have a link to a different image. The UV coordinates define how this image is mapped onto the face. This image then can be rendered or displayed in real-time. A 3D Viewport has to be in «Face Select» mode to be able to assign Images or change UV coordinates of the active mesh object. This allows a face to participate in many UV textures. A face at the hairline of a character might participate in the facial UV texture, and in the scalp/hair UV texture.
Це описується більш повно у наступних розділах.
Почин – Getting Started
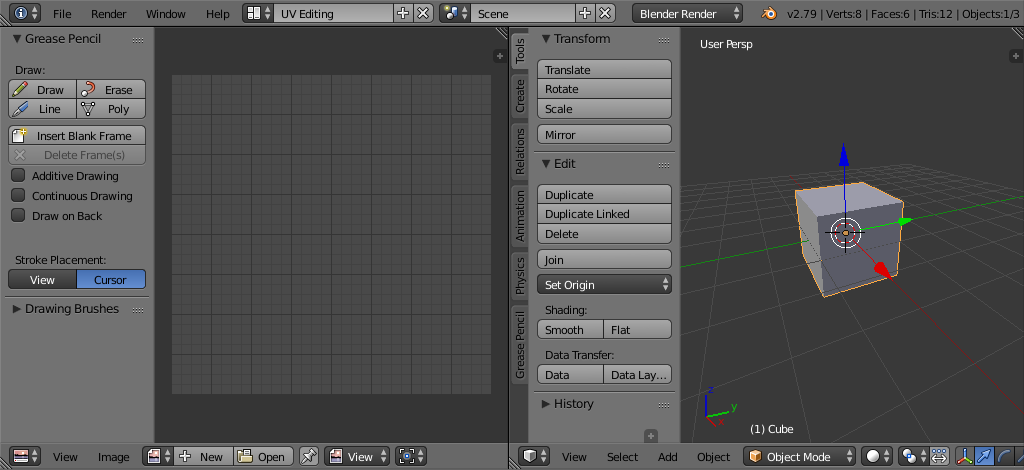
Розстава екрану «Редагування UV» – UV Editing.
By default, meshes are not created with UVs. First you must map the faces, then you can edit them. The process of unwrapping your model is done within Edit Mode in the 3D Viewport. This process creates one or more UV Islands in the UV Editor.
To begin, choose the UV Editing workspace from the selection list at the top of your screen in the Preferences header. This sets one of the areas to show you the UV Editor, and the other area to the 3D Viewport.
Перемкніться у Режим Редагування – Edit Mode, оскільки все розгортування здійснюються у цьому режимі. Ви можете бути у будь-якому режимі вибору сіті – «Вершина» – Vertex, «Ребро» – Edge або «Грань» – Face.
Робпотік – Workflow
Процес для розгортування є простим, але є безліч доступних опцій, кожна з яких значно впливає на результат розгортання. Розуміючи значення цих опцій, ви станете більш ефективним у розгортуванні.
Цей процес передбачає:
Позначення Швів, при необхідності.
Вибір усіх компонентів сіті.
Вибір методу розкладання UV з меню UV Unwrap.
Наладнання устав розгортання.
Add a test image to see if there will be any distortion. See Applying Images to UVs.
Adjust UVs in the UV editor. See Editing UVs.