Những Biến Hóa Cơ Bản -- Basic Transformations
Move
Tham Chiếu -- Reference
- Chế Độ -- Mode
Object Mode, Edit Mode, and Pose Mode
- Trình Đơn -- Menu
- Phím Tắt -- Hotkey
G
In Object Mode, the move option lets you move objects. Translation means changing location of objects. It also lets you move any elements that make up the object within the 3D space of the active 3D Viewport.
Pressing G activates "Move" transformation mode. The selected object or element then moves freely according to the mouse pointer's location and camera.
To confirm the action, press LMB.
While Move is active, the amount of change in the X, Y, and Z coordinates is displayed in the footer (at the upper left corner) of the 3D Viewport.

Translation Display.
Mẹo
Moving an object in Object Mode changes the object's origin. Moving the object's vertices/edges/faces in Edit Mode does not change the object's origin.
Xoay Chiều -- Rotate
Tham Chiếu -- Reference
- Chế Độ -- Mode
Chế Độ Vật Thể và Biên Soạn -- Object and Edit Modes
- Trình Đơn -- Menu
- Phím Tắt -- Hotkey
R
Rotation is also known as a spin, twist, orbit, pivot, revolve, or roll and involves changing the orientation of elements (vertices, edges, faces, objects, etc.) around one or more axes or the Pivot Point.
The angle of rotation is displayed in the footer (at the upper left corner) of the 3D Viewport.

Rotation values.
Xoay Chiều dùng Hình Cầu Điều Khiển -- Trackball Rotation
A free rotation mode. Press R R to enable Trackball rotation.
Tỷ Lệ -- Scale
Tham Chiếu -- Reference
- Chế Độ -- Mode
Chế Độ Vật Thể và Biên Soạn -- Object and Edit Modes
- Trình Đơn -- Menu
- Phím Tắt -- Hotkey
S
Scaling means changing proportions of objects. Pressing S will enter the Scale transformation mode where the selected element is scaled inward or outward according to the mouse pointer's location. The element's scale will increase as the mouse pointer is moved away from the Pivot Point and decrease as the pointer is moved towards it. If the mouse pointer crosses from the original side of the Pivot Point to the opposite side, the scale will continue in the negative direction and flip the element.
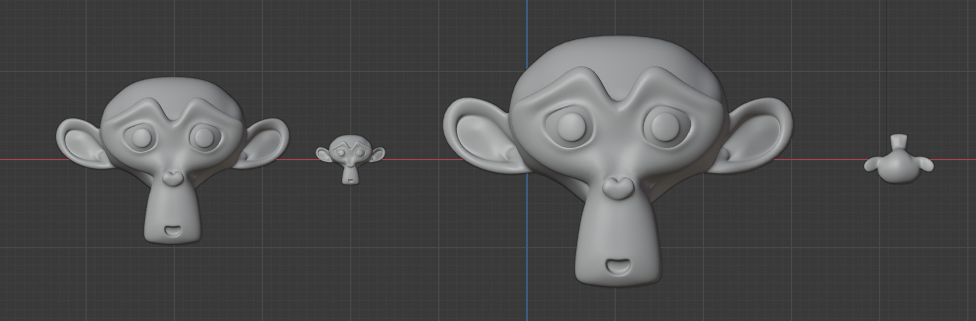
Basic scale usage. From left to right, the panels show: the original object, a scaled down object, a scaled up object and a scale-flipped object.
The amount of scaling will be displayed in the footer of the 3D Viewport.

Scale values.
Scale Cage
Tham Chiếu -- Reference
- Chế Độ -- Mode
Chế Độ Vật Thể và Biên Soạn -- Object and Edit Modes
- Tool
The Scale Cage tool is a bounding box around the object(s) which scales objects from a particular point or axis. The tool works by selecting a scale point and dragging inwards or outwards to adjust the scale accordingly. The origin for the scale will be from the point on the cube directly opposite from the point selected. Selecting points on the faces of the cube scales along one axis, selecting points on the edges of the cube scales along two axes, and selecting points on the vertices of the cube scales along all three axes.

Scale Cage tool.
Tùy Chọn Chung -- Common Options
There are multiple ways to transform an element which include:
The keyboard shortcut.
The menu in the header.
The 3D Transform Gizmos.
The Transform panel in the Sidebar region or the Object tab.
Chấp Thuận và Hủy -- Confirm and Cancel
LMB click to accept changes.
To cancel the transformation press RMB or Esc instead. This will reset the object or element to its original state.
Xem thêm
Using a combination of shortcuts gives you more control over your transformation. See Transform Control.
Adjust Last Operation
In the case of the 3D Viewport, there is the possibility to tweak the operation once accepted, using the specific Adjust Last Operation panel corresponding to the tool.
- Giá Trị -- Value
The amount of the transformation.
Vector, Angle
- Trục Ràng Buộc -- Constrain Axis
Used to constraint the transformation to one or more axes.
X, Y, Z
- Định Hướng -- Orientation
Shows the Orientations of the constraint axes.
- Biên Soạn Cân Đối, Dốc Suy Giảm, Kích Thước -- Proportional Editing, Falloff, Size
Activates/deactivates Proportional Editing and configures the Falloff type and Size of the Chỉnh Sửa Cân Đối -- Proportional Edit tool.