编辑
变换
参考
- 菜单
- 快捷键
G, R, S
Move a single node by clicking and dragging it around. A node can be clicked almost anywhere to start dragging. Multiple nodes can be moved after pressing G.
通常 , 建议在视图内排列节点 , 以便数据从左到右、从上到下流动。
A node can be resized by dragging the edges on the left or right side.
连接接口
交互式
LMB-click on a socket and drag. You will see a line coming out of it: This is called a link. Keep dragging and connect the link to an input socket of another node, then release the LMB. While multiple links can route out of an output socket, only a single link can be attached to an input socket.
要重新定位节点的输出链接,而不是添加新链接,按住 Ctrl 在输出接口拖放 。这适用于单个以及多个输出链接。
没有连接的节点可以插入到连接线上。只需将该节点移动到连接线上并在连接线变为橙色时释放。
- 生成连接 F
使用打开的接口选择多个节点,然后使用制作链接在它们之间创建链接。如果有其他可以连接的节点,请再次使用建立链接。
- 生成并替换链接 Shift-F
生成并替换连接 与 生成连接 的作用类似,但它将替换现有连接(如果存在)。
断开接口
交互式
Drag the link from an input socket and let it go keeping it unconnected.
切断连接
参考
- 菜单
- 快捷键
Ctrl-Alt-RMB
Mute links works as a mute/unmute toggle depending on the existing state of the link.
To mute a link between sockets click in an empty area, near the link you want to mute, and drag: You will see a little mute icon appearing at your mouse pointer. Move it over the link itself, and release.
When muting links connected to a reroute node, links connected to the reroute node will also be muted.
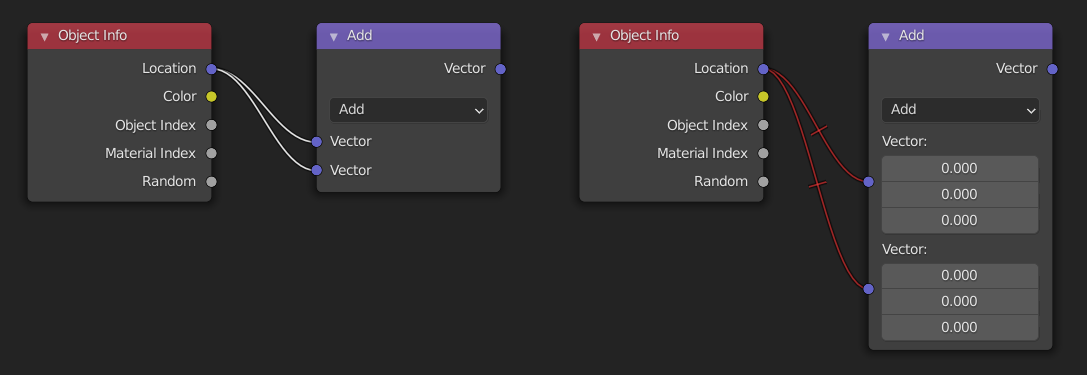
Muting links temporarily disconnects sockets but leaves the link connected. The muted link is displayed in red with a bar across. The controls for sockets are normally hidden when connected, when links are muted the controls are shown.

切断连接
参考
- 菜单
- 快捷键
Ctrl-RMB
To break a link between sockets click in an empty area, near the link you want to disconnect, and drag: You will see a little cutter icon appearing at your mouse pointer. Move it over the link itself, and release.
- Alt-D, Alt-LMB 拖动分离链接
Use Detach Links in order to cut all links attached to selected nodes at once.
复制操作
参考
- 菜单
- 快捷键
Shift-D
Click LMB or RMB on the desired node, press Shift-D and move the mouse away to see the duplicate of the selected node appearing under the mouse pointer.
Note
当你复制一个节点时,新的节点将被 精确 定位在被复制的节点上。如果你把它留在那里(而且这样做很容易),你可能 不 容易知道那里有 两个 节点! 如果有疑问,抓住一个节点并稍微移动一下,看看下面是否有东西隐藏。
复制/粘贴
参考
- 菜单
- 快捷键
Ctrl-C, Ctrl-V
复制的不仅是选中的节点,节点之间的连线也将被复制到剪贴板上。
Note
被粘贴的节点将被放置到与复制时 相同 的位置。直接复制(Duplicate Shift-D)也要注意这一点。
删除
- 删除 X, Delete
删除选定的节点。
- 通过重新连接删除 Ctrl-X
Delete the node(s) without losing the connections.
屏蔽
参考
- 菜单
- 快捷键
M
Muting a node removes the contribution of the node to the node tree, and makes all links pass through that node without change. Links will appear red as an indicator of passing through the muted node.
Tip
Individual node links can be muted with 切断连接.
显示/隐藏
- Hide H
Collapses the node so only the node header is visible. This can also be toggled by clicking the triangle at the top left of the node header.
- 切换节点预览 Shift-H
当节点操作确认后,在节点上显示/隐藏一个预览区块。可以点击节点标题上的材质球图标切换。
- 显示 / 隐藏节点插口 Ctrl-H
当节点未连接时,折叠/展开全部输入和输入插口。
- 切换节点选项
显示/隐藏全部节点属性。
- 折叠并隐藏未使用的节点插口
同时应用 切换隐藏节点接口 和 隐藏 操作。
层
Note
These operators are only used in the Compositor.
- 读取渲染层 Ctrl-R
Reads all the current scene's render layers from cache, as needed. This can be used to save RAM while rendering because the render layers do not have to be saved in RAM. And also for recovering some information from a failed render. For this to work, Cache Result must be enabled.