Timeline
The Timeline editor, identified by a clock icon, is used for manipulating keyframes and scrubbing the playhead.

La Timeline.
The Timeline gives the user a broad overview of a scene’s animation, by showing the current frame, the keyframes of the active object, the start and end frames of your animation sequence, as well as markers set by the user.
The Timeline includes Transport Controls, to play, pause, and skip through an animation sequence.
It also includes tools for manipulating Keyframes, Keying Sets, and Markers.
Vue principale
La région principale de la Timeline affiche les trames de l’animation au fil du temps.

Here you can see the Keyframes (diamond shapes), Playhead (blue handle), Scrollbar (along the bottom),
Ajustage de la Vue
La Timeline peut être divisée en panneaux en maintenant MMB, puis en glissant la zone vers la gauche ou la droite.
Vous pouvez zoomer la Timeline en utilisant Ctrl-MMB, la Molette de la souris, ou en pressant PavnumMoins et PavnumPlus.
You can also use the scrollbars, located at the bottom or the right of the editor, to pan and zoom the view.
Playhead
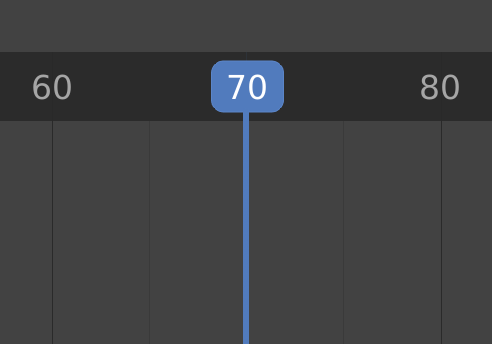
The Playhead is the blue vertical line with the current frame number at the top.
Playhead.
The Playhead can be set or moved to a new position by pressing or holding LMB in scrubbing area at the top of the timeline.
The Playhead can be moved in single-frame increments by pressing Left or Right, or you can jump to the beginning or end frame by pressing Shift-Left or Shift-Right.
Frame Range
By default, the Frame Range is set to start at frame 1 and end at frame 250. You can change the frame range in the top right of the Timeline header, or in the Output Properties.
Trames clés
For the active and selected objects, keyframes are displayed as diamond shapes.
You can click to select one at a time, or select several by holding Shift, or by dragging a box around the keyframes. You can then move single keys by dragging them, and you can move multiple keys by pressing G and scale them with S.
Only Selected Channels can be enabled. . For Armatures, this will display the object keyframes, and the keyframes for the active and selected pose bones.
Marqueurs
Voir la page des Marqueurs pour plus d’informations.
Entête
Popovers
Playback Popover
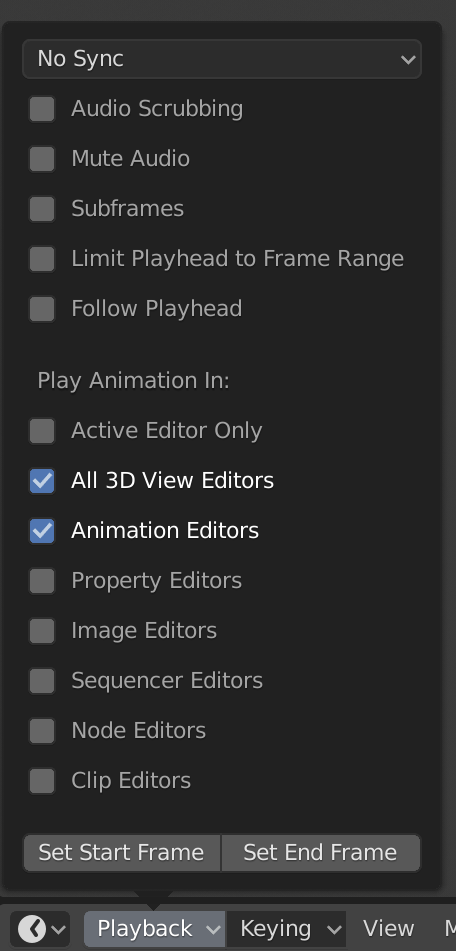
The Playback popover contains options controlling the animation playback.
- Sync Mode

FPS en rouge dans la Vue 3D.
60:54.75When you play an animation, the frame rate is displayed at the top left of the 3D View. If the scene is detailed and playback is slower than the set Frame Rate (see Panneau Dimensions), these options are used to synchronize the playback.
- No Sync
- Ne synchronise pas, lit chaque trame.
- Frame Dropping
- Drop frames if playback is too slow.
- AV-sync
- (Audio/Video Synchronization). Sync to audio clock, dropping frames if playback is slow.
- Audio Scrubbing
- If your animation has sound, this option plays bits of the sound wave while you move the playhead with LMB or keyboard arrows (like a moving playhead).
- Mute Audio
- Mute the sound from any audio source.
- Subframes
- Display and allow changing the current scene sub-frame.
- Limit Playhead to Frame Range
- Don’t allow selecting frames outside of the playback range using the mouse.
- Follow Playhead
- les éditeurs d’animation peuvent être configurés pour toujours suivre l’indicateur de temps pendant la lecture de l’animation. Le suivi sera effectué pendant l’animation et la modification de trame. Quand le curseur atteint la fin de l’écran, la plage de trames suivante de même taille sera affichée.
- Active Editor Only
- While playing, updates the Timeline, if Animation Editors and All 3D Viewports disabled.
- All 3D Viewports
- Pendant la lecture, met à jour la Vue 3D et la Timeline.
- Animation Editors
- While playing, updates the Timeline, Dope Sheet, Graph Editor, Video Sequencer.
- Property Editors
- Pendant la lecture de l’animation, ceci va mettre à jour les valeurs des propriétés dans l’UI.
- Image Editors
- The Image editor in Mask mode.
- Sequencer Editors
- While playing, updates the Video Sequencer.
- Node Editors
- While playing, updates the Node properties for the node editors.
- Clip Editors
- Pendant la lecture, met à jour l’éditeur Movie Clip.
Keying Popover
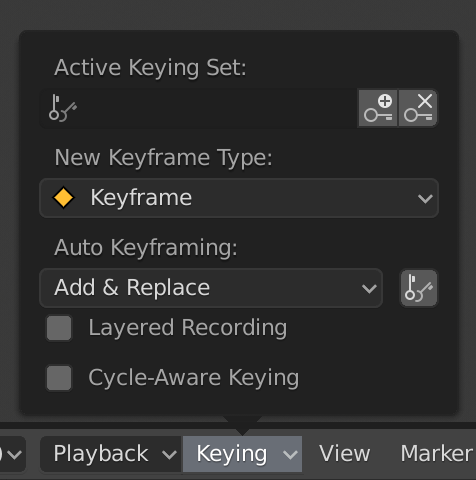
The Keying popover contains options that affect keyframe insertion.
- Keying Set actif
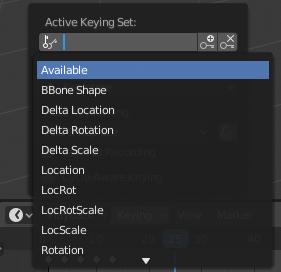
Timeline Keying Sets.
Les Keying Sets sont un ensemble de canaux de trame clé en un. Ils sont construits de manière à ce que l’utilisateur puisse enregistrer de nombreuses propriétés en même temps. Avec un Keying Set sélectionné, quand vous insérez une trame clé, Blender va ajouter des trames clés pour les propriétés dans le Keying Set actif. Il y a quelques Keying Sets intégrés, LocRotScale, et aussi des Keying Sets personnalisés. Les Keying Sets personnalisés peuvent être définis dans les panneaux .
- Insert Keyframes (plus icon)
- Insérer des trames clés sur la trame courante pour les propriétés dans le Keying Set actif.
- Delete Keyframes (minus icon)
- Supprimer des trames clés sur la trame courante pour les propriétés dans le Keying Set actif.
- New Keyframe Type
- Types de trame clé on insertion.
- Auto-Keyframing Mode
This controls how the auto keyframe mode works. Only one mode can be used at a time.
- Add & Replace
- Add or replace existing keyframes.
- Replace
- Only replace existing keyframes.
- Auto Keying Set (two keys icon)
- Si l’option est activée, Auto Keyframe va insérer de nouvelles trames clés dans les propriétés du Keying Set actif.
- Layered Recording
- Adds a new NLA Track and strip for every loop/pass made over the animation to allow non-destructive tweaking.
- Cycle-Aware Keying
When inserting keyframes into trivially cyclic curves, special handling is applied to preserve the cycle integrity (most useful while tweaking an established cycle):
- If a key insertion is attempted outside of the main time range of the cycle, it is remapped back inside the range.
- When overwriting one of the end keys, the other one is updated appropriately.
Contrôles de l’entête
Les contrôles de l’entête de la Timeline.

Contrôles de l’entête de la Timeline.
Transport Controls
These buttons are used to set, play, rewind, the Playhead.
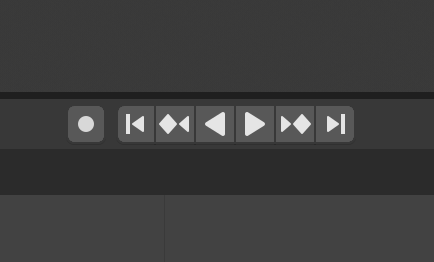
Transport controls.
- Saut au début (⏮) Maj-Ctrl-Bas, Maj-Gauche
- Ceci met le curseur au début de la plage de trames.
- Saut à la trame clé précédente (⏪︎) Bas
- Ceci met le curseur à la trame clé précédente.
- Rembobinage (◀) Maj-Alt-A
- Ceci lit la séquence d’animation à l’envers. Pendant la lecture, les boutons de lecture passent au bouton pause.
- Lecture (▶) Alt-A
- Ceci lit la séquence d’animation. Pendant la lecture, les boutons de lecture passent au bouton pause.
- Saut à la trame clé suivante (⏩︎) Haut
- Ceci met le curseur à la trame clé suivante.
- Saut à la fin (⏭) Maj-Ctrl-Haut, Maj-Droite
- Ceci met le curseur à la fin de la plage de trames.
- Pause (⏸) Alt-A
- Ceci arrête la lecture de l’animation.
Frame Controls
- Current Frame Alt-Molette
- The current frame of the animation/playback range. Also the position of the Playhead.
- Preview Range (clock icon)
- This is a temporary frame range used for previewing a smaller part of the full range. The preview range only affects the viewport, not the rendered output. See Preview Range.
- Start Frame
- La trame de début de l’animation / plage de lecture.
- End Frame
- La trame de fin de l’animation / plage de lecture.
Contrôle de trames clés
- Auto Keyframe

Auto Keyframe dans la Timeline.
The record button enables Auto Keyframe: It will add and/or replace existing keyframes for the active object when you transform it in the 3D View.
For example, when enabled, first set the Playhead to the desired frame, then move an object in the 3D View, or set a new value for a property in the UI.
When you set a new value for the properties, Blender will add keyframes on the current frame for the transform properties. Other use cases are Fly/Walk Mode to record the walk/flight path and Lock Camera to View to record the navigation in camera view.
Note
Notez que Auto Keyframe fonctionne uniquement pour les propriétés de transformation (objets et os), dans les Vues 3D (càd. que vous ne pouvez pas l’utiliser par ex. pour animer les couleurs d’un matériau dans l’éditeur Properties…).
