Outils de sommet
Référence
| Mode: | Mode Édition |
|---|---|
| Menu: | |
| Raccourci: | Ctrl-V |
This page covers many of the tools in the menu. These are tools that work primarily on vertex selections, however, some also work with edge or face selections.
Merging
Fusion de sommets
Référence
| Mode: | Mode Édition |
|---|---|
| Menu: | , |
| Raccourci: | Alt-M |
Cet outil vous permet de fusionner tous les sommets sélectionnés en un sommet unique, en faisant disparaître tous les autres. Vous pouvez choisir la position du sommet survivant dans le menu que cet outil fait apparaître avant l’exécution :
- At First
- Disponible uniquement en mode de sélection Vertex, il va placer le sommet restant à la position du premier sélectionné.
- At Last
- Disponible uniquement en mode de sélection Vertex, il va placer le sommet restant à la position du dernier sélectionné (celui actif).
- At Center
- Disponible dans les modes de sélection, il va placer le sommet restant au centre de la sélection.
- At Cursor
- Disponible dans les modes de sélection, il va placer le sommet restant au niveau du curseur 3D.
- Collapse
- Every island of selected vertices (connected by selected edges) will merge on its own median center, leaving one vertex per island. It is also available via the menu option…
Merging vertices of course also deletes some edges and faces. But Blender will do everything it can to preserve edges and faces only partly involved in the reunion.
Note
At First and At Last depend on that the selection order is saved: the order is lost, for instance, after changing selection mode.
- UVs
- If UVs is ticked in the Adjust Last Operation panel, the UV mapping coordinates, if existing, will be corrected to avoid image distortion.
Merge by Distance
Référence
| Mode: | Mode Édition |
|---|---|
| Menu: | , |
Merge by Distance is a useful tool to simplify a mesh by merging the selected vertices that are closer than a specified distance to each other. An alternative way to simplify a mesh is to use the Decimate Modifier.
- Merge Distance
- Sets the distance threshold for merging vertices.
- Unselected
- Allows vertices in the selection to be merged with unselected vertices. When disabled, selected vertices will only be merged with other selected ones.
Separating
Rip Region
Référence
| Mode: | Mode Édition |
|---|---|
| Menu: | |
| Raccourci: | V |
Rip creates a « hole » in the mesh by making a copy of selected vertices and edges, still linked to the neighboring non-selected vertices, so that the new edges are borders of the faces on one side, and the old ones, borders of the faces on the other side of the rip.
Exemples
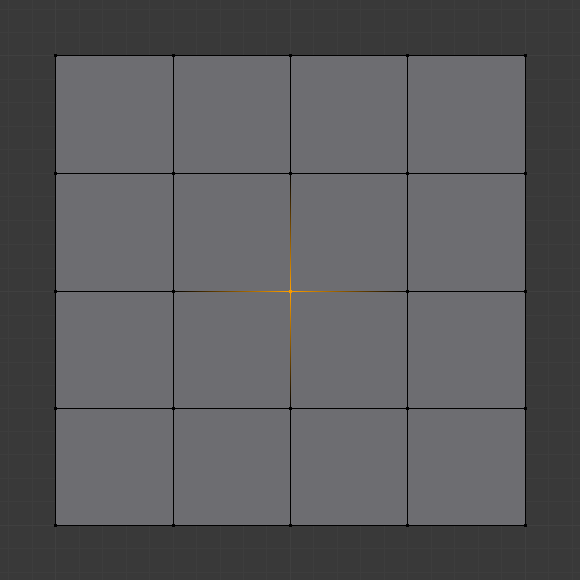
Sommet sélectionné. |

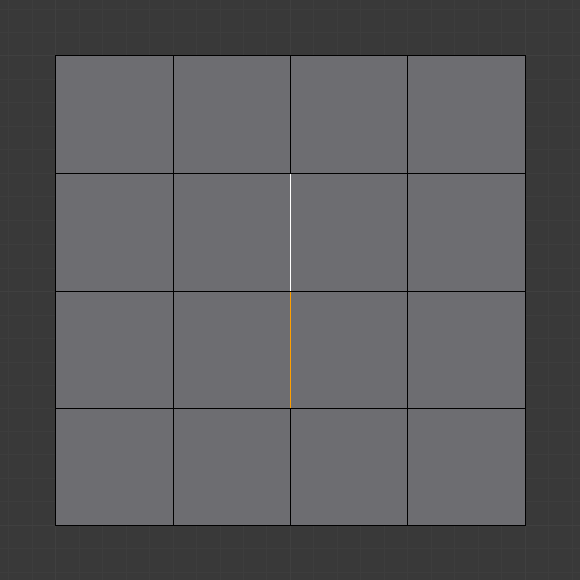
Trou créé après l’utilisation de rip sur le sommet. |
Arêtes sélectionnées. |
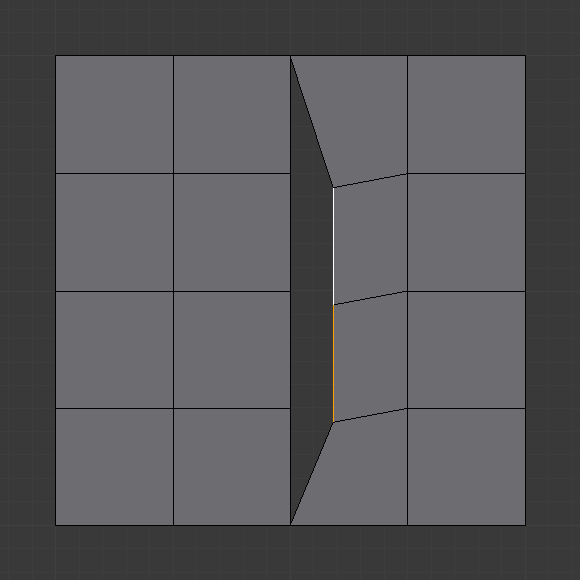
Résultat de rip avec une sélection d’arêtes. |

Une sélection complexe de sommets. |

Résultat de l’opération rip. |
Limitations
Rip will only work when edges and/or vertices are selected. Using the tool when a face is selected (explicitly or implicitly), will return an error message « Cannot perform ripping with faces selected this way ». If your selection includes some edges or vertices that are not « between » two faces manifold, it will also fail with the message « No proper selection or faces include ».
Rip Vertices and Fill
Référence
| Mode: | Mode Édition |
|---|---|
| Menu: | |
| Raccourci: | Alt-V |
Rip fill fonctionne de la même manière que l’outil Rip ci-dessus, mais au lieu de laisser un trou, il remplit l’espace par la géométrie.
|
Arêtes sélectionnées. |
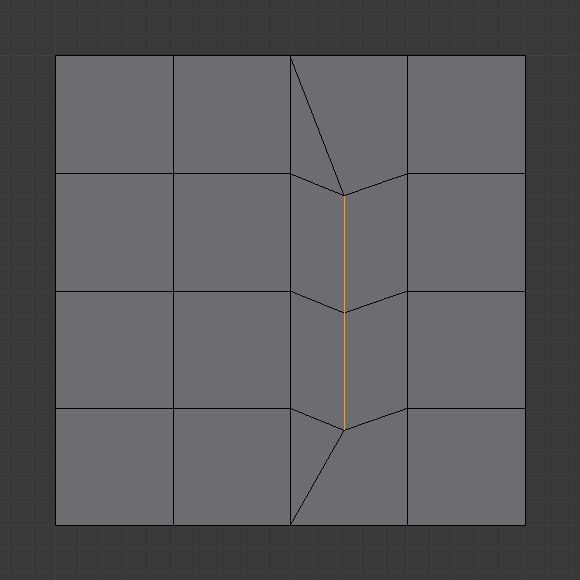
Result of rip fill. |
Split
Référence
| Mode: | Mode Édition |
|---|---|
| Menu: | |
| Raccourci: | Y |
Splits (disconnects) the selection from the rest of the mesh. The border edge to any non-selected elements are duplicated.
Notez que la « copie » est laissée exactement à la même position que l’original, aussi vous devez la déplacer G pour la voir nettement…
Rip Edge
Référence
| Mode: | Mode Édition |
|---|---|
| Menu: | |
| Raccourci: | Alt-D |
This tool takes any number of selected vertices and duplicate-drags them along the closest edge to the mouse, When extending an edge loop, it extends the vertices at the endpoints of the loop. The behavior is similar to the Extrude tool, but it creates an n-gon.
Il contribue à ajouter facilement des détails aux arêtes existantes.
Separate
Référence
| Mode: | Mode Édition |
|---|---|
| Menu: | |
| Raccourci: | P |
The Separate tool will Split mesh elements into another mesh object.
- Selection
- Sépare les éléments sélectionnés.
- By Material
- Sépare des fragments suivant les matériaux assignés aux différentes faces.
- By loose parts
- Crée un objet de chaque élément indépendant (déconnecté) du maillage d’origine.
Vertex Slide
Référence
| Mode: | Mode Édition |
|---|---|
| Menu: | |
| Raccourci: | Maj-V |
Vertex Slide va transformer un sommet sur une de ses arête adjacentes. Utilisez Maj-V pour activer l’outil. Le sommet sélectionné le plus proche du curseur de la souris sera le sommet de contrôle. Déplacez la souris dans la direction de l’arête souhaitée pour spécifier la position du sommet. Ensuite pressez LMB pour confirmer la transformation.
- Even E
- Par défaut, la valeur de compensation des sommets est un pourcentage de la longueur des arêtes sur laquelle ils se déplacent. Quand la mode Even est active, les sommets sont modifiés par une valeur absolue.
- Flipped F
- When Flipped is active, vertices move the same distance from adjacent vertices, instead of moving from their original position.
- Clamp Alt or C
- Toggle clamping the slide within the edge extents.

Sommet sélectionné. |

Positioning vertex interactively. |

Repositioned vertex. |
Convex Hull
Référence
| Mode: | Mode Édition |
|---|---|
| Menu: |
The Convex Hull operator takes a point cloud as input and outputs a convex hull surrounding those vertices. If the input contains edges or faces that lie on the convex hull, they can be used in the output as well. This operator can be used as a bridge tool as well.
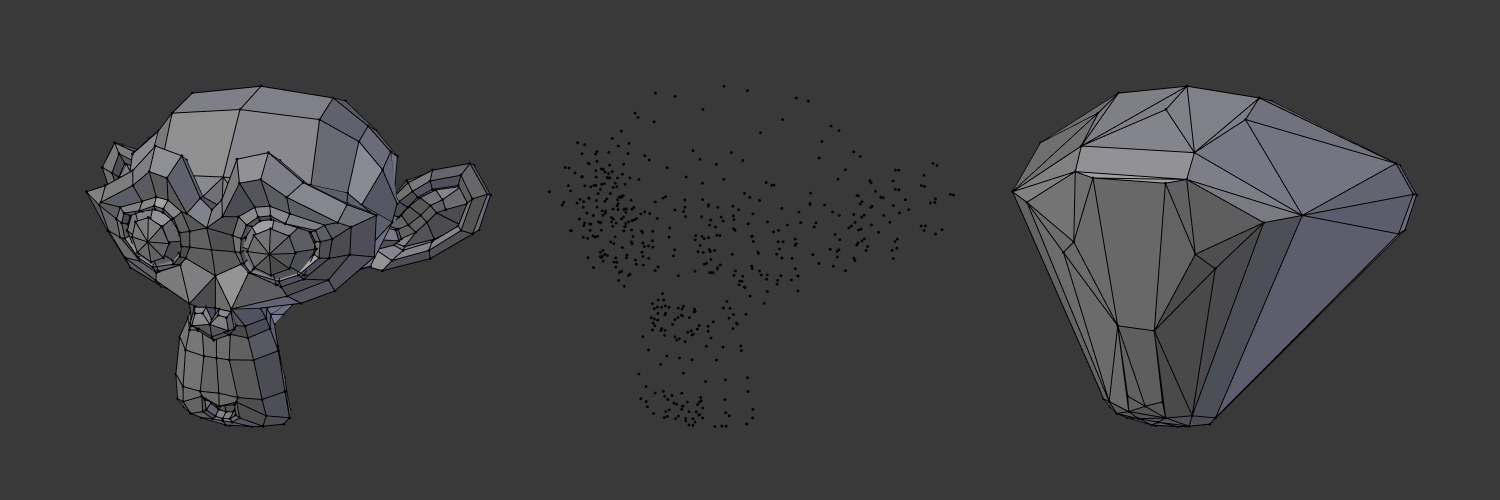
Input mesh, point cloud, and Convex Hull result.
- Delete Unused
- Removes vertices, edges, and faces that were selected, but not used as part of the hull. Note that vertices and edges that are used by other edges and faces not part of the selection will not be deleted.
- Use Existing Faces
- Where possible, use existing input faces that lie on the hull. This allows the convex hull output to contain n-gons rather than triangles (or quads if the Join Triangles option is enabled).
- Make Holes
- Delete edges and faces in the hull that were part of the input too. Useful in cases like bridging to delete faces between the existing mesh and the convex hull.
- Join Triangles
- Joins adjacent triangles into quads. Has all the same properties as the Tris to Quads operator (angle limit, compare UVs, etc.).
- Max Face Angle, Max Shape Angle, Compare
- See Triangles to Quads (triangles en quads).
Make Vertex Parent
Référence
| Mode: | Mode Édition |
|---|---|
| Menu: | |
| Raccourci: | Ctrl-P |
This will parent the other selected object(s) to the vertices/edges/faces selected, as described here.
Add Hook
Référence
| Mode: | Mode Édition |
|---|---|
| Menu: | |
| Raccourci: | Ctrl-H |
Adds a Hook Modifier (using either a new empty, or the current selected object) linked to the selection. Note that even if it appears in the history menu, this action cannot be undone in Edit Mode – because it involves other objects…
When the current object has no hooks associated, only the 2 first options will appear on the menu.
- Hook to New Object
- Creates a new Hook Modifier for the active object and assigns it to the selected vertices; it also creates an empty at the center of those vertices, which are hooked to it.
- Hook to Selected Object
- Does the same as Hook to New Object, but instead of hooking the vertices to a new empty, it hooks them to the selected object (if it exists). There should be only one selected object (besides the mesh being edited).
- Hook to Selected Object Bone
- Does the same as Hook to New Object, but it sets the last selected bone in the also selected armature as a target.
- Assign to Hook
- The selected vertices are assigned to the chosen hook. For that to happen, a list of the hooks associated to the object is displayed. All the unselected vertices are removed from it (if they were assigned to that particular hook). One vertex can be assigned to more than one hook.
- Remove Hook
- Removes the chosen hook (from the displayed list) from the object: the specific Hook Modifier is removed from the modifier stack.
- Select Hook
- Selects all vertices assigned to the chosen hook (from the hook list).
- Reset Hook
- It’s equivalent to the Reset button of the specific Hook Modifier (chosen from the hook list).
- Recenter Hook
- It’s equivalent to the Recenter button of the specific Hook Modifier (chosen from the hook list).
Blend From Shape, Propagate Shapes
Référence
| Mode: | Mode Édition |
|---|---|
| Menu: | and |
These are options regarding shape keys.
- Shape Propagate
- Apply selected vertex locations to all other shape keys.
- Blend From Shape
- Blend in the shape from a shape key.