Parentage d’objet
Make Parent
Référence
- Mode
Mode Objet
- Menu
- Raccourci
Ctrl-P
When modeling a complex object, such as a watch, you may choose to model the different parts as separate objects. Yet all the parts may be attached to each other. In these cases, you want to designate one object as the parent of all the children. Movement, rotation or scaling of the parent also affects the children.
To parent objects, select at least two objects (select the child objects first, and select the parent object last), and press Ctrl-P. The Set Parent To menu will pop up allowing you to select from one of several possible different parenting types. Selecting one of the entries in Set Parent To confirms, and the child/children to parent relationship is created.
The last object selected will be the active object (outlined in light orange), and will also be the parent object. If you selected multiple objects before selecting the parent, they will all be children of the parent and will be at the same level of the hierarchy (they are called “siblings”).
Le menu déroulant Set Parent To est sensible au contexte, ce qui signifie que le nombre d’entrées qu’il affiche peut changer selon les objets sélectionnés quand le raccourci Ctrl-P est utilisé.
Moving, rotating or scaling the parent will also usually transform the child/children. Yet transforming the child/children of the parent will not affect the parent. In other words, the direction of influence is from parent to child and not child to parent.
In general when using Ctrl-P or to parent objects, the child objects can only have one parent object. If a child object already has a parent object and you give it another parent then Blender will remove the previous parent relationship.
Parent Inverse
When objects are parented with Ctrl-P, the current transformation of the parent is stored in a hidden parent inverse matrix. By using that, the location, rotation and scale properties of the child can continue to be effectively interpreted in world space, as long as the parent doesn’t move.
For parenting without assigning the matrix, select the Without Inverse option in the Ctrl-P pop-up menu. This creates an alternative parent-child-relationship where child object’s properties are evaluated in the parent’s coordinate system. This is the better choice for CAD purposes, for example.
La matrice peut être également être effacée après le parentage en utilisant Clear Parent Inverse.
Parent Types
Blender prend en charge différents types de parentage, listés ci-dessous :
Object
Bone
Vertex
Vertex (Triangle)
Setups
En plus du parentage des objets sélectionnés, il ajoute un Modificateur ou une Contrainte aux objets enfants, avec le parent comme objet cible ou active une propriété du parent à savoir Follow Path.
Object Parent
Object Parent is the most general form of parenting that Blender supports. If will take selected objects and make the last selected object the parent object, while all other selected objects will be child objects. The child objects will inherit the transformations of the parent. The parent object can be of any type.
Object (Keep Transform) Parent
Object (Keep Transform) Parent works in a very similar way to Object Parent. The major difference is in whether the child objects will keep any previous transformations applied to them from the previous parent object.
Puisque l’explication de ceci de manière technique simple à comprendre est ardue, utilisons plutôt un exemple pour en faire la démonstration.
Assume that we have a scene consisting of three objects, those being two empty objects named « EmptyA » and « EmptyB », and a Monkey object. Fig. Scène sans parentage. shows the three objects with no parenting relationships active on them.
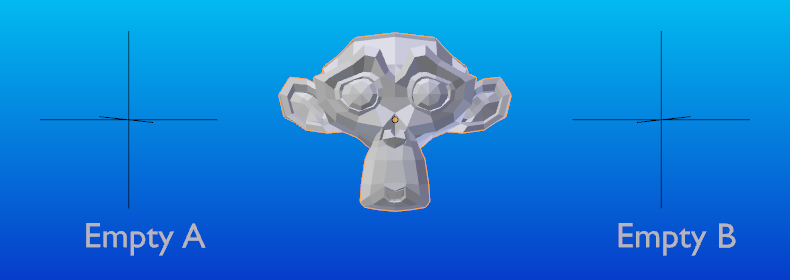
Scène sans parentage.
If you select the Monkey object by LMB click and then Shift-LMB click « EmptyA » object and press Ctrl-P and finally select Object from the Set Parent To pop-up menu. This will result in « EmptyA » object being the parent object of the Monkey object. With only « EmptyA » selected rotating/scaling/moving it will result in the Monkey object being altered respectively.
Dimensionnez l’objet « EmptyA » afin que « Monkey » soit plus petit et se déplace un peu à gauche.
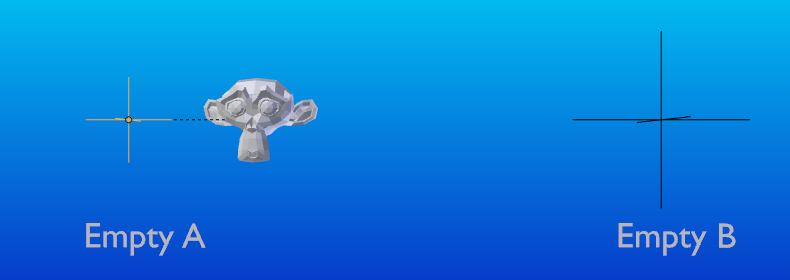
« Monkey » est l’objet enfant de « EmptyA ».
If you select only the Monkey object by LMB click and then Shift-LMB click « EmptyB » object and press Ctrl-P and select Object from the Set Parent To pop-up menu. This will result in « EmptyB » object being the parent object of the Monkey object. Notice that when you change the parent of the Monkey the scale of the Monkey changed.
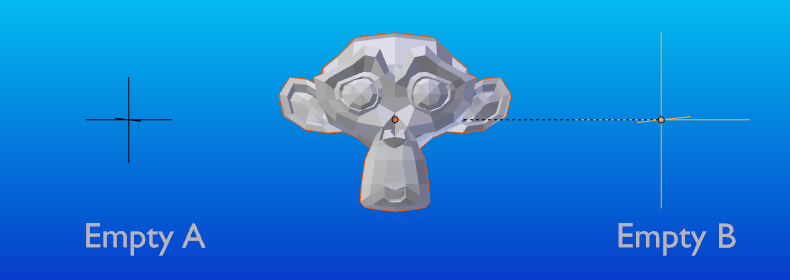
« Monkey » est l’objet enfant de « EmptyB ».
Ceci se produit car l’objet « Monkey » n’avait jamais eu son échelle modifié directement, le changement est venu du fait qu’il était l’enfant de « EmptyA » qui avait on échelle modifiée. Le changement de parent de « Monkey » a produit ces changements indirects dans l’échelle , car « EmptyB » n’a pas eu son échelle modifiés.
This is often the required behavior, but it is also sometimes useful that if you change your parent object that the child object keep any previous transformations it got from the old parent object; If instead when changing the parent object of the Monkey from « EmptyA » to « EmptyB » we had chosen parenting type Object (Keep Transform), the Monkey would keep its scale information it obtained from the old parent « EmptyA » when it is assigned to the new parent « EmptyB ».
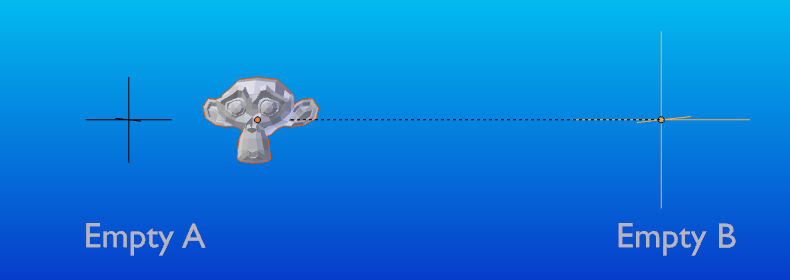
La méthode Object (Keep Transform) parent.
Si vous voulez suivre la description ci-dessus voici le fichier blend utilisé pour décrire la méthode de parentage Object (Keep Transform) :
Parent d’os
Bone parenting allows you to make a certain bone in an armature the parent object of another object. This means that when transforming an armature the child object will only move if the specific bone is the child object of moves.
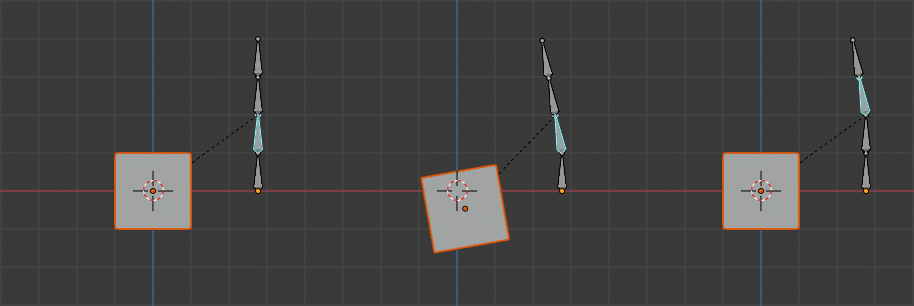
Trois images d’armatures avec quatre os.
In Fig. Trois images d’armatures avec quatre os. with the 2nd bone being the bone parent of the child object cube. The cube is only transformed if the 1st or 2nd bones are. Notice altering the 3rd and 4th bones has no effect on the cone.
To use bone parenting, you must first select all the child objects you wish to parent to a specific armature bone, then Shift-LMB select the armature object and switch it into Pose Mode and then select the specific bone you wish to be the parent bone by LMB selecting it. Once done press Ctrl-P and select bone from the Set Parent To pop-up menu.
Now transforming that bone in Pose Mode will result in the child objects also transforming.
Parentage relatif
Bone relative parenting is an option you can toggle for each bone. This works in the same way as bone parenting with one difference.
With bone parenting if you have parented a bone to some child objects and you select that bone and switch it into Edit Mode and then move that bone; When you switch back into Pose Mode on that bone, the child object which is parented to that bone will snap back to the location of the bone in Pose Mode.
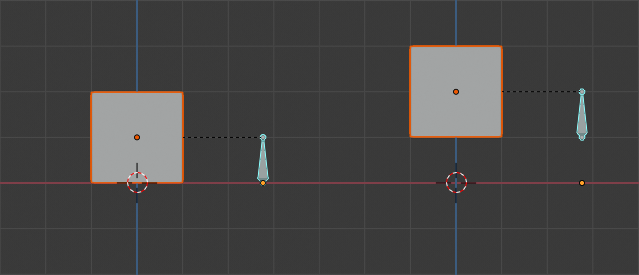
Os d’armature unique qui a un objet cube enfant parenté en vertu du parentage d’os.
In Fig. Os d’armature unique qui a un objet cube enfant parenté en vertu du parentage d’os. the 1st picture shows the position of the cube and armature before the bone is moved in Edit Mode. 2nd picture shows the position of the cube and armature after the bone was selected in Edit Mode, moved and switched back into Pose Mode. Notice that the child object moves to the new location of the pose bone.
Bone relative parenting works differently; If you move a parent bone in Edit Mode, when you switch back to Pose Mode, the child objects will not move to the new location of the Pose Bone.
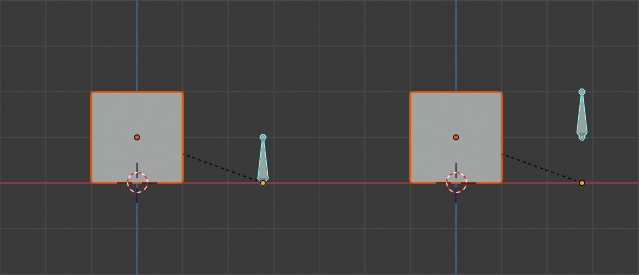
Os unique avec un parent à un cube.
In Fig. Os unique avec un parent à un cube. the 1st picture shows the position of the cube and armature before the bone is moved in Edit Mode. 2nd picture shows the position of the cube and armature after the bone was selected in Edit Mode, moved and switched back into Pose Mode. Notice that the child object does not move to the new location of the pose bone.
Note
When using Ctrl-P to set parents, choosing « Bone » or « Bone Relative » will respectively clear and set the bone’s « Relative Parenting » option. Since « Relative Parenting » is an option that is set per bone, this influences all child objects of that bone at once.
Parent de sommet
Pour des objets de type curve, surface, mesh et lattice, il existe la possibilité d’utiliser un de ses sommets ou points comme parent d’autres objets. Vous pouvez parenter un objet à un sommet unique ou à un groupe de trois sommets ; de cette manière les enfants se déplaceront quand le mesh parent est déformé.
Parent de sommet en Mode Édition
En Mode Objet, sélectionnez l(es) enfant(s) et ensuite l’objet parent. Tab en Mode Objet et sur l’objet parent sélectionnez soit un sommet qui définit un point unique, soit sélectionnez trois sommets qui définissent une zone (les trois sommets n’ont pas à former une face complète ; ils peuvent être trois sommets quelconques de l’objet parent), et ensuite pressez Ctrl-P et confirmez.
à ce stade, si un sommet unique a été sélectionné, une ligne de relation/parentage sera tracée du sommet vers l(es) enfant(s). Si trois sommets ont été sélectionnés alors une ligne relation/parentage sera tracée du centre moyen des trois points (de l’objet parent) vers l(es) enfant(s). Maintenant, comme le maillage parent déforme et le(s) sommet(s) parent(s) choisi(s) bouge(nt), l(es) enfant(s) bougeront aussi.
Parent de sommet en Mode Objet
Vertex parenting can be performed from Object Mode, this is done like regular object parenting, press Ctrl-P in Object Mode and select Vertex or Vertex (Triangle).
Les sommets les plus proches seront utilisés de chaque objet, ce qui est typiquement ce que vous souhaiteriez.
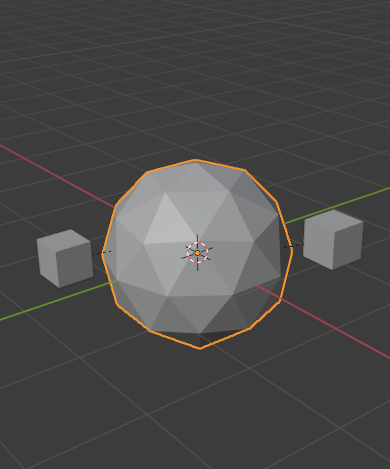
Les petits cubes peuvent chacun être parentés automatiquement à une triade de sommets proches sur l’icosphère en utilisant le « sommet (Triangle) » dans le menu contextuel set parent.¶ |
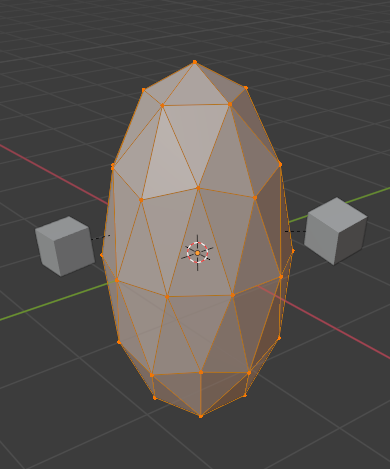
Reshaping the object in Edit Mode then means each of the cubes follows their vertex parent separately.¶ |
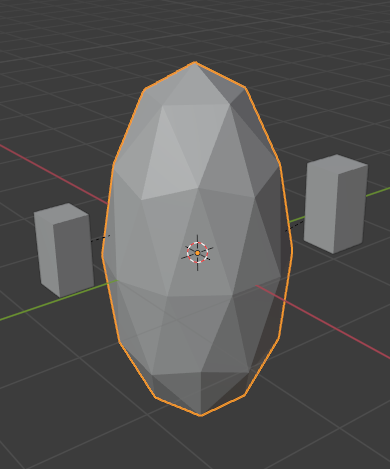
Scaling the parent icosphere in Object Mode means the child cubes are also scaled as expected.¶ |
L’item du menu contextuel du parent suppose que les utilisateurs peuvent rapidement configurer un grand nombre de relations parentales de sommet, et éviter l’effort fastidieux d’établir chaque relation parent-enfant de sommet individuellement.
Note
C’est en fait une sorte de hook « inversé ».
Options
Move Child
Vous pouvez déplacer un objet enfant vers son parent en effaçant son origine. La relation entre le parent et l’enfant n’est pas affecté. Sélectionnez l’objet enfant et pressez Alt-O. En confirmant, l’objet enfant va se coller sur la position du parent. Utilisez la vue Outliner pour vérifier que l’objet enfant est toujours parenté.
Clear Parent
Référence
- Mode
Mode Objet
- Menu
- Raccourci
Alt-P
Vous pouvez supprimer une relation parent-enfant via Alt-P.
- Clear Parent
Si le parent dans le groupe est sélectionné, rien n’est fait. Si un enfant ou des enfants sont sélectionnés, ils sont dissociés du parent, ou libérés, et ils reviennent à leur emplacement, rotation et taille d”origine.
- Clear and Keep Transformation
Libère les enfants du parent, et leur conserve les emplacement, rotation et taille donnés par le parent.
Voir Non-Uniform Scale qui peut s’appliquer ici.
- Clear Parent Inverse
Au lieu de supprimer la relation hiérarchique parent-enfant, celui-ci efface la matrice « Parent Inverse » des objets sélectionnés. Avec une matrice vide, les propriétés de position, de rotation et d’échelle des enfants sont i nterprétés dans l’espace des coordonnées du parent.
Indication
Use the Outliner
Il existe une autre manière de voir la relation parent-enfant dans des groupes et c’est d’utiliser la vue Outliner de l”Éditeur Outliner.
Limitations connues
Non-Uniform Scale
Un parent avec une échelle et une rotation non uniformes par rapport à son enfant peut causer un effet shear (cisaillement).
Alors que ceci est pris en charge par le parentage, le shear sera perdu quan le parent est effacé puisqu’il ne peut pas être représenté par la position, la mise à l’échelle et la rotation.
Si Clear and Keep Transformation déplace l’objet, une échelle non uniforme est la cause la plus probable.