Zones (Areas)

Les limites des zones sont indiquées par des coins arrondis (surlignés en jaune).
The Blender window is divided into a number of rectangles called Areas. Areas reserve screen space for Éditeurs, such as the 3D Viewport or the Outliner. Each editor offers a specific piece of functionality.
Areas are grouped into Workspaces, which are geared towards particular tasks (modeling, animating and so on).
Note
While some keyboard shortcuts in Blender are global (such as Ctrl-S for saving), many depend on which editor the mouse cursor is hovering over.
As an example, say you just selected two objects in the Outliner and want to join them. If you pressed the shortcut for this (Ctrl-J) while the cursor is still in the Outliner, nothing would happen as the shortcut isn’t valid there; you first need to move your cursor to the 3D Viewport.
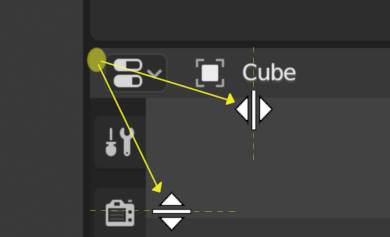
Redimensionner

Vous pouvez redimensionner les zones en faisant glisser leurs frontières avec LMB. Déplacez le curseur de votre souris sur la frontière entre deux zones, de sorte que le curseur se transforme en flèche à double tête, puis cliquez et faites glisser.
Diviser
Splitting an area will create a new area. Placing the mouse cursor in an area corner will change the cursor to a cross (+) to indicate that pressing down LMB will activate splitting or joining. Dragging from an area corner inward will split the area. You define the split direction by dragging either horizontally or vertically.
Assembler (Joining)

Les propriétés sont jointes à l’Outliner.
Dragging from an area corner outward will join two areas. The area that will be closed shows a dark overlay. You can select which area will be closed by moving the mouse over it. Release the LMB to complete the join. If you press Esc or RMB before releasing the mouse, the operation will be canceled.
Astuce
The cursor will also turn into a cross when hovering over either end of the border between two areas. When splitting or joining, it’s best not to start dragging from this border, but from a corner inside one of the areas.
Options de Zone (Area)
RMB sur le bord ouvre les Area Options.
- Vertical/Horizontal Split
Affiche une ligne indicatrice qui vous permet de sélectionner la zone et la position de la coupe. Tab commute entre vertical/horizontal.
- Fusion de zones (Join Areas)
Indique le recouvrement de la direction de fusion.
- Swap Areas
Échange cette zone avec celle adjacente.
Échange de contenu entre zones (Swap areas)
You can swap the contents of two areas by pressing Ctrl-LMB on one of the corners of the initial area, dragging towards the target area, and releasing the mouse there. The two areas do not need to be side-by-side, though they must be inside the same window.
Duplication de zone dans une nouvelle fenêtre
Référence
- Menu
Une nouvelle fenêtre flottante contenant une zone peut être créée à partir de . (Non disponible dans certains éditeurs.)
La nouvelle fenêtre est une fenêtre pleinement fonctionnelle, faisant partie de la même instance de Blender. Ceci peut être utile, par exemple, si vous avez plusieurs moniteurs.
You can also create a new window from an existing area by pressing Shift-LMB on an area corner, then dragging outward slightly.
Bascule maximisation/réduction de zone
Référence
- Menu
- Raccourci
Ctrl-Espace
Expands the Area so it fills the whole window (while keeping the Topbar and Status Bar visible). To return to normal size, use the keyboard shortcut again or click the Back to Previous button in the Topbar.
Bascule en plein écran
Référence
- Menu
- Raccourci
Ctrl-Alt-Espace
Expands the Area so it fills the whole window, hiding the Topbar, Status Bar, and even the secondary regions (toolbars etc.) of the Area’s own editor. To return to normal size, use the keyboard shortcut again or click the icon in the Area’s top right corner (only becomes visible when hovering).