Introduction
La Dope Sheet.
The Dope Sheet gives the animator a birds-eye-view of the keyframes inside the scene.
The Dope Sheet is inspired by classical hand-drawn animation process, in which animators will make use of a chart, showing exactly when each drawing, sound and camera move will occur, and for how long. This is called an exposure sheet or “dope sheet”. While CG foundations dramatically differ from classical hand-drawn animation, Blender’s Dope Sheet inherits a similar directive.
Modes de la Dope Sheet
Modes de la Dope Sheet.
While the Dope Sheet Mode allows you to edit multiple actions at once, the other ones are dedicated to view and edit specific data-blocks used in different context of animation.
Dope Sheet
Cache File: Alembic Todo 2.78.
Région principale
Keyframes
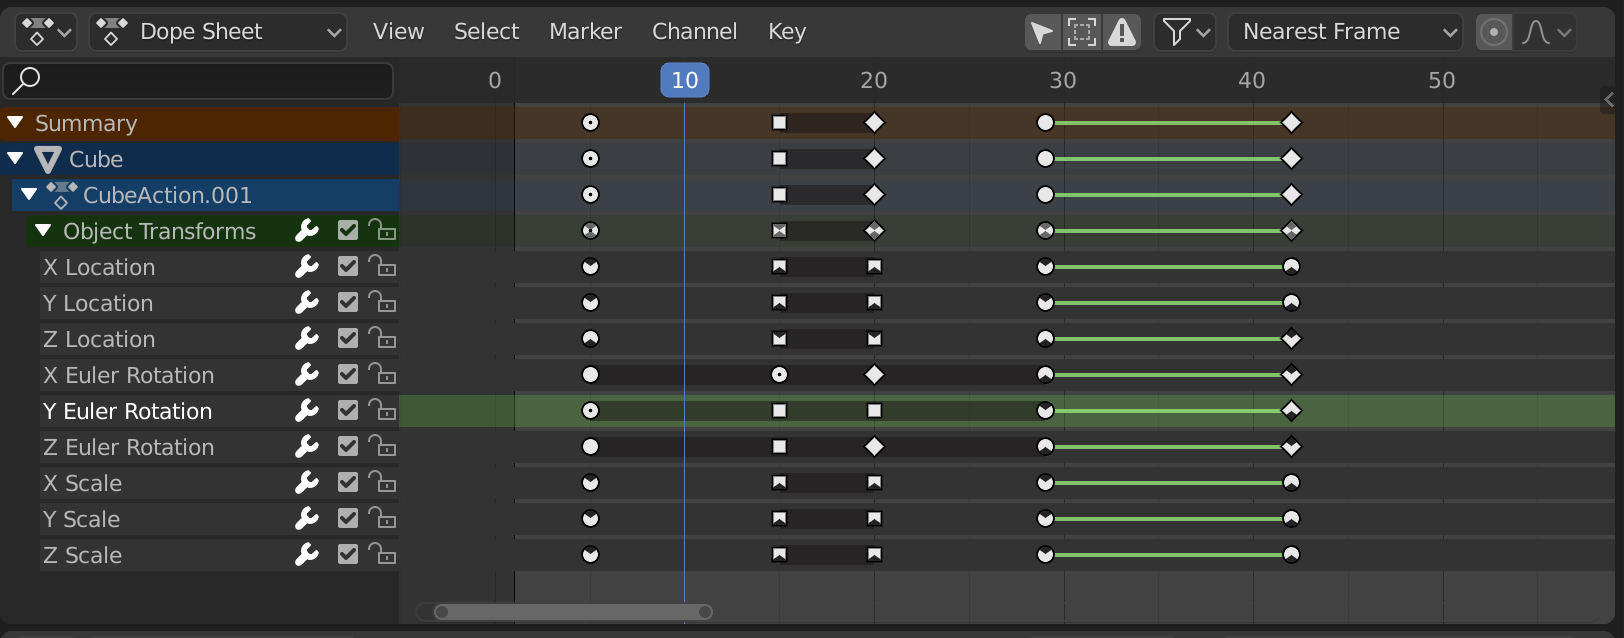
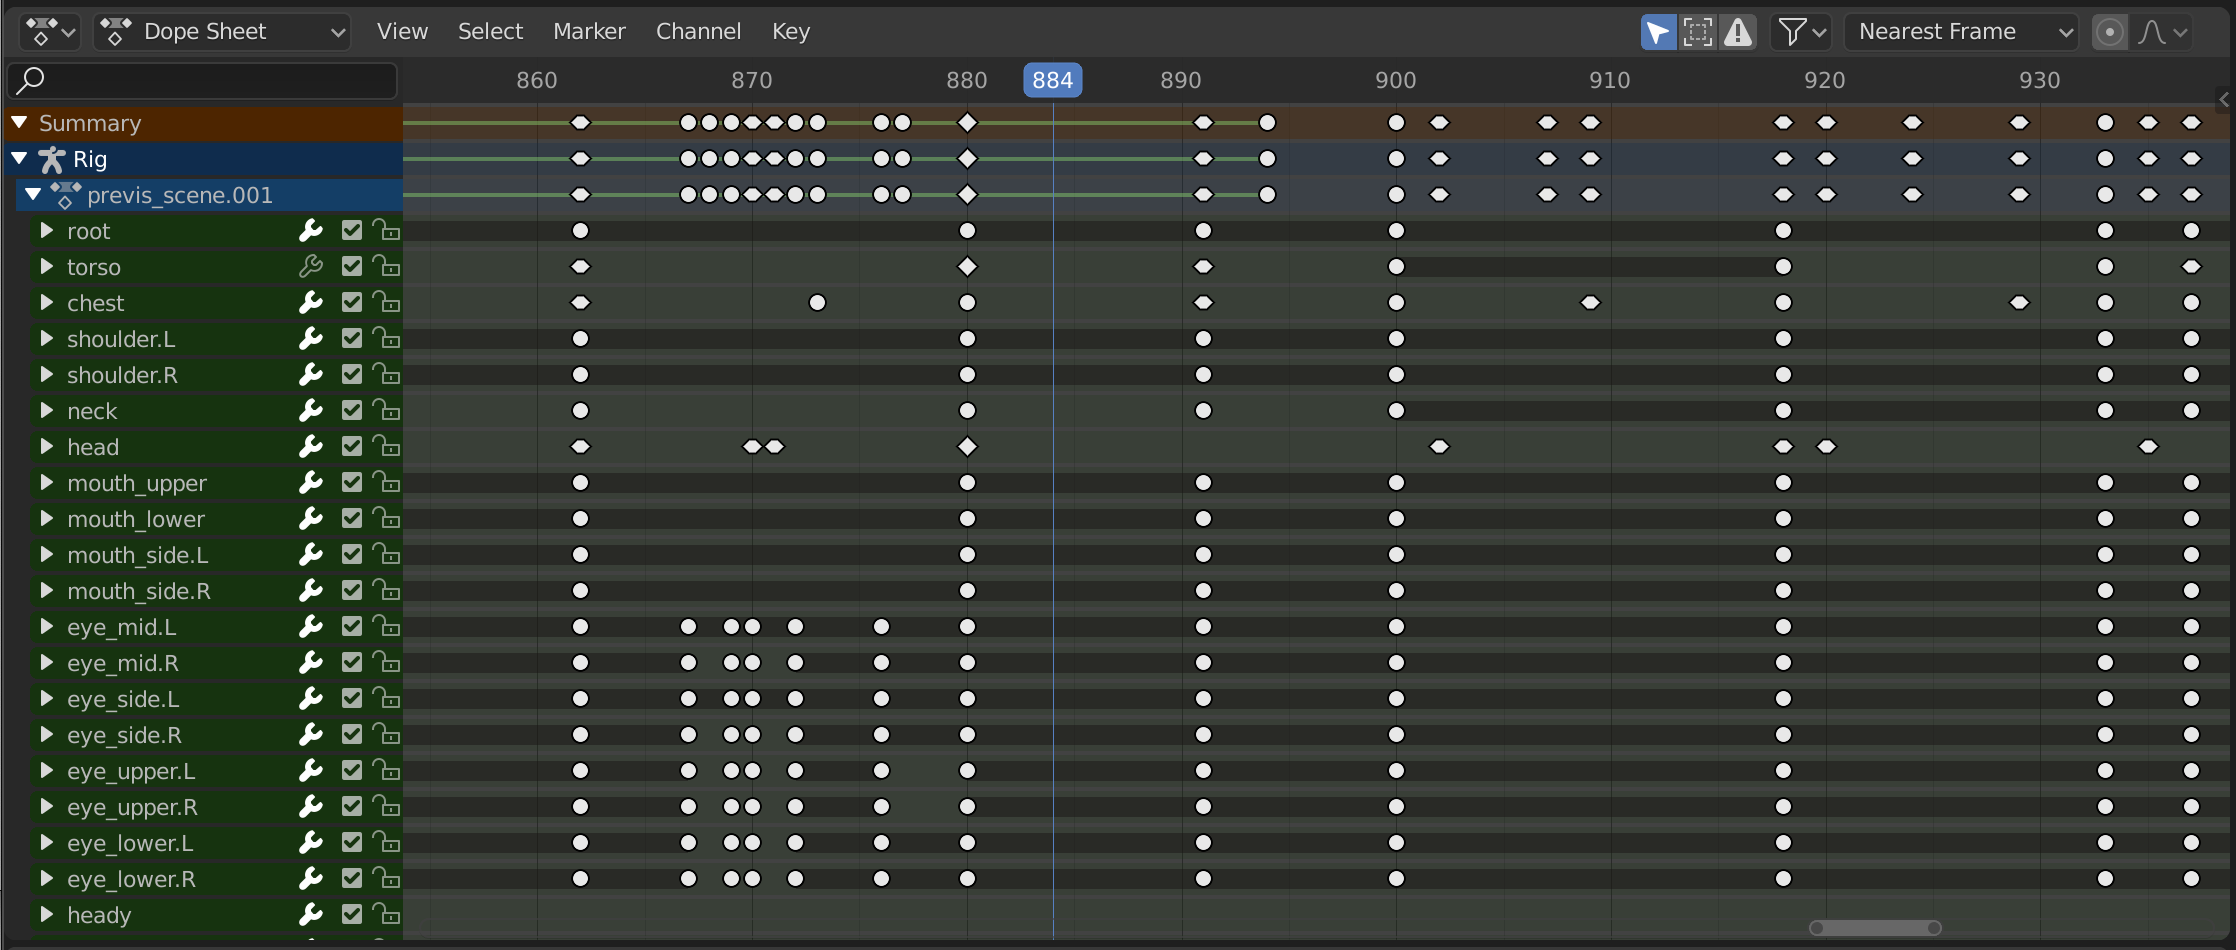
L’Éditeur Dope Sheet avec des canaux d’objet.
This area contains keyframes for all visible action channels. As with the other time-based editors, the X axis represents time. The Y axis represents a stack of action channels.
On these channels lay the keyframes, which can show different information:
Gris |
Non sélectionné |
Jaune |
Selected |
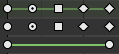
Losange |
Free Keyframe Handle |
Round |
Poignée de Trame clé Auto-Limitée (Auto-Clamped) |
Circle |
Poignée de Trame clé Automatique |
Carré |
Poignée de Trame clé Vectorielle |
Losange |
Poignées de Trame clé Alignée |
Various colors |
These represent custom keyframe tags set by the user () |
Barre grise entre les clés |
Touche maintenue (les deux trames clés sont identiques) |
Ligne verte entre les clés |
Fixed keyframe interpolation (set in ) |
Flèche vers le haut |
Maximum Extreme keyframe (visible if are enabled) |
Flèche vers le bas |
Minimum Extreme keyframe (visible if are enabled) |
A diagonal hash fill in the background is used to display the Manual Frame Range of the action the channel belong to.
Selecting Keyframes
Selection tools are available in the Select menu in the header, and the main shortcuts are listed below:
- Sélection
Click on a key to select it. Hold Shift to extend the current selection.
- Box Selecting
Click and drag to box select multiple keyframes at once. You can hold Shift to extend or Ctrl to subtract from the current selection.
- Select Lasso
Voir Select Lasso.
- Select/Deselect All
To select all keys, press A.
To deselect all keys, press Alt-A.
To inverse the selection, press Ctrl-I.
- Before/After Current Frame [, ]
Select all to the right or left. Or hold Shift-Ctrl and click on either side of the Playhead.
See the Select menu for a full list of selection tools.
Manipulating Keyframes
Keyframe tools are available in the Key menu in the header, and the main shortcuts listed below:
- Moving Keyframes
To move a single keyframe, click and drag on a key. To move multiple keyframes, make sure several keys are selected and press G.
- Scaling Keyframes
To scale (stretch) selected keys, press S.
- Extending Keyframes
To extend the time between two keys, select all with A, place the Playhead between two keyframes and press E.
See the Key menu for a full list of selection tools.
Région des canaux
The Action editor’s channels region.
See Channels.
Header (Entête)
Here you find the menus, a first group of controls related to the editor « mode », a second one concerning the action data-blocks, and a few other tools (like the copy/paste buttons, and snapping type).
Menu View
- Adjust Last Operation
Affiche un panneau popup pour modifier les propriétés de la dernière opération terminée. Voir Adjust Last Operation.
Types de poignée.
- Show Handles and Interpolation
Instead of displaying all keyframes as diamonds, different icons are used to show the Bézier handle type. When curves use a different interpolation type, a line is shown between keys to highlight that.
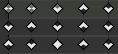
Marqueurs extrêmes.
- Show Extremes
Detect keys where the curve changes direction based on comparing with the adjacent key values, and display that by changing the keyframe icons to resemble an arrow. A muted version of the icon is used if the curve overshoots the extreme, or for groups with different results for contained curves.
See Graph editor’s Menu View.
Markers Menu
Les Marqueurs sont utilisés pour désigner les images comportant des points clés ou des événements significatifs au sein d’une animation. Comme pour la plupart des éditeurs d’animation, les marqueurs sont affichés en bas de l’éditeur.

Marqueurs dans l’éditeur d’animation.
Certaines options sont exclusives à l’éditeur de Feuille d’Exposition :
- Sync Markers
Sync Markers with keyframe edits.
- Show Pose Markers (montrer les marqueurs Pose)
Available in Action and Shape Key modes. Shows pose markers owned by the active action instead of the scene ones.
- Make Markers Local (rendre les marqueurs locaux)
Available in Action and Shape Key modes. Converts selected scene markers in pose markers, assigning them to the active action.
For more information and the description of the other marker tools, see Editing Markers.
Filtres
- Only Show Selected
Only include keyframes related to the selected item this item could be sequencer strips, nodes, objects, or any other type of data.
- Show Hidden
Include keyframes from objects or bones that are not visible.
- Only Show Errors
Only include curves and drivers that are disabled or have errors. Useful for debugging.
- F-Curve Name Filter
Fuzzy/Multi-Word name filtering matches word snippets/partial words, instead of having to match everything. It breaks down the search text based on whitespace placement. e.g. « lo ro » will filter all location and rotation, while « lc rt » will not work.
- Filter by Type
Filtrer les courbes par type de propriété.
- Filtering Collection
Select a collection to only show keyframes from objects contained in that collection.
- Sort Data-Blocks
Objects data-blocks appear in alphabetical order, so that it is easier to find where they occur (as well as helping to keep the animation of related objects together in the NLA editor for instance).
If you find that your playback speed suffers from this being enabled (it should only really be an issue when working with lots of objects in the scene), you can turn this off.
- Summary
Toggles the « Dope Sheet Summary » channel at the top of the Channels Region. This is used to give an overview of all the channels by combining all the actions into one channel.
Région de la Barre Latérale (Sidebar)
Panneau Action
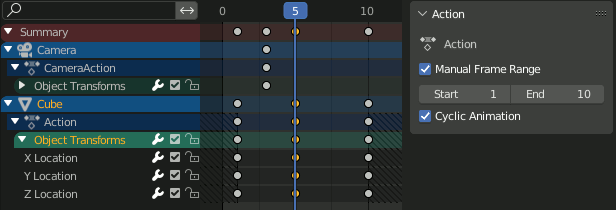
Actions avec et sans Manual Frame Range dans la Dope Sheet.
When the editor is in the Action mode, or a channel belonging to an action is selected in Dope Sheet mode, this panel allows changing some settings of the selected action, specifically the Manual Frame Range.
Custom Properties
Crée et gére vos propres propriétés pour stocker des données dans le bloc de données de l’action. Voir la page Propriétés personnalisées pour plus d’informations.