Parti dei Nodi
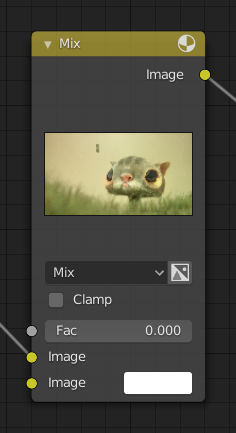
Tutti i nodi in Blender si basano su una costruzione simile. Questo vale per qualsiasi tipo di nodo. Queste parti includono il Titolo, i Connettori, l’Anteprima e altro.

Titolo
The title shows the name/type of the node; it can be overridden by changing the node’s Label. On the left side of the title is the collapse toggle which can be used to collapse the node. This can also be done with H.

Come appare un nodo quando viene compresso.
Connettori

The sockets input and output values from the node. They appear as little colored circles on either side of the node. Unused sockets can be hidden with Ctrl-H. There are two kinds of sockets: inputs and outputs.
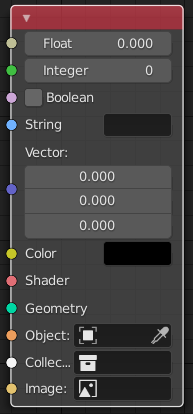
Ogni connettore ha una codifica a colori in relazione al tipo di dati che gestisce.
- Float (gray)
Indica le informazioni sul valore numerico. Può essere un singolo valore numerico o una cosiddetta «mappa dei valori». (Puoi pensare a una mappa di valori come a una scala di grigi in cui la diversa quantità di chiaro/scuro riflette il valore per ciascun punto.) Se un singolo valore viene utilizzato come ingresso per un connettore «mappa di valore», tutti i punti della mappa saranno impostati sullo stesso valore. Uso comune: mappe alfa e opzioni di valore per un nodo.
- Integer (lime green)
Used to pass an integer value (a number without a fractional component).
- Boolean (pink)
Used to pass a true or false value.
- String (light blue)
Used to pass a text value.
- Vector (dark blue)
Indica informazioni vettoriali, coordinate e normali.
- Colore (giallo)
Indica che le informazioni sul colore devono essere immesse o verranno emesse dal nodo. A seconda del tipo di albero del nodo, il colore ha un canale alfa o no.
- Shader (bright green)
- Geometry (turquoise)
Used in Geometry Nodes.
- Object (orange)
Used to pass an object data-block.
- Collection (white)
Used to pass a collection data-block.
- Image (apricot)
Used to pass an image data-block.
Ingressi
The inputs are located on bottom left side of the node, and provide the data the node needs to perform its function. Each input socket, except for the green shader input, when disconnected, has a default value which can be edited via a color, numeric, or vector interface input. In the screenshot of the node above, the second color option is set by a color interface input.
Some nodes have special sockets that can accept multiple inputs into a single socket. These sockets will have an ellipsis shape rather than a circle to indicate its special behavior.
Uscite
The outputs are located on the top right side of the node, and can be connected to the input of nodes further down the node tree.
Conversion
Some socket types can be converted to other socket types either implicitly or explicitly. Implicit conversion can happen automatically without the need of a conversion node.
For example, color and float sockets can both be placed into one another. Once a socket conversion is made data may be lost and cannot be retrieved later down the node tree. Implicit socket conversion can sometimes change the data units as well. When plugging a Value input node into an angle socket will default to use radians regardless of the scene Unità. This happens because the Value node has no unit while the angle input does.
Valid conversions:
Between color and vector – in this case the using individual color channels to store the vector.
Between color and float – the color data is converted to its gray scale equivalent.
Color/float/vector to Shader – implicitly converts to color and gives the result of using an Emission node.
Explicit conversion requires the use of a conversion node for example the Shader To RGB node or the RGB to BW Node node. The Math Node node also contains some functions to convert between degrees and radians.
Proprietà
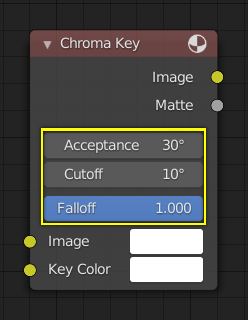
Molti nodi hanno impostazioni che possono influenzare il modo in cui interagiscono con ingressi e uscite. Le impostazioni del nodo si trovano sotto le uscite e sopra tutti gli ingressi.

Un esempio dei controlli sul nodo Chroma Key.
Anteprima
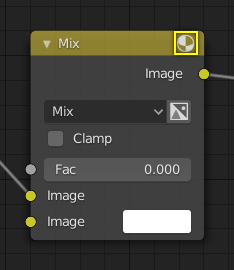
Su alcuni nodi questo mostra un’immagine di anteprima di come appariranno i dati di output per un determinato canale. Di solito mostra i dati di colore.
L’anteprima può essere attivata usando l’icona nell’angolo in alto a destra del nodo, vicino al titolo.

Come appare un nodo senza l’anteprima.