Data Transfer Modifier
The Data Transfer modifier transfers several types of data from one mesh to another. Data types include vertex groups, UV maps, vertex colors, custom normals...
Transfer works by generating a mapping between source mesh's elements (vertices, edges, etc.) and destination ones, either on a one-to-one basis, or mapping several source elements to a single destination one, using interpolation.

Transferring normals between objects, see example blend-file.
Options(オプション)
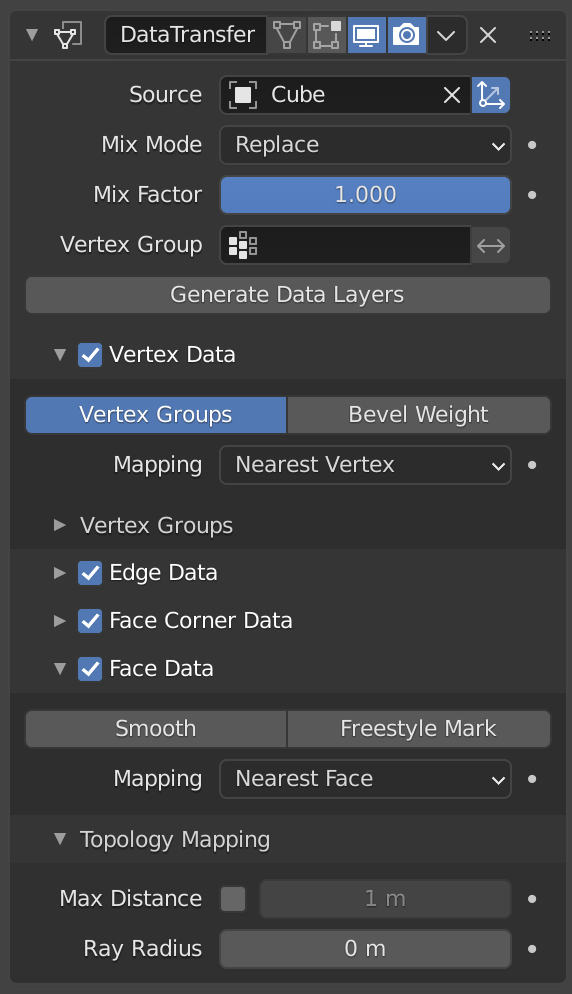
Data Transfer Modifier.
- Source(ソース)
Mesh object to copy data from.
If the button to the right of the field is unset, both the source and the destination geometry is considered in global space when generating the mapping, otherwise they are evaluated in local space (i.e. as if both object's origins were at the same place).
- Mix Mode(ミックスモード)
Controls how destination data are affected:
- All(全て)
対象のすべてを置き換えます( Mix Factor(ミックス係数) は引き続き使用されることに気をつけてください)。
- Above Threshold(しきい値超過)
Only replaces destination value if it's above given threshold Mix Factor. How that threshold is interpreted depends on the data type, note that for Boolean values this option fakes a logical AND.
- Below Threshold(しきい値未満)
Only replaces destination value if it's below given threshold Mix Factor. How that threshold is interpreted depends on the data type, note that for Boolean values this option fakes a logical OR.
- Mix(ミックス)、Add(追加)、Subtract(減算)、Multiply(乗算)
Apply that operation, using mix factor to control how much of source or destination value to use. Only available for a few types (vertex groups, vertex colors).
- Mix Factor(ミックス係数)
既存のデータにミックスされる、転送されたデータの量(すべてのデータタイプでサポートされているわけではありません)。
- Vertex Group(頂点グループ)
Allows per-element fine control of the mix factor. Vertex group influence can be reverted using the small "arrow" button to the right.
- Generate Data Layers
This modifier cannot generate needed data layers itself. Once the set of source data to transfer is selected, this button shall be used to generate matching destination layers, if needed.
Selection of Data to Transfer
To keep the size of the modifier reasonable, the kind of elements to be affected must be selected first (vertices, edges, face corners and/or faces).
- Mapping Type
How is generated the mapping between those source and destination elements. Each type has its own options, see Geometry Mapping below for details.
- Data Types
The left column of toggle buttons, to select which data types to transfer.
- Multi-layers Data Types Options
In those cases (vertex groups, vertex colors, UVs), one can select which source layers to transfer (usually, either all of them, or a single specified one), and how to affect destination (either by matching names, matching order/position, or, if a single source is selected, by specifying manually the destination layer).
- Islands Handling Refinement
This setting only affects UV transfer currently. It allows to avoid a given destination face to get UV coordinates from different source UV islands. Keeping it at 0.0 means no island handling at all. Typically, small values like 0.02 are enough to get good results, but if you are mapping from a very high-poly source towards a very low-poly destination, you may have to raise it quite significantly.
使用方法
First key thing to keep in mind when using this modifier is that it will not create destination data layers. Generate Data Layers button shall always be used for this purpose, once the set of source data to transfer has been selected. It should also be well understood that creating those data layers on destination mesh is not part of the modifier stack, which means e.g. that they will remain even once the modifier is deleted, or if the source data selection is modified.
Geometry Mapping
Geometry mapping is how a given destination mesh relates to a source mesh. In this process a destination vertex/edge/... gets a part of the source mesh assigned with functions as its data source. It is crucial to understand this topic well to get good results with this modifier.
- Topology(トポロジー)
最もシンプルなオプションは、両方のメッシュが同じ数の要素を持ち、順番(インデックス番号)でそれらを一致させることを想定しています。例えば、同一のコピーで変形されたメッシュ間で利用できます。
- 一対一のマッピング
転送先ごとに、最も距離が近い転送元要素を常に選択します。
- Vertices(頂点)
- Nearest Vertex(最近接頂点)
最も近い転送元頂点を使用します。
- Nearest Edge Vertex(最近接辺の頂点)
最も近い転送元辺の最も近い頂点を使用します。
- Nearest Face Vertex(最近接面の頂点)
最も近い転送元面の最も近い頂点を使用します。
- Edges(辺)
- Nearest Vertices(最近接頂点群)
転送先辺の頂点から最も近い頂点の、転送元辺を使用します。
- Nearest Edge(最近接辺)
最も近い転送元辺を使用します(辺の中点を使用)。
- Nearest Face Edge(最近接面の辺)
最も近い転送元面の最も近い辺を使用します(辺の中点を使用)。
- Face Corners(面コーナー)
面のコーナーは、それ自体が実際の要素ではなく、特定の面にアタッチされたある種の分割された頂点です。したがって、頂点(位置)と面(法線、...)の両方のアスペクトを使用して、それらを一致させます。
- Nearest Corner and Best Matching Normal(最近接コーナーと最適法線)
最も近い転送元頂点を共有しているものから、転送先の対象と最も類似した 分割 法線を持つ転送元コーナーを使用します。
- Nearest Corner and Best Matching Face Normal(最近接コーナーと最適面法線)
最も近い転送元頂点を共有しているものから、転送先の対象と最も類似した 面 法線を持つ転送元コーナーを使用します。
- Nearest Corner of Nearest Face(最近接面の最近接コーナー)
最も近い転送元面の最も近い転送元コーナーを使用します。
- Faces(面)
- Nearest Face(最近接面)
最も近い転送元面を使用します。
- Best Normal-Matching
転送先の対象と最も類似している法線の転送元面を使用します。
- マッピングの補間
転送中にデータを補間して、転送先の対象ごとにいくつかの転送元要素を使用します。
- Vertices(頂点)
- Nearest Edge Interpolated(最近接辺の補間)
転送元辺の両方の頂点からのデータを補間し、最も近い転送元辺上の最も近いポイントを使用します。
- Nearest Face Interpolated(最近接面の補間)
転送元面の頂点すべてからのデータを補間し、最も近い転送元面上の最も近いポイントを使用します。
- Projected Face Interpolated(投影面の補間)
転送元面の頂点すべてからのデータを補間し、独自の法線に沿った転送先頂点の投影によってヒットされた転送元上の面のポイントを使用します。
- Edges(辺)
- Projected Edge Interpolated(投影辺の補間)
これはサンプリングプロセスです。いくつかのレイが転送先の辺に沿って投影され(辺の両方の頂点の法線を補間)、充分な数のレイが転送元の辺に当たると、ヒットしたすべての転送元辺のデータが転送先の対象に補間されます。
- Face Corners(面コーナー)
面のコーナーは、それ自体が実際の要素ではなく、特定の面にアタッチされたある種の分割された頂点です。したがって、頂点(位置)と面(法線、...)の両方のアスペクトを使用して、それらを一致させます。
- Nearest Face Interpolated(最近接面の補間)
転送元の面のすべてのコーナーからのデータを補間し、最も近い転送元の面の最も近いポイントを使用します。
- Projected Face Interpolated(投影面の補間)
転送元の面のすべてのコーナーからのデータを補間し、独自の法線に沿った転送先コーナーの投影によってヒットした転送元上の面のポイントを使用します。
- Faces(面)
- Projected Face Interpolated(投影面の補間)
これはサンプリングプロセスです。いくつかのレイが転送先の面から(独自の法線に沿って)投影され、充分な数のレイが転送元の面に当たると、ヒットしたすべての転送元面のデータが転送先の対象に補間されます。
Topology Mapping
- Max Distance(最大距離)
When the "pressure stylus" icon button to the right is enabled, this is the maximum distance between source and destination to get a successful mapping. If a destination element cannot find a source one within that range, then it will get no transferred data.
This allows to transfer a small sub-detailed mesh onto a more complete one (e.g. from a "hand" mesh towards a "full body" one).
- Ray Radius(レイ範囲)
The starting ray radius to use when Ray Casting against vertices or edges. When transferring data between meshes Blender performs a series of ray casts to generate mappings. Blender starts with a ray with the radius defined here, if that does not return a hit then the radius is progressively increased until a positive hit or a limit is reached.
このプロパティは、精度/パフォーマンスの制御として機能します。より小さいレイ半径を使用するとより正確になりますが、Blenderが制限を徐々に増やす必要がある場合は、より長い時間がかかる可能性があります。値が小さいほど詳細で密なメッシュに適していますが、値が大きいほどシンプルなメッシュに適しています。