はじめに
Channels Region(チャンネル領域)

Channels Region(チャンネル領域)。
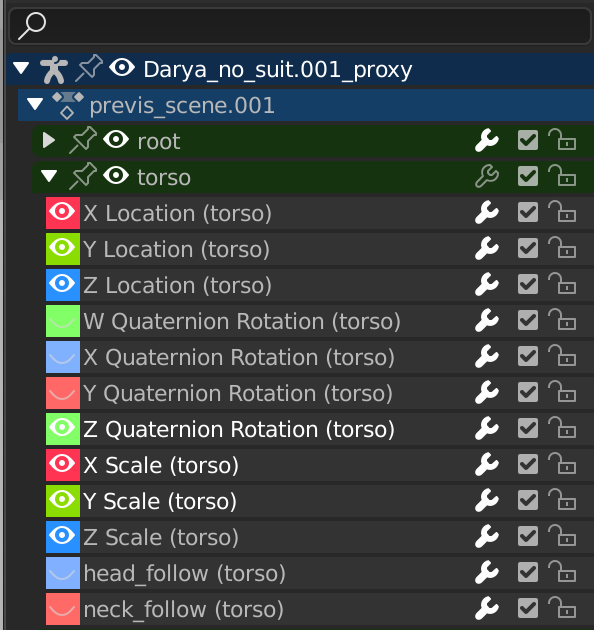
The channels region is used to select and manage the curves for the Graph editor. This part shows the objects and their animation data hierarchy each as headers. Each level can be expanded/collapsed by the small arrow to the left of its header.
Scenes, Objects (dark blue)
Actions, Shape keys, etc. (light blue)
Groups (green)
Channels (gray)
- Name Filter Ctrl-F
Only displays channels that match the search text. Pressing the invert button displays all channels except the channels that match the search text.
コントロール
On the headers, there are toggles to control channel's setting:
- Pin(ピン止め) (画鋲アイコン)
Make the channel always visible regardless of the current selection.
- Hide(隠す) (目 アイコン)
Hides the channel(s)/curve (Graph editor only).
- Modifiers(モディファイアー) (レンチ アイコン)
Deactivates the F-Curve modifiers of the selected curve or all curves in the channel.
- Mute (checkbox)
Deactivates the channel/curve.
- Lock (padlock icon) Tab
Toggle channel/curve from being editable. Selected channels can be locked by pressing Tab.
注釈
In the Dope Sheet this is also working inside the NLA, but that it does not prevent edition of the underlying F-Curve.
選択
Select channel (text in white/black): LMB
Multi Select/Deselect: Shift-LMB
すべて選択: A
Deselect All: Alt-A
Box Select: (LMB drag) or B (LMB drag)
Box Deselect: (Ctrl-LMB drag) or B (Shift-LMB drag)
Select all keyframes in the channel: double LMB on a channel header.
Editing(編集)
Rename: Ctrl-LMB
選択したものを削除: X または、 Delete
選択をロック: Tab
Enable Channel Setting: Shift-Ctrl-W
Disable Channel Setting: Alt-W
Toggle Channel Setting: Shift-W
スライダー

スライダーを表示するアクションエディター。
On channels headers you can have another column with number fields or sliders, allowing you to change the value on the current keyframes, or to add new keyframes. See View(ビュー) メニュー for how to show these sliders.