Vytváranie meta-výbav
Pridanie jednej kosti z ponuky .
Prejdite do režimu editácie armatúry a vytvorte meta-výbavu pomocou snímok alebo typov Rigify.
Define Rigify layers, bone grouping and selection sets.
Vo vlastnostiach armatúry kliknite na tlačidlo Vygenerovať, čím výbavu vygenerujete.
Ako funguje Rigify
- Meta-výbavy Rigify sú rozdelené do viacerých čiastkových výbav
Meta-výbava je zostava reťazí kostí. Reťaz kostí je identifikovaný atribútom Pripojené. Reťaze kostí je možné ďalej spájať nadväzovaním bez použitia atribútu Pripojené (t. j. použitím možnosti Zachovať posuv pri nadväzovaní).
- Vlastný atribút je nastavený na prvej kosti reťaze čiastkovej výbavy
Každá prvá kosť reťaze kostí má vlastný atribút, ktorý je užívateľskou vlastnosťou Rigify, ktorá identifikuje typ čiastkovej výbavy. V čase generovania výbavy Rigify určí, ktoré ovládacie a deformačné kosti budú vytvorené pri spracovaní meta-výbavy od prvej kosti po poslednú z každej reťaze.
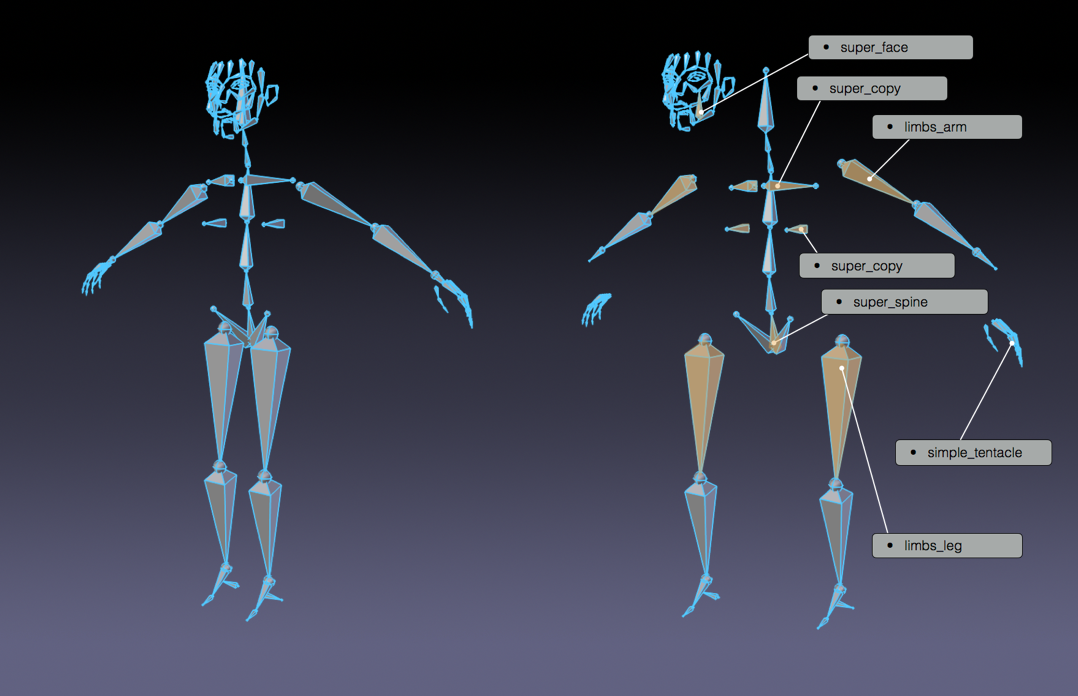
Meta-výbava človeka rozdelená podľa vzoriek.
- Nové meta-výbavy sa vytvárajú zostavením vzoriek čiastkových výbav
Keďže meta-výbavy je len súbor čiastkových súprav, nové meta-výbavy možno vytvárať zostavovaním čiastkovými výbavymi rôznymi spôsobmi. Týmto spôsobom možno z rovnakých blokov výbavy zostaviť nekonečný počet meta-výbav.

Meta-výbava človeka rozdelená podľa vzoriek.
- Všetky mechaniky, deformačné kosti a miniaplikácie sa vytvárajú jediným kliknutím
Meta-výbavy obsahuje viac informácií ako vizualizované kosti. Rigify totiž v čase generovania identifikuje každý typ čiastkovej výbavy a v závislosti od zvolených možností vytvorí všetky sofistikované ovládače, prepínače a deformujúce kosti jediným kliknutím.
Vytvorenie novej meta-výbavy
Pridať nový objekt Armatúra
Referencia
- Režim:
Režim objektu
- Ponuka:
- Skratka:
Shift+A
Vytvorenie vlastnej meta-výbavy od začiatku si vyžaduje objekt armatúry, s ktorým môžete pracovať. Stačí pridať jedinú kosť z ponuky Pridať.
Tip
At this stage naming the newly added armature „meta-rig“ is a good idea. You can do it at any time (or not at all) but it’s suggested to do it before going on so it will always be clear on which armature you have to work when editing the meta-rig structure.
Úprava armatúry
Teraz, keď je k dispozícii objekt armatúry, s ktorým môžete pracovať – s vybranou armatúrou – vstúpte do režimu editácie armatúry. Vytvorenie armatúry od začiatku v režime editácie je možné vykonať dvoma spôsobmi:
Pridanie vzoriek výbavy.
Vytvorenie reťaze kostí.
Pridávanie vzoriek (základné)
Adding samples in Edit Mode is a good way to start building a meta-rig. This way you can become familiar with the available building blocks and how they are meant to be used. To add a rig sample:
Prejdite na kartu armatúry.
Prejdite nadol na panel Rigify.
Vyberte vzorku zo zoznamu.
Kliknite na tlačidlo Pridať vzorku.
Upravte pozície kostí tak, aby zodpovedali vašej postave.
Zoznam dostupných vzoriek nájdete na stránke Rig Types (Typy výbavy).
Používanie typov výbavy (pokročilé)
Create your bone chains in Edit Mode.
Assign the correct rig type to the first bone of each chain in Pose Mode.
Poznámka
Každá podskupina má ako vstupný údaj požadovaný počet kostí. Ak si nie ste istí, ako používať vlastnosti typu výbavy, pridajte k armatúre vzorku výbavy, aby ste videli, ako sa má používať.
Vlastná koreňová kosť
If the meta-rig contains a bone called „root“, it is used as the root control bone instead of creating a new one. This allows changing the rest position of the root bone, assigning a custom widget, or adding custom properties to the bone.
Vlastná koreňová kosť nesmie mať žiadneho rodiča a musí používať typ pod-výbavy basic.raw_copy alebo žiadny.
Layers, Bone Groups & Selection Sets
Armature Layers are usually used to isolate bones. Rigify can take advantage of armature layer to generate extra features and the user interface for the final rig. Rigify layers are displayed in a vertical layout inside their own separate panel named Rigify Layer Names.
The first column shows the layer number.
The second column is a display toggle.
This toggle controls the armature layer visibility. It has the same effect of enabling/disabling the layer visibility from the top armature layers menu. It is just redrawn here for a simplicity.
The third column sets a specific layer name to be used to build the rig UI of the final rig. If set, a button with the specified name will be created in the
rig_ui_templateto control the visibility of this specific armature layer. If layer contains at least one bone but its name field is empty, a button with no name will be created in the rig UI.The fourth column defines in which UI row the layer button will be created.
This numbers define the layer ordering in the UI and will ignore the effective layer number. If two layer have the same row number their UI buttons will be created in the same row.
The fifth column is a toggle for the selection set.
If checked a selection set with that name will be created and associated to the final rig.
The sixth column defines the Rigify Bone Grouping.
If Rigify Bone Groups are set, the user can make the association between the bones on the layer and the specified bone group from the list. The controls on the final rig will inherit the bone grouping through this value.
The seventh column displays – if set – the associated bone group name.
In order to use the Bone Groups in the Rigify Layer Names fields, Rigify Bone Groups must be set through the specific panel. Usually this panel is displayed just above Rigify Layer Names panel.
Rigify Bone Groups are used to define bone colors on the final rig. The top two rows of the Rigify Bone Groups panel are used to define the bone colors general behavior. Usually color themes use a gradient of colors to define the different bone states: default, selected and active. When multiple color themes are used in the same rig, identifying which bone is selected or active can be tricky since each color will have its corresponding state.
To override this behavior Rigify Bone Groups unifies the active and selected states with the same color. This is defined by two values:
- Zjednotené farby Vybrané/Aktívne
When this option is active adding a bone group in the list will always keep the colors consistent. When a color scheme is added as from a theme, the color scheme is loaded as is. Click on the Apply button to force the system to unify selected and active colors.
- Farby Vybrané/Aktívne
This two color fields define respectively Selected and Active colors. By default Rigify reads this colors from the theme defined by the user in the Blender preferences. This way the Selected/Active colors can always have a predictable and consistent behavior in the UI. The colors can be customized by clicking on the relative color field. To reset them to the Blender current theme value just click on the button with the update icon.
Bone Groups can be added and deleted as done in the general Bone Group panel
by clicking on the + or - buttons.
All Bone Groups can be deleted at once by clicking on the Specials menu.
To add the predefined Rigify Default Bone Groups list click on Add Standard button.
Ak chcete pridať konkrétnu tému s vlastnou farebnou schémou, vyberte ju zo zoznamu a kliknite na tlačidlo Pridať z motívu.