Mask – Маска
Masking to control which areas of the mesh are influenced by sculpting.
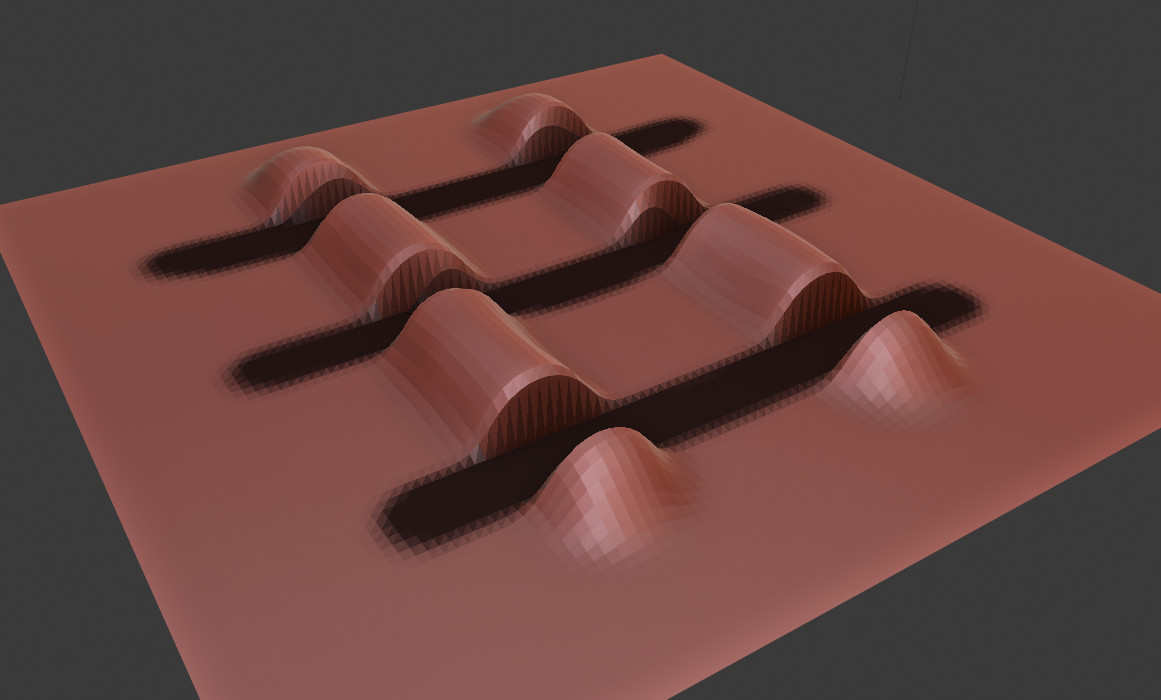
Black part is masked.
Пензель – Brush
To edit the mask, select the Mask Brush from the Brush panel.
Editing – Редагування
Reference – Довідка
- Mode – Режим
Sculpt Mode – Режим Ліплення
- Menu – Меню
Masks can be edited across the entire model. Using A opens a pie menu to choose different operations.
Invert Mask
Reference – Довідка
- Mode – Режим
Sculpt Mode – Режим Ліплення
- Menu – Меню
- Shortcut – Шоткат
Ctrl-I
Inverts an existing mask.
Заповнити Маскою – Fill Mask
Reference – Довідка
- Mode – Режим
Sculpt Mode – Режим Ліплення
- Menu – Меню
Fills the whole mask with a value of 1.
Clear Mask
Reference – Довідка
- Mode – Режим
Sculpt Mode – Режим Ліплення
- Menu – Меню
- Shortcut – Шоткат
Alt-M
Fills the mask with a value of 0. To completely remove the mask data, see Clear Sculpt-Mask Data.
Box Mask
Reference – Довідка
- Mode – Режим
Sculpt Mode – Режим Ліплення
- Menu – Меню
- Shortcut – Шоткат
B
Works like the Box Select tool, it creates a rectangular mask region. Hold Shift to clear the mask of the selected region.
Lasso Mask
Reference – Довідка
- Mode – Режим
Sculpt Mode – Режим Ліплення
- Menu – Меню
- Shortcut – Шоткат
Shift-Ctrl-LMB
Can be used to create a free-form mask, similar to the Lasso Select tool.
Порада
To clear the mask of areas with the Lasso Mask tool, first invert the mask, apply the Lasso Mask, and then invert the mask back.
Фільтри Масок – Mask Filters
Reference – Довідка
- Mode – Режим
Sculpt Mode – Режим Ліплення
- Menu – Меню
Mask filters are operations that are applied to the whole paint mask.
- Type – Тип
- Згладити/Гострішати Маску – Smooth/Sharpen Mask
Changes the crispness of the mask edge.
- Розростити/Стиснути Маску – Grow/Shrink Mask
Changes the size of the mask.
- Збільшити/Зменшити Контраст – Increase/Decrease Contrast
Змінює контраст маски.
- Iterations – Ітерації
The number of times that the filter is going to be applied.
- Рахунок Авто Повторення – Auto Iteration Count
Use an automatic number of iterations based on the number of vertices of the sculpt.
Expand Mask by Topology
Reference – Довідка
- Mode – Режим
Sculpt Mode – Режим Ліплення
- Menu – Меню
- Shortcut – Шоткат
Shift-A
Creates a mask radiating outwards from the active vertex in a uniform manner.
Примітка
This operator is meant to be used interactively through the shortcut.
Hotkeys – Хоткеї
- Invert – Інверт
F Flips between expanding a positive mask (value of one) or a negative mask (value of zero). In the case of face sets, this option flips between including areas inside the masked area or areas outside the masked area.
- Toggle Preserve State
E Accumulates the new mask on top of the previous one instead of replacing it. For Face Sets, this creates Face Sets boundaries instead of replacing the existing Face Set.
- Toggle Gradient
G Enables linear gradient, creates a linear gradient of values from the origin to the current active vertex.
- Geodesic Recursive Step
R Generate a new Geodesic falloff from the boundary of the enabled vertices of the current falloff.
- Topology Recursive Step
Alt-R Generate a new topology flood fill falloff from the boundary of the enabled vertices of the current falloff.
- Move Origin
Spacebar Moves the initial vertex used for calculating the falloff.
- Geodesic Falloff
1 Uses a falloff based on the Geodesic distances from the edge boundary to the active vertex.
- Topology Falloff
2 Uses a falloff based on a flood fill using edges.
- Diagonals Falloff
3 Uses a falloff based on a flood fill using polygon diagonals and edges.
- Spherical Falloff – Сферичний Спад
4 Uses a falloff based on the Euclidean distances from the edge boundary to the active vertex.
- Snap Expanded to Face Sets
Ctrl Isolates the expanded region to the boundary of the face set under the cursor.
- Loop Count Increase
W Increase the number of loops or iterations the operator is run; using four loops will split the mask into four parts.
- Loop Count Decrease
Q Decrease the number of loops or iterations the operator is run; using four loops will split the mask into four parts.
- Toggle Brush Gradient
B Similar to linear gradient but uses the current brush Falloff to define the shape of the falloff.
- Texture Distortion Increase
Y Increases the falloff distance when using a texture to distort the mask shape.
- Texture Distortion Decrease
T Decreases the falloff distance when using a texture to distort the mask shape.
Usage – Використання
Textures – Текстури
Textures can be used to affect the «strength» of the mask. This feature can be combined with loops and recursion to create really unique looking masks. To enable textures, you first need to create/select a texture to use, this is done by in the Properties editor’s Texture Properties. Next select the texture in the Texture Brush Settings, while there make sure to enable 3D Mapping. Now, you can use Y and T to increase or decrease the affect the texture has on the edge of the mask.
Expand Mask by Normals
Reference – Довідка
- Mode – Режим
Sculpt Mode – Режим Ліплення
- Menu – Меню
- Shortcut – Шоткат
Shift-Alt-A
Creates a mask radiating outwards from the active vertex while following the curvature of the mesh. This operator uses the same internal operator as Expand Mask by Topology meaning all the shortcuts and functionality works the same as that tool.
Примітка
This operator is meant to be used interactively through the shortcut.
Витягнення Маски – Mask Extract
Reference – Довідка
- Mode – Режим
Sculpt Mode – Режим Ліплення
- Menu – Меню
Creates a duplicate mesh object based on masked geometry.
- Поріг – Threshold
Мінімальне значення маски, щоб вважати вершину дійсною для витягання грані з оригінальної сіті.
- Додати Рубіжну Петлю – Add Boundary Loop
Creates and extra boundary loop on the edges of the geometry, making it ready for adding a Subdivision Surface modifier later.
- Повтори Згладження – Smooth Iterations
Повтори згладження, що застосуються до витягненої сіті.
- Проектувати на Ліплення – Project to Sculpt
Проектується витягнена сіть на оригінальний об’єкт ліплення.
- Витягти як Суцільне – Extract as Solid
Додає модифікатор потовщення Solidify Modifier до ново створеного об’єкта сіті.
Краяння Маски – Mask Slice
Reference – Довідка
- Mode – Режим
Sculpt Mode – Режим Ліплення
- Menu – Меню
Вилучає масковані вершини із сіті.
- Поріг – Threshold
Мінімальне значення маски, щоб вважати вершину дійсною для витягання грані з оригінальної сіті.
- Заповнити Отвори – Fill Holes
Заповнює угнуті отвори геометрією, що може бути результатом операції Mask Slice.
- Краяння в Новий Об’єкт – Slice to New Object
Створюється новий об’єкт з маскованої геометрії.
Dirty Mask
Reference – Довідка
- Mode – Режим
Sculpt Mode – Режим Ліплення
- Menu – Меню
Generates a mask based on the geometry cavity and pointiness.
Random Mask
Reference – Довідка
- Mode – Режим
Sculpt Mode – Режим Ліплення
- Menu – Меню
Generates a mask with random values for the entire object based on different mesh data.
- Per Vertex
Assigns a random mask value for each vertex.
- Per Face Set
Assigns a random mask value for each Face Set.
- Per Loose Mask
Assigns a random mask value for each disjoint part of the mesh.
Display Settings – Устави Показу
Reference – Довідка
- Mode – Режим
Sculpt Mode – Режим Ліплення
- Випливне – Popover
– «Наклади Оглядвікна > Ліплення > Маска»
The mask display can be toggled as a viewport overlay. In the overlay popover, the opacity of the mask overlay can be adjusted to make it more or less visible on the mesh.
Зчистити Дані Маски Ліплення – Clear Sculpt-Mask Data
Reference – Довідка
- Mode – Режим
Режим Об’єкта/Редагування – Object/Edit Mode
- Menu – Меню
«Властивості > Дані Об’єкта > Дані Геометрії > Зчистити Дані Маски Ліплення» –
Completely frees the mask data layer from the mesh. While not a huge benefit, this can speed-up sculpting if the mask is no longer being used.