Giới Thiệu
Hoạt Họa với Bút Chì Dầu
The main goal of Grease Pencil is to offer a 2D animation tool full immersed in a 3D environment.

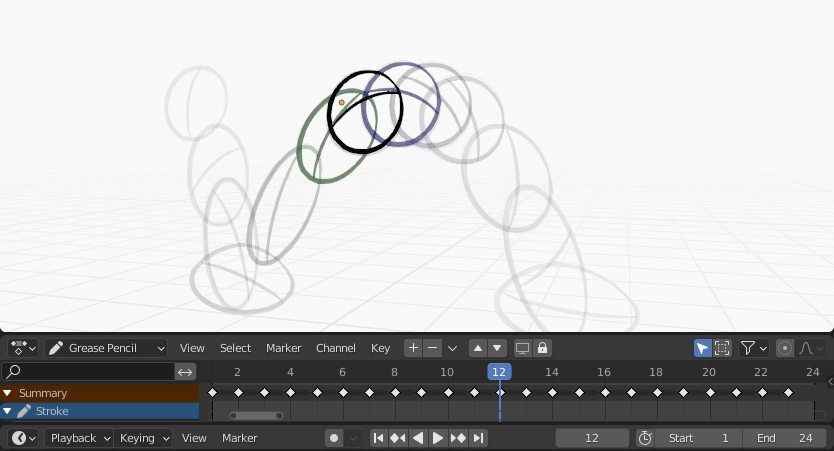
Sample animation showing Grease Pencil object keyframes in the Dope Sheet with onion skinning enabled.
In Blender, Grease Pencil objects can be animated in many ways:
- Di chuyển toàn bộ như một vật thể
Thay đổi vị trí, định hướng hoặc kích thước của chúng theo thời gian;
- Vẽ từng khung hình một
Drawing one frame at a time (traditional animation).
- Biến dạng chúng
Animating their points;
- Thừa Kế
Causing the object to move based on the movement of another object (e.g. its parent, hook, armature, etc.). Useful for cut-out animation for example.
For a complete overview of animation in Blender please refer to the Animation & Rigging chapter.
Hoạt Họa Truyền Thống 2D
Số/Khung Khóa
Traditional animation in Grease Pencil is achieved with the use of keyframes that hold the strokes information at a particular frame or frame range.
With Auto keyframe activated, every time you create a stroke in Grease Pencil object Draw Mode a new keyframe is added at the current frame on the active channel. With Auto keyframe deactivated, you will have to add manually a new keyframe or your new strokes will be added on the active keyframe.
Xin xem mục Keyframes for more information.
Ghi chú
The channels in the Dope Sheet correspond to the active 2D layer of the Grease Pencil object.
Grease Pencil has its own mode in the Dope Sheet to work with keyframes. See Grease Pencil mode in the Dope Sheet section for more information. There are also several tools on the Stroke menu to work with keyframes and strokes. See Animation tools for more information.
Bóc Vỏ Hành
One key element in traditional animation is the use of onion skinning. Grease Pencil offer a lot of flexibility and options for this tool. See Onion Skinning for more information.
Các Tùy Chọn về Hoạt Họa
Chế Độ Vẽ
In Draw Mode there are three options related to the animation workflow that you can use.

General drawing/animation options.
- Cho thêm trọng lượng dữ liệu
When enabled, new strokes weight data is added according to the current vertex group and weights. If there is no vertex group selected, no weight data is added.
This is useful for example in cut-out animation for adding new drawing on the same vertex group without the need to creating it afterwards.
Xin xem mục Chế Độ Sơn trọng lượng -- Weight Paint Mode để biết thêm thông tin.
- Vẽ Bổ Sung
Khi kiến tạo các khung hình mới thì những nét vẽ từ khung hình trước đây/đang hoạt động sẽ đã được sử dụng để làm cơ sở cho cái mới.
- Nhiều Khung Hình Cùng Một Lúc
If you need to add new strokes to your animation on several frames you can use multiframe drawing.
You can activate multiframe drawing with the Multiframe button next to the modes selector (faded lines icon). See Multiframe for more information.
Chế Độ Biên Soạn
In Edit Mode there is an option related to the animation workflow that you can use.

Biên Soạn Đa Khung Hình.
- Nhiều Khung Hình Cùng Một Lúc
Sometimes you may need to modify several frames at the same time with edit tools, for example to repositioning drawings in an animation.
Bạn có thể kích hoạt biên soạn đa khung hình bằng nút Đa khung hình nằm bên cạnh hộp lựa chọn Chế Độ (biểu tượng các đường mờ dần đi). Xin xem mục Đa khung hình -- Multiframe để biết thêm thông tin.
Ví Dụ
Hoạt họa truyền thống
This example shows you how to animate a bouncing ball with a traditional 2D animation technique and Grease Pencil.
First, go to menu to start with a new 2D animation template. The template is ready to quick start your animation with a Grease Pencil object already created, Onion Skinning activated, Auto Keyframe enabled and in camera view.
Set the range of the animation in the Timeline from 1 to 24.
In the 3D Viewport draw a ball on the upper left corner with the Draw Tool (extreme).
Move to frame 12 and draw a squashed ball in the bottom center (breakdown).
Move to frame 24 and draw a ball in the top right corner of the 3D Viewport (extreme).
Keep drawing all the inbetween frames you want using the onion skinning ghost as a reference.
Để thử nghiệm hoạt họa, xin bấm Dấu Cách (Spacebar) để chơi nó.