Edición
Transformación
Referencia
- Modo:
Modo Edición
- Menú:
An F-Curve can be edited by transforming the locations of the keyframes.
- Mover, Rotar, Escalar
Like other elements in Blender, keyframes can be moved, rotated, or scaled as described in Basic Transformations.
- Extender
Moves keyframes relative to the current frame. If the mouse is to the left of the Playhead, this operator only affects the selected keyframes that are to the left of the Playhead. On the contrary, if the mouse is to the right of the Playhead, this operator only affects the selected keyframes that are to the right of the Playhead.
Truco
For precise control of the keyframe position and value, you can set values in the Active Keyframe of the Sidebar region.
Adherir
Referencia
- Menú:
- Atajo:
Mayús-S
Keyframes can be snapped to different properties by using the Snap Keys tool.
- Selección al fotograma actual
Snap the selected keyframes to the current frame.
- Selección al valor Y del cursor
Snap the selected keyframes to the 2D Cursor.
- Selección al fotograma más cercano
Snap the selected keyframes to their nearest frame individually.
- Selección al segundo más cercano
Snap the selected keyframes to their nearest second individually, based on the FPS of the scene.
- Selección al marcador más cercano
Snap the selected keyframes to their nearest marker individually.
- Aplanar asas
Aplana las asas Bezier para los fotogramas clave seleccionados.
Ejemplo de ajuste de asas planas. 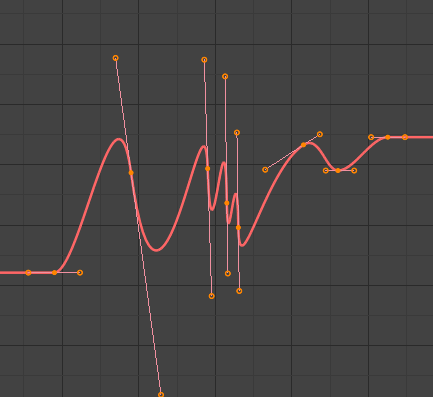
Antes de Aplanar las Asas.
Después de Aplanar las Asas.
- Igualar asas
Se asegurará de que las asas de los fotogramas clave seleccionados tengan la misma longitud, haciéndolas opcionalmente horizontales. Las asas de tipo Automática, Automática limitada o Vector, serán convertidas a Alineada.
- Lado
Side of the keyframes” Bézier handles to affect
- Izquierda:
Equalize selected keyframes” left handles.
- Derecha:
Equalize selected keyframes” right handles.
- Ambos:
Equalize both of a keyframe’s handles.
- Longitud de asas
Longitud para las asas Bezier de los claves seleccionados.
- Aplanar
Make the values of the selected keyframes” handles the same as their respective keyframes.
- Cursor a selección (XY) Ctrl-G
Places the cursor at the midpoint between selected keyframes.
- Cursor a selección (Y)
Places the cursor value on the average value of selected keyframes.
Voltear
Referencia
- Menú:
- Atajo:
Ctrl-M
Selected keyframes can be mirrored over different properties using the Mirror Keys tool.
- Tiempo, en torno al fotograma actual
Mirror horizontally over the current frame.
- Valor, en torno al valor Y del cursor
Mirror vertically over the 2D cursor.
- By Times over Time 0
Mirror horizontally over frame 0.
- By Values over Value 0
Mirror vertically over value 0.
- Tiempo, en torno al primer marcador seleccionado
Mirror horizontally over the first selected marker.
Saltar a seleccionados
Referencia
- Menú:
- Atajo:
Ctrl-G
Places the 2D cursor at the center of the selected keyframes.
Insertar
Referencia
- Menú:
- Atajo:
I
Inserts a keyframe to the active F-Curve at the mouse position. The newly added keyframes will be selected, making it easier to quickly tweak the newly added keyframes. All previously selected keyframes are kept selected by using I.
- Tipo
- Todos los canales:
Insertará un fotograma clave en todas las curvas-f visibles y editables, utilizando el valor actual de cada curva.
- Sólo canales seleccionados:
Insert a keyframe on selected F-Curves using each curve’s current value.
- Sólo curva-f activa:
Insertará un fotograma clave en la curva-f activa, utilizando el valor actual de la curva.
- En el cursor (curva-f activa):
Insert a keyframe for the active F-Curve at the cursor point.
- En el cursor (canales seleccionados):
Insert a keyframe for selected F-Curves at the cursor point.
Copiar / Pegar
Referencia
- Menú:
,
- Atajo:
Ctrl-C, Ctrl-V
Será posible utilizar Ctrl-C para copiar los claves seleccionados y Ctrl-V para pegarlos. Luego de realizar el pegado, el panel Ajustar última operación proporcionará algunas opciones adicionales.
- Desplazamiento
- Sin desplazamiento:
Pastes the keyframes in the location they were copied from.
- Relativo a fotograma:
Pastes the keyframe relative to the current frame based on the locations of the keyframes relative to the current frame when they were copied.
- Fotograma Inicio:
Pastes the keyframes with the first keyframe of the copied set placed at the current frame.
- Fotograma (fin):
Pastes the keyframes with the last keyframe of the copied set placed at the current frame.
- Tipo
- Mezclar:
Integrates the pasted keyframes in with existing keyframes only overwriting keyframes that share a frame.
- Sobrescribir todo:
Removes all previous keyframes and replaces them with the pasted keyframes.
- Sobrescribir rango:
Overwrite keys in pasted range.
- Sobrescribir rango completo:
Overwrite keys in pasted range, using the range of all copied keys.
- Opuesto
Paste keyframes from mirrored bones if they exist.
Duplicar
Referencia
- Menú:
- Atajo:
Mayús-D
Duplicará los claves seleccionados, pudiendo reposicionarlos moviendo el ratón.
Borrar
Referencia
- Menú:
- Atajo:
X, Suprimir
Al presionar X o Suprimir se abrirá un menú emergente desde donde será posible eliminar los claves seleccionados.
Tipo de asa
Referencia
- Menú:
- Atajo:
V
Establecerá el tipo de asa para los claves seleccionados.
Modo de interpolación
Referencia
- Menú:
- Atajo:
T
Sets the interpolation mode between the selected keyframes.
Aplicación de la interpolación
Referencia
- Menú:
- Atajo:
Ctrl-E
Sets the easing mode of the selected keyframes.
Densidad
Diezmar
Referencia
- Menú:
- Menú:
The Decimate tool simplifies an F-Curve by removing keyframes that influence the curve shape the least.
- Modo
Controls which method is used pick the number of keyframes to use.
- Proporción:
Deletes a defined percentage of keyframes, the amount of keyframes to delete is define by the Remove property.
- Margen de error:
Deletes keyframes which only allowing the F-Curve to change by a defined amount. The amount of change is controlled by the Max Error Margin which controls how much the new decimated curve is allowed to deviate from the original.
Sample Keyframes
Referencia
- Menú:
- Atajo:
Mayús-Alt-O
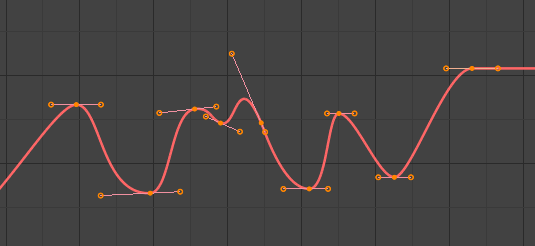
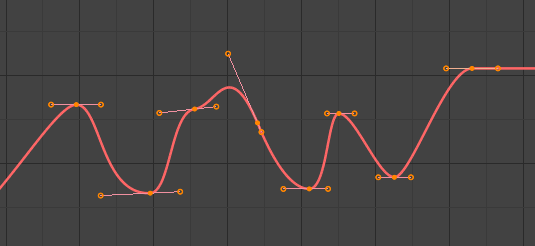
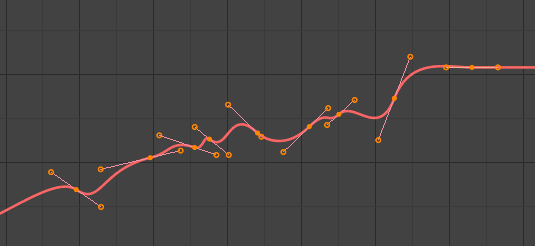
Sampling a set of keyframes replaces interpolated values with a new keyframe for each frame.

F-Curve before sampling. |
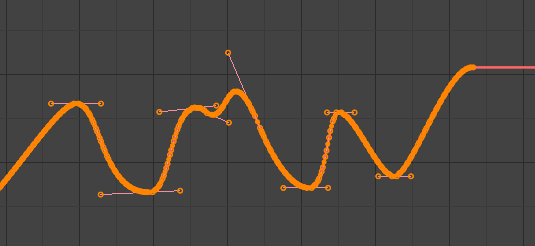
F-Curve after sampling. |
Eliminar claves
Referencia
- Menú:
- Atajo:
X
Clean Keyframes resets the keyframe tangents on selected keyframes to their auto-clamped shape, if they have been modified.
Truco
The modified curve left after the Clean tool is run is not the same as the original, so this tool is better used before doing custom editing of F-Curves and after initial keyframe insertion, to get rid of any unwanted keyframes inserted while doing mass keyframe insertion (by selecting all bones and pressing I for instance).
- Canales
Deletes the channel itself if it is only left with a single keyframe containing the default property value and it’s not being used by any generative F-Curve modifiers or drivers.
Curva-f antes de eliminar claves. |
Curva-f después de eliminar claves. |
Fundido
Referencia
- Menú:
- Atajo:
Alt-D
Intermedio
Referencia
- Menú:
Moves the selected keyframes to an in between position relative to the adjacent keyframes. To use this operator, drag the mouse left or right to adjust the operator’s Factor property.
- Factor
The amount to favor either the left or the right key. Values less than 0.5 favor the left keyframe, values greater than 0.5 favor the right keyframe, a value of 0.5 results in no change.
Fundir a cercano
Referencia
- Menú:
Transitions the current keyframe with the neighboring keyframes in the timeline. In order for this operator to work, there must be a keyframe before and after the current frame. To use this operator, drag the mouse left or right to adjust the operator’s Blend property.
- Fundido
The amount to favor either the left or the right key. Values less than 0.5 favor the left keyframe, values greater than 0.5 favor the right keyframe, a value of 0.5 results in no change.
Fundir a valor predefinido
Referencia
- Menú:
Transitions the current keyframe towards the property’s default value. To use this operator, drag the mouse left or right to adjust the operator’s Blend property.
- Fundido
The amount to favor either the current key or the default value. A value of 0 represents the current key, a value of 1 represents the default value.
Ver también
El operador Restablecer a valor predefinido permitirá restablecer cualquier propiedad a su valor predefinido sin necesidad de que ésta contenga fotogramas clave.
Acelerar
Referencia
- Menú:
Aligns selected keyframes to follow an exponential path between the first and last keyframes. To use this operator, drag the mouse left or right to adjust the operator’s Blend property.
- Fundido
Changes the concavity of the curve. Values less than 0.5 cause keyframes to concave up, values greater than 0.5 cause keyframes to concave down, a value of 0.5 results in a straight line.
Suavizado
Referencia
- Menú:
- Atajo:
Alt-S
Suavizar (antiguo)
Referencia
- Menú:
- Atajo:
Alt-O
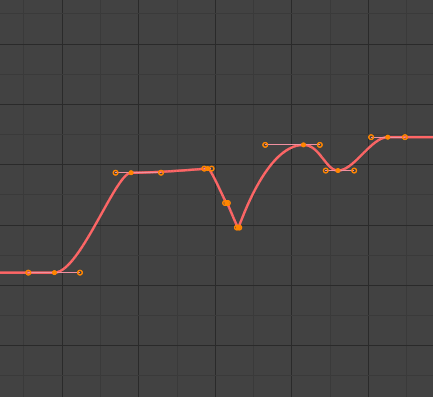
There is also an option to smooth the selected curves, but beware: its algorithm seems to be to divide by two the distance between each keyframe and the average linear value of the curve, without any setting, which gives quite a strong smoothing! Note that the first and last keys seem to be never modified by this tool.
|
Curva-f antes de ser suavizada. |
Curva-f después de ser suavizada. |