Node Wrangler (Pengelola simpul)
Node Wrangler menyediakan beragam alat untuk bekerja dengan node secara cepat dan efisien.
Meskipun banyak fungsi add-on ini bekerja di semua node editor yang didukung (Compositor, Shader, Geometry Nodes, dan Texture Nodes), beberapa fungsi hanya bekerja pada node editor tertentu dan beberapa lainnya bekerja secara berbeda di tiap editor. Fungsi yang hanya bekerja pada editor tertentu ditandai dengan label (Compositor, Shader, Geometry Nodes, Texture Nodes). Fungsi tanpa label berlaku untuk semua node editor.
Mengaktifkan Add-on
Buka Blender, lalu buka Preferensi dan pilih bagian Add-on.
Cari "Node Wrangler", lalu centang opsi Enable Add-on (Aktifkan Add-on).
Penggunaan
Gunakan panel di Bar Sisi dari Editor Node atau tekan Shift-W untuk membuka menu akses cepat. Daftar pintasan juga dapat dilihat pada panel preferensi pengaya.
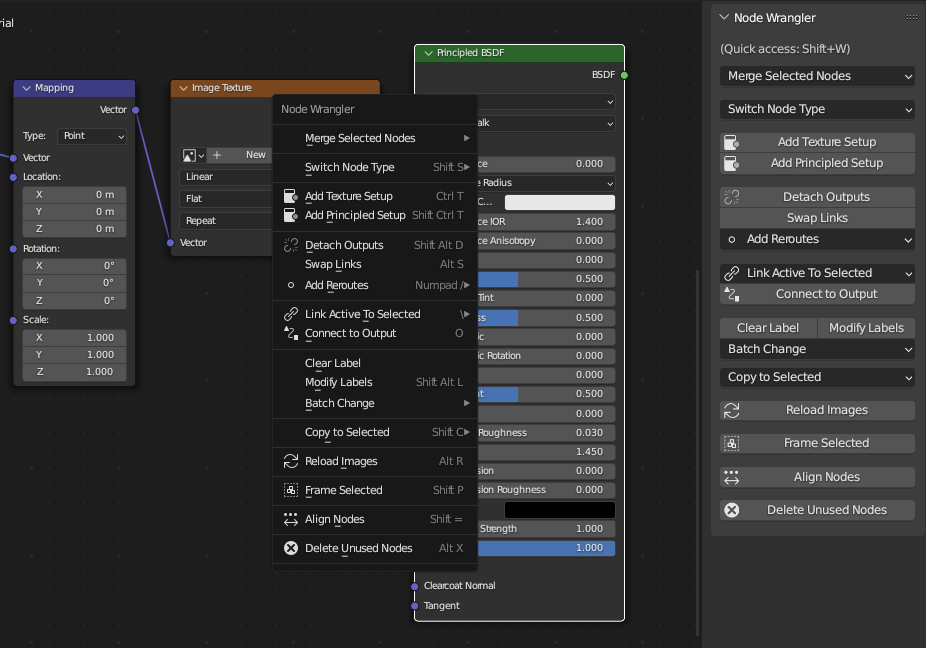
Sebagian besar fungsi dapat diakses melalui panel Bar Sisi atau menu akses cepat.
Deskripsi
Koneksi Praktis
Referensi
- Pintasan:
seret dengan Alt-RMB, seret dengan Shift-Alt-RMB
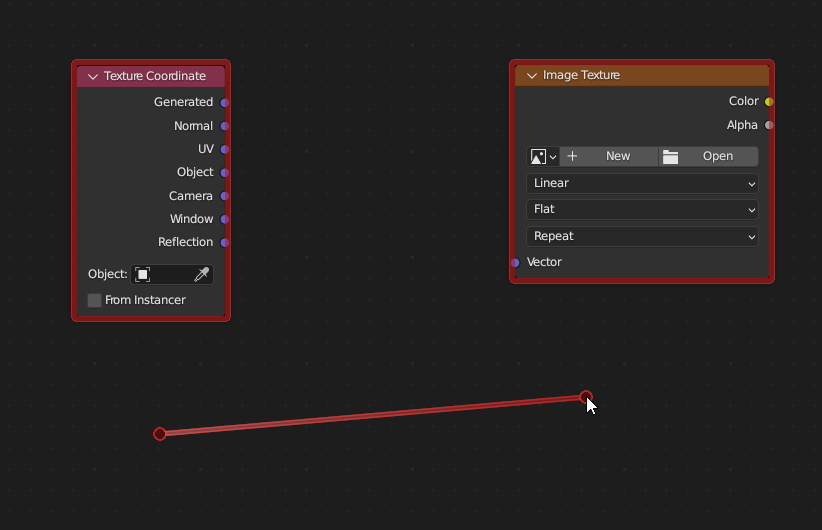
Hubungkan dua node (simpul) tanpa perlu mengklik soket (penghubung). Cukup seret kursor dari satu node ke node lain sambil menahan Alt-RMB. Fitur akan memilih node terdekat dari titik awal sampai akhir seretan secara otomatis untuk koneksi.
Seleksi tidak perlu teliti
Fitur ini mencoba menghubungkan soket yang paling sesuai berdasarkan nama, tipe, dan status terbuka tau tidak koneksinya.
Untuk koneksi yang lebih presisi, gunakan Shift-Alt-RMB. Menu input dan output yang tersedia akan ditampilkan, sehingga soket yang tepat dapat dipilih untuk dihubungkan. Fitur ini sangat berguna saat bekerja dengan pohon node yang besar karena dapat membuat koneksi tanpa harus sering memperbesar dan memperkecil tampilan.
Lazy Mix
Referensi
- Pintasan:
Seret dengan Shift-Ctrl-RMB
Hubungkan output dari dua node ke node bertipe "mix" yang sesuai. Ini merupakan cara "lazy" untuk memilih node dan menjalankan fungsi Mix dari Merge with Automatic Type Detection.
Gabungkan (Merge)
Referensi
- Menu:
Connect outputs of the selected nodes into a "mix" type of node (Mix, Math, Z-Combine, Alpha Over, Mix Shader, Add Shader, Join Geometry).
Catatan
Merge currently does not support outputs of Integer, String, or Boolean types from Geometry Nodes.
There are automatic and manual ways of merging. The automatic ways let the add-on determine which "mix" node to use based on the types of outputs to merge. The manual ways let you decide and force connections even if the types of outputs and the "mix" node are not compatible.
Catatan
Generally, the modifier part of the shortcut signifies the type of "mix" node you want to use (Ctrl for automatic detection, Ctrl-Alt for the Mix node, and Shift-Ctrl for the Math node), the non-modifier part signifies the mode of "mix" node you want to set (NumpadPlus for add, NumpadMinus for subtract, NumpadSlash for divide, and NumpadAsterisk for multiply).
Merge with Automatic Type Detection
The automatic merge functions determine the type of "mix" node to use based on the types of outputs to merge. If it has a Color output, it will use the Mix node. It will use the Math node if both outputs are of Value type. Add Shader, Mix Shader, and Join Geometry nodes will also be used for specific cases.
- Modes
- Add Ctrl-=, Ctrl-NumpadPlus
Merge into Mix or Math nodes, then set blend mode or math operation as Add. If the outputs are Shaders, it will use Add Shader node instead.
- Multiply Ctrl-8, Ctrl-NumpadAsterisk
Merge into Mix or Math nodes, then set blend mode or math operation as Multiply.
- Subtract Ctrl-Minus, Ctrl-NumpadMinus
Merge into Mix or Math nodes, then set blend mode or math operation as Subtract.
- Divide Ctrl-Slash, Ctrl-NumpadSlash
Merge into Mix or Math nodes, then set blend mode or math operation as Divide.
- Mix Ctrl-0, Ctrl-Numpad0
Merge into Mix node, then set blend mode as Mix. If the outputs are Shaders, it will use Mix Shader node instead. If the outputs are Geometry, it will use Join Geometry node.
Merge Using Mix Node
Referensi
- Menu:
Use the Mix nodes for merging, regardless of the selected nodes. You can choose the mode of the node via the menu. You can quickly set some operations by using corresponding shortcuts.
Add: Ctrl-Alt-=, Ctrl-Alt-=
Subtract: Ctrl-Alt-Minus, Ctrl-Alt-NumpadMinus
Multiply: Ctrl-Alt-8, Ctrl-Alt-NumpadAsterisk
Divide: Ctrl-Alt-Slash, Ctrl-Alt-NumpadSlash
Merge Using Math Node
Referensi
- Menu:
Use the Math nodes for merging, regardless of the selected nodes. You can choose the mode of the node via the menu. You can quickly set some operations by using corresponding shortcuts.
Add: Shift-Ctrl-=, Shift-Ctrl-=
Subtract: Shift-Ctrl-Minus, Shift-Ctrl-NumpadMinus
Multiply: Shift-Ctrl-8, Shift-Ctrl-NumpadAsterisk
Divide: Shift-Ctrl-Slash, Shift-Ctrl-NumpadSlash
Greater than: Ctrl-Comma
Less than: Ctrl-Period
Merge Using Z-Combine Node
Compositor
Referensi
- Menu:
- Pintasan:
Ctrl-NumpadPeriod
Use the Z-Combine nodes for merging. If possible, Image and Z-Depth outputs will be linked. If the current node editor is not Compositor, this will execute the Mix function from the automatic merge.
Merge Using Alpha Over Node
Compositor
Referensi
- Menu:
- Pintasan:
Ctrl-Alt-0
Use the Alpha Over nodes for merging. If the current node editor is not Compositor, this will execute the Mix function from the automatic merge.
Batch Change Blend Mode / Math Operation
Referensi
- Menu:
Change the blend mode or math operation of the selected Mix and Math nodes at once. You can use Alt-Up or Alt-Down to cycle through previous or next blend modes or math operations. You can also quickly set some operations by using corresponding shortcuts.
Add: Alt-=, Alt-=
Subtract: Alt-Minus, Alt-NumpadMinus
Multiply: Alt-8, Alt-NumpadAsterisk
Divide: Alt-Slash, Alt-NumpadSlash
Greater than: Alt-Comma
Less than: Alt-Period
Change Mix Factor
Referensi
- Pintasan:
Alt-Left, Shift-Alt-Left, Alt-Right, Shift-Alt-Right, Shift-Ctrl-Alt-Left, Shift-Ctrl-Alt-0, Shift-Ctrl-Alt-Right, Shift-Ctrl-Alt-1
Change the Factor value of the selected Mix and Mix Shader nodes with shortcuts.
Increase Factor by 0.1: Alt-Right
Decrease Factor by 0.1: Alt-Left
Increase Factor by 0.01: Shift-Alt-Right
Decrease Factor by 0.01: Shift-Alt-Left
Set Factor to 0.0: Shift-Ctrl-Alt-Left, Shift-Ctrl-Alt-0
Set Factor to 1.0: Shift-Ctrl-Alt-Right, Shift-Ctrl-Alt-1
Delete Unused Nodes
Referensi
- Menu:
- Pintasan:
Alt-X
Clean up your node tree. Delete all nodes that don't contribute to the final result.
Swap Links
Referensi
- Menu:
- Pintasan:
Alt-S
When two nodes are selected, this swaps each other's output link. Note that some output connections can be lost if the two nodes have a different number of connected outputs.
With one node selected, if the node has one linked input, it cycles the link through the available input sockets. If the node has two linked inputs, it swaps those two links. If there are more than two inputs linked, it swaps the two inputs with matching types (the Mix node's two Color inputs, for example).
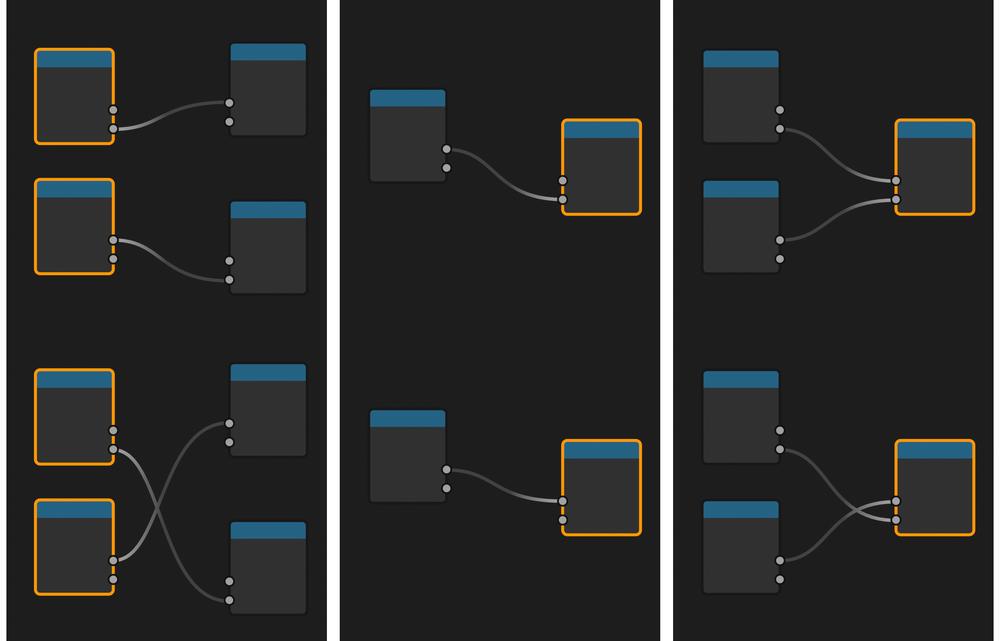
Swap works differently depending on the selected nodes and their links.
Reset Backdrop
Compositor
Referensi
- Menu:
- Pintasan:
Z
Reset the position and scale of the backdrop.
Add Attribute Node
Shader
Referensi
- Menu:
Add an Attribute node with the selected attribute.
Preview Node Output
Shader Geometry Nodes
Referensi
- Pintasan:
Shift-Ctrl-LMB for Shader, Shift-Alt-LMB for Geometry Nodes
Connect an output of the selected node to the final output of the node tree (the Material Output or World Output for Shader, the final Group Output for Geometry Nodes) to preview its output in the viewport. You can cycle through the available outputs by clicking it again while holding the modifier keys.
Lihat juga
While in Shader, any output can be connected to the final output, in Geometry Nodes, only Geometry outputs can be connected to the final output. To preview other types of outputs in Geometry Nodes, use its own Viewer Node.
Lihat juga
Also check out Connect to Output. It is a similar function but has different behaviors. It also works in all node editors.
Join Nodes
Referensi
- Menu:
- Pintasan:
Shift-P
See Join in New Frame.
Reload Images
Compositor Shader Texture Nodes
Referensi
- Menu:
- Pintasan:
Alt-R
Reload all of the images used in the node tree. This lets you reload the images without using the Image Editor.
Copy Settings
Referensi
- Menu:
- Pintasan:
Shift-C
Copy the settings of the active node to all selected nodes of the same type.
Reset Nodes
Referensi
- Pintasan:
Backspace
Revert the settings of the selected nodes to default while maintaining connections.
Copy Label
Referensi
- Menu:
- Pintasan:
Shift-V, Shift-C
Copy custom labels to all of the selected nodes. You can copy them from the active node (Shift-V), from the nodes that are linked to the selected ones, or from the names of the sockets that the selected nodes are linked to. Shift-C will bring up a submenu with all available options.
Clear Label
Referensi
- Menu:
- Pintasan:
Alt-L
Clear the custom labels of selected nodes and revert them back to their default node names.
Modify Labels
Referensi
- Menu:
- Pintasan:
Shift-Alt-L
Batch rename the custom labels of selected nodes. You can add text to the beginning and the end and replace parts of the text.
Add Texture Setup
Shader
Referensi
- Menu:
- Pintasan:
Ctrl-T
Add a setup of a texture node, Texture Coordinate, and Mapping nodes to any shader node. If you select a texture node, it will only add the Texture Coordinate and Mapping nodes. For a background shader it will add an Environment Texture node.
Add Principled Texture Setup
Shader
Referensi
- Menu:
- Pintasan:
Shift-Ctrl-T
Add a principled texture setup from the selected texture files. Select a Principled BSDF node, select Add Principled Setup from the quick access menu (or press Shift-Ctrl-T), and select texture files. It automates the process of adding Image Texture nodes, loading images, selecting the appropriate Color Space, and connecting their outputs to the Principled BSDF node.
It detects the type of textures by looking at their file names. You can edit the tags used for this matching process in the add-on preferences.
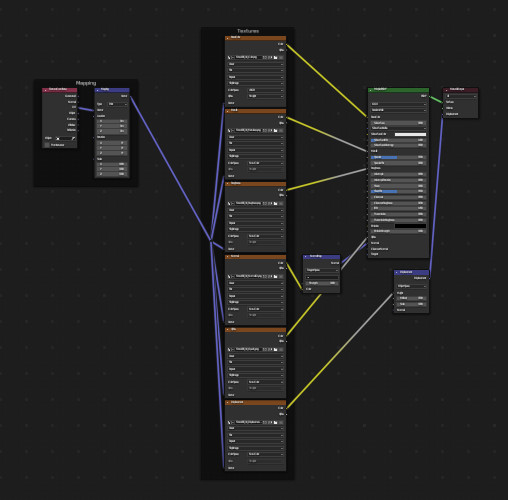
Setting up these textures can take dozens of clicks, even with Node Wrangler's other tools. With Principled Texture Setup, you can reduce that to a few clicks.
Add Reroutes to Outputs
Referensi
- Menu:
- Pintasan:
Slash
Add reroute nodes to each output of the selected nodes.
Link Active to Selected
Referensi
- Menu:
- Pintasan:
Backslash
Link the active node to the selected nodes based on various criteria.
- To All Selected
Link the active node to all selected nodes. (K) You can force it to replace existing links. (Shift-K)
- Use Node Name/Label
Link only to the selected nodes that have the same label as the active node. (') You can force it to replace existing links. (Shift-')
- Use Outputs Names
Link only when the name of the outputs matches the name or label of the selected nodes. (;) You can force it to replace existing links. (Shift-;) This is handy for replacing sources at the same time. (For example, connecting outputs from Render Layer to image (multi-layer EXR) in Compositor.)
Align Nodes
Referensi
- Menu:
- Pintasan:
Shift-=
Align the selected nodes horizontally or vertically. The effect is similar to scaling nodes on an axis (S X 0 or S Y 0), but it places the nodes at an even distance.
Center Nodes
Referensi
- Menu:
Move selected nodes to the center of the node editor.
Select within Frame (Parent/Children)
] -- Select all direct child nodes of the selected frame.
[ -- Select the direct parent frame node of the selected nodes.
Detach Outputs
Referensi
- Menu:
- Pintasan:
Shift-Alt-D
Detach the selected node's outputs while leaving linked inputs intact.
Add Multiple Images
Compositor Shader
Referensi
- Menu:
for Compositor, or for Shader
Select multiple images and add a node for each image. (Useful for importing multiple render passes or renders for image stacking.)
Add Image Sequence
Compositor Shader
Referensi
- Menu:
for Compositor, or for Shader
Add an Image Sequence by only selecting one image from a sequence of image files. It will automatically detect the length of the sequence and set the node appropriately.
- Relative Path
Sets the file path to be relative to the currently opened blend-file. See Relative Paths.
- Start Frame
Global starting frame of the movie/sequence, assuming first picture has a #1.
Referensi
- Category:
Node
- Deskripsi:
Various tools to enhance and speed up node-based workflow.
- Lokasi:
or see the shortcuts of individual tools.
- File:
node_wrangler.py
- Author:
Bartek Skorupa, Greg Zaal, Sebastian Koenig, Christian Brinkmann, Florian Meyer
- License:
GPL
- Catatan:
This add-on is bundled with Blender.