Editing(編集)
Transform(トランスフォーム)
参照
- Mode(モード):
Edit Mode(編集モード)
- Menu(メニュー):
An F-Curve can be edited by transforming the locations of the keyframes.
- Move(移動)、Rotate(回転)、Scale(スケール)
Like other elements in Blender, keyframes can be moved, rotated, or scaled as described in Basic Transformations.
- Extend(拡張)
Moves keyframes relative to the current frame. If the mouse is to the left of the Playhead, this operator only affects the selected keyframes that are to the left of the Playhead. On the contrary, if the mouse is to the right of the Playhead, this operator only affects the selected keyframes that are to the right of the Playhead.
Tip
For precise control of the keyframe position and value, you can set values in the Active Keyframe of the Sidebar region.
Snap(スナップ)
参照
- Menu(メニュー):
- ショートカットキー:
Shift-S
Keyframes can be snapped to different properties by using the Snap Keys tool.
- Selection to Current Frame(選択物 → 現在のフレーム)
Snap the selected keyframes to the current frame.
- Selection to Cursor Value(選択物 → カーソル値)
Snap the selected keyframes to the 2D Cursor.
- Selection to Nearest Frame(選択物 → 最近フレーム)
Snap the selected keyframes to their nearest frame individually.
- Selection to Nearest Second(選択物 → 最近秒数)
Snap the selected keyframes to their nearest second individually, based on the FPS of the scene.
- Selection to Nearest Marker(選択物 → 最近マーカー)
Snap the selected keyframes to their nearest marker individually.
- Flatten Handles(水平のハンドル)
選択したキーフレームの ベジェ ハンドルをフラットにします。
Flatten Handles(水平のハンドル) のスナップの例。 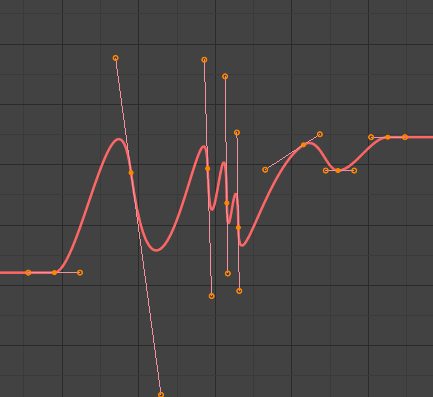
Flatten Handles(水平のハンドル) の実施前。
Flatten Handles(水平のハンドル) の実施後。
- Equalize Handles
Ensure selected keyframes' handles have equal length.
- Side(サイド)
Side of the keyframes' Bézier handles to affect
- Left(左):
Equalize selected keyframes' left handles.
- Right(右):
Equalize selected keyframes' right handles.
- Both(両方):
Equalize both of a keyframe's handles.
- Handle Length
Length to make selected keyframes' Bézier handles.
- Flatten
Make the values of the selected keyframes' handles the same as their respective keyframes.
- Cursor to Selected(カーソル → 選択物) Ctrl-G
Places the cursor at the midpoint between selected keyframes.
- Cursor Value to Selection(カーソル値 → 選択物)
Places the cursor value on the average value of selected keyframes.
Mirror(ミラー)
参照
- Menu(メニュー):
- ショートカットキー:
Ctrl-M
Selected keyframes can be mirrored over different properties using the Mirror Keys tool.
- By Times over Current Frame(現在のフレームを中心に時間を反転)
Mirror horizontally over the current frame.
- By Values over Cursor Value(カーソルの値を中心に値を反転)
Mirror vertically over the 2D cursor.
- By Times over Time 0
Mirror horizontally over frame 0.
- By Values over Value 0
Mirror vertically over value 0.
- By Times over First Selected Marker(最初の選択中のマーカーを中心に時間を反転)
Mirror horizontally over the first selected marker.
Jump to Selected
参照
- Menu(メニュー):
- ショートカットキー:
Ctrl-G
Places the 2D cursor at the center of the selected keyframes.
Insert
参照
- Menu(メニュー):
- ショートカットキー:
I
Inserts a keyframe to the active F-Curve at the mouse position. The newly added keyframes will be selected, making it easier to quickly tweak the newly added keyframes. All previously selected keyframes are kept selected by using I.
- Type(タイプ)
- All Channels:
Insert a keyframe on all visible and editable F-Curves using each curve's current value.
- Only Selected Channels:
Insert a keyframe on selected F-Curves using each curve's current value.
- Only Active F-Curve:
Insert a keyframe on the active F-Curve using the curve's current value.
- Active Channels at Cursor:
Insert a keyframe for the active F-Curve at the cursor point.
- Selected Channels at Cursor:
Insert a keyframe for selected F-Curves at the cursor point.
Copy(コピー)/Paste(貼り付け)
参照
- Menu(メニュー):
,
- ショートカットキー:
Ctrl-C 、 Ctrl-V
Use Ctrl-C to copy selected keyframes and Ctrl-V to paste the previously copied keyframes. During the paste action, the Adjust Last Operation(最後の操作を調整) panel provides some options in how the paste is applied.
- Offset(オフセット)
- No Offset(オフセットなし):
Pastes the keyframes in the location they were copied from.
- Frame Relative(フレームの相対):
Pastes the keyframe relative to the current frame based on the locations of the keyframes relative to the current frame when they were copied.
- Frame Start(開始フレーム):
Pastes the keyframes with the first keyframe of the copied set placed at the current frame.
- Frame End(フレームの終わり):
Pastes the keyframes with the last keyframe of the copied set placed at the current frame.
- Type(タイプ)
- Mix(ミックス):
Integrates the pasted keyframes in with existing keyframes only overwriting keyframes that share a frame.
- Overwrite All(全てを上書き):
Removes all previous keyframes and replaces them with the pasted keyframes.
- Overwrite Range(範囲を上書き):
Overwrite keys in pasted range.
- Overwrite Entire Range(範囲全体を上書きします):
Overwrite keys in pasted range, using the range of all copied keys.
- Flipped(反転)
Paste keyframes from mirrored bones if they exist.
Duplicate(複製)
参照
- Menu(メニュー):
- ショートカットキー:
Shift-D
選択したキーフレームを複製します。マウスを動かすことで、それらの位置を変えることができます。
Delete(削除)
参照
- Menu(メニュー):
- ショートカットキー:
X 、 Delete
X か Delete を押すことで、選択したキーフレームを削除できるポップアップメニューを開きます。
Handle Type(ハンドルタイプ)
参照
- Menu(メニュー):
- ショートカットキー:
V
選択したキーフレームの Handle Type(ハンドルタイプ) を設定します。
Interpolation Mode(補間モード)
参照
- Menu(メニュー):
- ショートカットキー:
T
Sets the interpolation mode between the selected keyframes.
Easing Type
参照
- Menu(メニュー):
- ショートカットキー:
Ctrl-E
Sets the easing mode of the selected keyframes.
Density(密度)
Decimate(減量)
参照
- Menu(メニュー):
- Menu(メニュー):
The Decimate tool simplifies an F-Curve by removing keyframes that influence the curve shape the least.
- Mode(モード)
Controls which method is used pick the number of keyframes to use.
- Ratio(比率):
Deletes a defined percentage of keyframes, the amount of keyframes to delete is define by the Remove property.
- Error Margin(エラーマージン):
Deletes keyframes which only allowing the F-Curve to change by a defined amount. The amount of change is controlled by the Max Error Margin which controls how much the new decimated curve is allowed to deviate from the original.
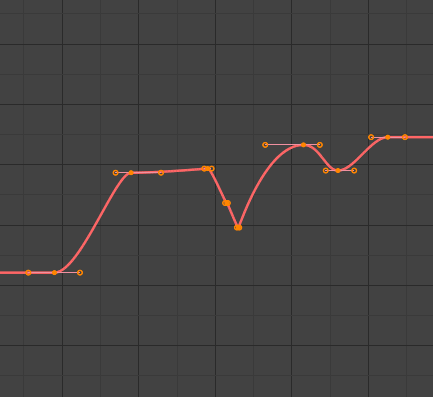
Sample Keyframes
参照
- Menu(メニュー):
- ショートカットキー:
Shift-Alt-O
Sampling a set of keyframes replaces interpolated values with a new keyframe for each frame.

F-Curve before sampling. |
F-Curve after sampling. |
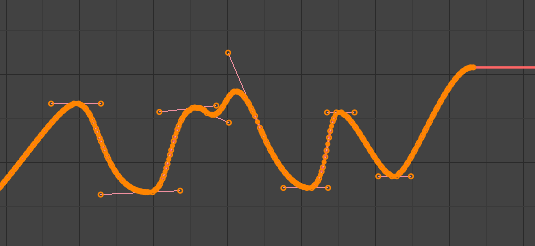
Clean Keyframes(キーフレームを掃除)
参照
- Menu(メニュー):
- ショートカットキー:
X
Clean Keyframes resets the keyframe tangents on selected keyframes to their auto-clamped shape, if they have been modified.
Tip
The modified curve left after the Clean tool is run is not the same as the original, so this tool is better used before doing custom editing of F-Curves and after initial keyframe insertion, to get rid of any unwanted keyframes inserted while doing mass keyframe insertion (by selecting all bones and pressing I for instance).
- Channels(チャンネル)
Deletes the channel itself if it is only left with a single keyframe containing the default property value and it's not being used by any generative F-Curve modifiers or drivers.

掃除前のFカーブ。 |
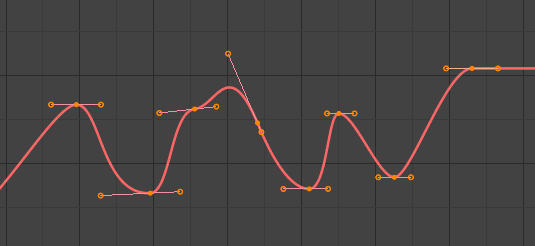
掃除後のFカーブ。 |
Blend (混合度)
参照
- Menu(メニュー):
- ショートカットキー:
Alt-D
Breakdown
参照
- Menu(メニュー):
Moves the selected keyframes to an in between position relative to the adjacent keyframes. To use this operator, drag the mouse left or right to adjust the operator's Factor property.
- Factor(係数)
The amount to favor either the left or the right key. Values less than 0.5 favor the left keyframe, values greater than 0.5 favor the right keyframe, a value of 0.5 results in no change.
Blend to Neighbor
参照
- Menu(メニュー):
Transitions the current keyframe with the neighboring keyframes in the timeline. In order for this operator to work, there must be a keyframe before and after the current frame. To use this operator, drag the mouse left or right to adjust the operator's Blend property.
- Blend (混合度)
The amount to favor either the left or the right key. Values less than 0.5 favor the left keyframe, values greater than 0.5 favor the right keyframe, a value of 0.5 results in no change.
Blend to Default Value
参照
- Menu(メニュー):
Transitions the current keyframe towards the property's default value. To use this operator, drag the mouse left or right to adjust the operator's Blend property.
- Blend (混合度)
The amount to favor either the current key or the default value. A value of 0 represents the current key, a value of 1 represents the default value.
参考
The Reset to Default operator resets any property to its default value without the need of keyframing.
Ease(イーズ)
参照
- Menu(メニュー):
Aligns selected keyframes to follow an exponential path between the first and last keyframes. To use this operator, drag the mouse left or right to adjust the operator's Blend property.
- Blend (混合度)
Changes the concavity of the curve. Values less than 0.5 cause keyframes to concave up, values greater than 0.5 cause keyframes to concave down, a value of 0.5 results in a straight line.
Smooth(スムーズ)
参照
- Menu(メニュー):
- ショートカットキー:
Alt-S
Smooth (Legacy)
参照
- Menu(メニュー):
- ショートカットキー:
Alt-O
There is also an option to smooth the selected curves, but beware: its algorithm seems to be to divide by two the distance between each keyframe and the average linear value of the curve, without any setting, which gives quite a strong smoothing! Note that the first and last keys seem to be never modified by this tool.
|
スムーズ前のFカーブ。 |
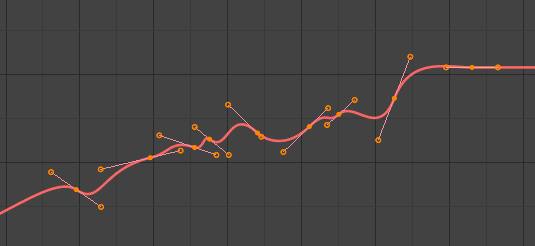
スムーズ後のFカーブ。 |