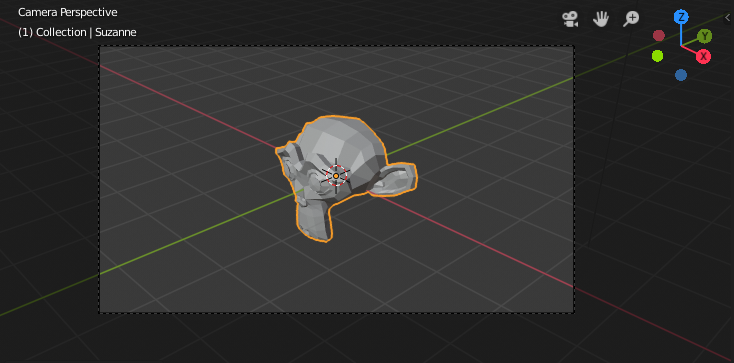
The Camera view shows the current scene as seen from the currently active camera’s view point.
The Camera view can be used to virtually compose shots and preview how the scene will look when rendered.
The rendered image will contain everything within the dashed line.
Setting the Active Camera
Referência
| Mode: | Object Mode |
|---|
| Menu: | |
|---|
| Hotkey: | Ctrl-Numpad0 |
|---|
This sets the current active object as the active camera & switches to the camera view.
The active camera can also be set in the Scene tab of the Properties Editor.
Nota
The active camera, as well as the layers, can be specific to a given view,
or global (locked) to the whole scene.
See Local Camera.
Animated Camera Switching
By default a scene contains one camera. However, a scene can contain more than one camera,
but only one of them will be used at a time.
So you will only need to add a new camera if you are making cuts between them.
See Animating Cameras.
Navegação em câmera
Existem diversas maneiras diferentes de navegar e posicionar a câmera em sua cena, algumas delas são explicadas abaixo.
A ampliação ou redução da visualização é possível nesta visão, mas para a alteração efetiva do ponto de visão, você terá de mover ou rotacionar a câmera.
Dica
The active «camera» might be any kind of object.
So these actions can be used, for example, to position and aim a light.
Mover a câmera ativa para a vista
Referência
| Mode: | Object Mode |
|---|
| Hotkey: | Ctrl-Alt-Numpad0 |
|---|
This matches the active camera to a regular (non camera) view,
for a convenient method of placing the camera without having to move the object directly.
Posicionamento da visão de câmera
By enabling Lock Camera to View in the View panel of the Sidebar region,
while in camera view, you can navigate the 3D View as usual,
while remaining in camera view. Controls are exactly the same as when normally moving in 3D.
Veja também
Fly/Walk Mode for first person navigation that moves the active camera too.
Rolagem, Panorama, Carrinho, e Rastreamento
To perform these camera moves, the camera must first be selected so transform operations apply to it.
The following actions also assume that you are in camera view.
Having done so, you can now manipulate the camera using the same tools that are used to transform any object:
- Rolagem
- Press R to enter object rotation mode. The default will be to rotate the camera in its local Z axis
(the axis orthogonal to the camera view), which is the definition of a camera «roll».
- Panorama vertical ou compasso
- This is just a rotation along the local X axis. Press R to enter object rotation mode, then X twice
(the first press selects the global axis, pressing the same letter a second time selects the local axis –
this works with any axis;
see the axis locking page).
- Panorama horizontal ou guinada
- Isto corresponde a uma rotação em torno do eixo local Y da câmera. Pressione R, e então Y duas vezes.
- Carrinho
- Para usar o carrinho (clássico) na câmera, pressione pressione G e então ajuste com o MMB (ou pressione Z duas vezes).
- Rastreamento pelas laterais
- Pressione G e mova o mouse (você poderá usar tanto X quanto Y duas vezes para obter o efeito de rastreamento pelas laterias puramente horizontal ou vertical (contado como plano 2D a partir do topo).

